REC TEC GRILL Owner’s Manual Model #RT-680 Questions? Call our customer service at 1-855-696-0890 10am-8pm EST, M-F. Or visit RecTecGrills.com.
WARNING! FOR OUTDOOR USE ONLY! DO NOT STORE OR USE COMBUSTIBLE MATERIALS IN OR NEAR THIS APPLIANCE. TO PREVENT INJURY, NEVER ATTEMPT TO MOVE GRILL WHILE HOT OR WITH A FULL PELLET HOPPER.
Rec Tec Pellet Grill Owner’s Manual and User’s Guide Congratulations on your purchase of a Rec Tec Pellet Grill. With proper care and maintenance, your grill will provide you years of trouble free operation. Please review the following information carefully for useful tips and information that will help you utilize your grill’s extensive features and benefits. Keep in mind that your Rec Tec Pellet Grill is much more than a grill.
Contents Important Safety Information!....................................................................3 Carton Contents!.........................................................................................4 Assemble Your Rec Tec Grill!.....................................................................5 Before The First Use! ................................................................................10 About Your New Rec Tec Grill!................................................................
Important Safety Information Warning: Read all Safety Information Before Operating Grill For outdoor use only. Do not use in any enclosed area. Keep grill 24” or more from any combustible surface. To prevent grease fires, clean your grill on a regular basis (especially after cooking greasy foods at lower temperatures). This includes your drip tray (most owners line the drip tray with aluminum foil for easy clean up).
Carton Contents Please note that during shipping some movement may have taken place, so a complete visual inspection is required. Be sure to inspect entire grill after removing the protective shipping carton. Some surfaces may be sharp, so wear gloves when assembling. *Grill requires (2) two people for safe assembly* Do not plug in the grill until it is fully assembled and you’re ready to cook. See: “Start Up Procedure” for more details.
Assemble Your Rec Tec Grill STEP 1 – Unpack and Prepare for Assembly Remove and discard the 4 rubber bumpers from the grill lid and lid stopper. These are for shipping protection only. Remove all items from inside grill body and lay grill body on its back, with chrome towel loop facing up. For ease of assembly, complete steps 1-5 below before standing grill upright. STEP 2 – Attach Legs Attach legs with fixed wheels 5 on the left side, with wheels facing outward.
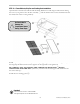
STEP 5 – Install Smart Grill Technology™ Controller A Find the metal bottom shelf. Insert the two white braided RTD wires through the grommet a shown illustration 1. B Plug the two white braided RTD wires onto the tabs b labeled ‘RTDA’ where indicated in illustration 2. Slide them firmly onto the connectors and be careful to not touch any other parts of the circuit board. Replace the shelf cover with the 4 included sheet metal screws.
STEP 6 – Stand Rec Tec Grill Upright After completing the Smart Grill Technology™ installation in Step 5, stand the grill upright. You will need two people to do this as the grill is very heavy. STEP 7 – Bull Horn Handle Assembly Attach bull horn handles 6 and 7 to grill body using 4 small bolts (M6 x 16). (See Bolt Assembly Order diagram.) There is a left and a right handle. Proper placement will result in the handle facing inward with the tip slightly upward.
STEP 10 – Flame Deflector, Drip Pan and Cooking Grate Installation Open the lid of the Rec Tec Grill. Install the Flame Deflector 12 with large notched cutout facing the rear of your grill over the Air Box Assembly A and the small notch over the small tab located at the inside front center of the grill body. Be Careful Not To Damage the Temperature Sensor c During These Steps.
STEP 11 – Interior Light Bulb and Lens Installation Open the lid of the grill and locate the light housing c on the back interior wall. Insert the halogen bulb A into the 2-sockets in the bottom of the interior light assembly. BE CAREFUL NOT TO TOUCH THE GLASS OF THE BULB AS SKIN OILS WILL REDUCE THE LIFE OF THE BULB. Do not touch the glass part of the halogen bulb as it will reduce bulb life. Bulb Replacement Information: The Rec Tec Grill uses a 120V, 50W halogen bulb with a GY6.35 base.
Before The First Use Read Prior to Lighting. Also make sure you have read all Safety Information on Page 3 before proceeding. Initial Clean & Cure Before cooking for the first time, we recommend that you remove the stainless steel cooking grates and wash them with a mild soap and detergent. Install the grates, light and set the grill to 400℉ and let the grill run with the lid down for 1 hour (Use the Initial Set Up procedure on page 12.
About Your New Rec Tec Grill Below is a list of features and specifications for the REC TEC Grill: Temperature Controls Smart Grill Technology™ Controller Automatic lighting feature 180ºF to 500ºF in 5º increments Proprietary PID algorithm maintains temperature precisely Exterior High temperature durable textured powder coat finish Micro polished stainless steel bull horn handles Stainless steel towel ring 4 tool hooks Large side and bottom shelves 40 pound hopper capacity Hopper lid doubles as a warming s
Initial Set Up Procedure For your first lighting, follow this Initial Set Up Procedure. Before starting your Rec Tec Grill, inspect the burn area inside the grilling area. It is a recommended practice to go through the following procedure at initial start up. 1. Open the main lid and remove the Stainless Steel Cooking Grates. 2. Remove the Stainless Steel Drip Pan and the Stainless Steel Flame Deflector. 3. Open the Pellet Hopper Lid found at the rear of your grill and check for any foreign objects. 4.
Operating your Smart Grill Technology Controller About the Smart Grill Technology™ Controller The SGT is the “brain” of your Rec Tec Grill and the reason for its ease-of-use. When you select a temperature, the SGT adjusts the pellet feed rate and compensates for ambient (outside) temperatures to maintain a precise temperature.
3 Temperature Display Screen Displays temperature readouts (either Actual or Set Point) error messages, and power up readout. LED Messages: rEC, GrLL, 5.10 These three screens will display when the appliance is plugged into a GFI electrical outlet. This describes the make and model of the Smart Grill Technology™ processor. (The 5.10 in this example identifies the software revision – your grill may indicate a different version of software.) 350F This is the default temperature at start up.
Manual Start Up: In case of ignitor failure, you can start your Rec Tec Grill manually: 1. Remove the stainless steel Grates, Drip Pan, and Flame Deflector. 2. Inspect the stainless steel burn pot to ensure that is clean of debris, ash and that the Ignitor Rod is not obstructed. 3. Place a small handful of pellets in the bottom of the Fire Pot. Add a small amount of solid fuel fire starter, such as those made from sawdust and wax or use wood shavings.
Maintenance & Cleaning A few simple steps will ensure that your Rec Tec Grill will give you many years of service with minimal effort. • Use a wire brush to clean your cooking grates after every cook to provide years of trouble free use from them. • Cover your drip tray with aluminum foil and change it frequently. This is the simplest way to maintain your drip pan.
Troubleshooting We pride ourselves on our grill and on our commitment to serve you. Please consult the chart below to help resolve issues you may encounter. Also, please don’t hesitate to contact us with any issue. Issue Potential Cause Grill is not getting power. Make sure the grill is plugged in to a working GFCI outlet and outlet is not tripped If grill light works, fuse on circuit board is blown. Replace fuse manually. Call or go to website for instructions Error message: Grill has overheated.
Rec Tec Grills Six (6) Year Limited Warranty This limited warranty covers Rec Tec Grills manufactured by “Rec Tec Industries, LLC.” Grills carry a 6 year limited warranty from the date of purchase by the original owner against defects in material and workmanship when subjected to normal residential use. Limited warranty does not apply to paint, grill cover, or damage caused from corrosion. Conditions of Limited Warranty 1.
Model #RT-680 Questions? Call our customer service at 1-855-696-0890 10am-8pm EST, M-F. Or visit RecTecGrills.com.