Another way RECOM ® PowerStation Evo Liquid Case Manual v1.
Liquid Cooling Case Installation Manual Introduction The working principle of the PowerStation Evo liquid cooling case, works on a method known as “Heat Exchange”. When power is sent to the pump, it begins to circulate the liquid around the system. Liquid coolant is then passed through the cooling blocks which are attached to your CPU, VGA & Northbridge Chipset (optional parts), the liquid coolant will then transfer the heat from the heat source through the cooling blocks and then into the coolant.
MAIN PARTS AND WORKING PRINCIPLE 1. CPU Cooling Block: Specifically designed for the heat transfer process from the CPU core. 2. Pump: will provide power for the circulation of the coolant. 3. Radiator & Fan: Also know as the Heat Exchanger, for dispersing heat from the coolant 4. Mounting Plate: for 1156 (i5), 1366(i7), LGA775, AM3/AM2(+), 754 / 939 / 940 / 478 5. Heat-Transferring Liquid: Liquid coolant, used to transfer heat from the system.
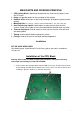
2. Please use the washer on the topside of the M/B as well. 3. Screw the four nuts onto the screws to fix the clip on the M/B. 4. Remove clear film from the base of the CPU Cooling Block and apply the thermal grease on it properly, and put it onto the CPU. 5. Fix the 1/4“ fittings on the CPU Block (hand screwed – no tool needed !) As a last step please fix the springs and the knurled nuts included in delivery onto the screws as you can see on the next page.
Pump installation The pump was created for usage in a complete water cooling system only – please take care on the coolant level. If it is too low the pump might be damaged. Pump is preinstalled on the bottom of the case, please take care on „IN“ and „OUT“ connector while installing the hose. Please connect the pump directly to the Power Supply Unit with the 4 pin molex connector. The pump can be moved for mounting. The current location is a suggested location.
Radiator Fitting Installation Screw the two 1/4” fittings into G1/4” thread of the pre-mounted radiator by hand, now you can connect this radiator with other components by using enclosed tube. Tubing Installation After installing the CPU-Block, it is time to connect the single components to each other. Please trim the tubes due to your personal system. It is important to straight cut the ends of the tubes. A side cutter is recommended to do so. The tubes will be connected with the included 1/4“ fittings.
Step 4: Step 5: Step 6: Please open the screw at the top of the pump to fill up, fill in some coolant into the pump using a small funnel. Switch on the ATX PSU and fill the pump step for step. Initial noises from the pump are quite normal and will stop after filling up the system completely. If there are problems with the circulation of the coolant please shake the pump carefully. In order to get out the air bubbles inside the radiator, you need to shake the radiator gently as well.
Specifications: CPU Block: Material: Copper base, Cover: Fiber Glass Nylon Dimension: 50,4 x 50,4 x 9 mm (Copper base), total: 80,5 x 104,5 x 25 mm 2x G1/4“ thread, Weight: 175 g Compatible Sockets: 1156(i5) / 1366(i7) / 478/ 775/ 939/ 754/ AM2(+) / AM3 Pump: Rated Voltage: 12V, 60 Hz Power Input: 10 W Pump Speed: 700 L/hr. Pump Height: 1.7 m Life Expectancy: 50000 hrs.
TROUBLESHOOTING: If any trouble is encountered with the operating of the liquid system, please refer to the section below before contacting your point of purchase.