
Installation Instructions

MODEL SS2
LOW VOLTAGE CONDENSATE OVERFLOW SHUT-OFF SWITCH
INSTALLATION INSTRUCTIONS
NOTICE: FAILURE TO READ AND COMPLY WITH ALL WARNINGS, CAUTIONS AND
INSTRUCTIONS PRIOR TO STARTING INSTALLATION MAY CAUSE PERSONAL INJURY
AND/OR PROPERTY DAMAGE AND VOID WARRANTEE.
It is recommended that this device be installed on the primary drain line between the pan outlet and P-Trap on
wall units with vertical pan outlets (i.e.: First Company; Janitrol) to prevent the unit from switching off in the
event condensate drips directly from the coil into the auxiliary pan outlet when the coil becomes dirty.
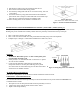
1. Disconnect power to unit at main panel and glue 5” stub dow
n
from primary pan outlet.
2. Glue ¾-inch slip Tee (not included) to bottom of stub with Tee stem horizontal and plumb.
3. Glue ¾” stub into horizontal outlet of Tee ensuring it is plumb.
4. Ensure switch/plug assembly is inserted into 1-inch inlet of PVC elbow so that float stem is at (inside)
bottom of PVC switch elbow. Float stem can be adjusted by threading it out of plug assembly. DO NOT
GLUE.
5. Place switch with wire leads up onto horizontal stub ensuring watertight seal. Switch may be angled up
to 20 degrees by rotating on stub. DO NOT GLUE.
INLINE INSTALLATION FOR (WALL) UNITS WITH VERTICAL PAN OUTLETS (See Fig. 1):
AUXILIARY DRAIN OUTLET INSTALLATION:
1. Disconnect power to unit at main panel and glue ¾” stub onto auxiliary drain outlet adapter on the equip-
ment supplied pan (secondary outlet of primary drain pan).
2. Ensure switch/plug assembly is inserted into 1-inch inlet of PVC elbow so that float stem is at (inside)
bottom of elbow. Float stem can be adjusted by threading it out of plug assembly. DO NOT GLUE.
3. Plumb ¾-inch inlet of PVC elbow to stub as close to drain outlet as possible with wires up. Position switch
level with or below outlet. Switch may be angled up to 20 degrees by rotating on stub.
4. Wire switch as instructed under Wiring, below.
5. Test switch: Remove switch/plug assembly from elbow and lift float with unit on. Unit should stop
running when float is raised.
6. Test switch sensitivity: Plug drain downstream from installation point and run unit to fill pan. Confirm that
float rises and unit stops before the pan overflows and check for plumbing leaks.
7. Place warning sticker on air handler or condenser unit.
SAFE-T-SWITCH
®
US Patent No.: 6,442,955
This device must be installed in strict accordance with manufacturer’s instructions and
all applicable plumbing, drainage and electrical codes to ensure proper operation.
Electric shock hazard – Disconnect power supply before installation to avoid injury
and/or equipment damage. For use in Class 2 circuits only - Do not use on circuits exceeding 24 volts.
CAUTION: This device will not detect clogs occurring upstream from installation point.
CAUTION: If not present, it is recommended that a fuse and a time delay be installed to protect the
24-volt circuit and to avoid rapid cycling of equipment prior to installing this product.
CAUTION: In any installation where personal injury or property damage may result from an inoperable
switch due to power interruptions, a backup system and/or alarm should be installed.
CAUTION: This device is intended for use in water only. Do not use in the presence of caustic or
flammable liquids or vapors.
CAUTION: Refer to the appropriate HVAC equipment operating manual prior to installing this product.
∆ WARNING
∆ WARNING