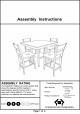
Assembly Instructions ASSEMBLY RATING Tools Required For Assembly: The Assembly Rating is a 5-point system that shows the degree of effort needed in Allen Wrench cadenced) | assembling a specific product (with 1 being easy and 5 being difficult. For some Wrench < {Included) products, two persons are recommended.
ASSEMBLY & CARE ADVICE FOR YOUR FURNITURE TC LAST CORRECT ASSEMBLY AND PROPER MAINTENANCE ARE NECESSARY PLEASE FOLLOW THE INFORMATION PROVIDED BELOW TO FULLY ENJOY YOUR FURNITURE. BASIC ASSEMBLY TECHNIQUES When lock or spring washer is used in Position each part correctly and insert Use cardboard or carpet area when an assembly, please make sure the sowers or bolts into their respective assembling furniture to prevent dock or paring washer is placed holes by hand tighten or using the scratches .
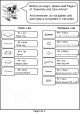
Before you begin, please read Page 2 of "Assembly and Care Advice". And remember, do not tighten until each step is completed or instructed.
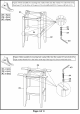
Prepare 8 bolts assembly by inserting lock washer then flat washer (#C) onto bolts Align legs (#2) to the holes of the apron (#3) and middle shelf Secure with bolts #A X PCs #B x PCs #C x PCs Prepare 4 bolts assembly by inserting lock washer then flat washer (#0) onto bolts Align connect board (#5) to the holes on the top of the legs Secure with bolts #A x PCs #B x PCs #C x PCs Page 4 of 8
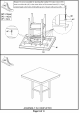
Prepare 16 screws assembly by inserting flat washer (#C) onto screws Insert wood dowels (£F) to the center holes of the connect board Align connect board to the holes of the table top Secure with screws #C x PCs B #E x PCs #F x PCs Somme— ASSEMBLY IS COMPLETED Page 50of 8
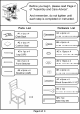
Before you begin, please read Page 2 of "Assembly and Care Advice". And remember, do not tighten until each step is completed or instructed.
#B x PCs #C x apes #D x PCs #A x PCs #C x PCs #D x apes I Prepare 2 bolts assembly by inserting lock washer #H then flat washer (#D) onto bolts Align chair seat I (#2) to the holes of the chair back Secure the middle two holes with bolts Prepare 4 boils assembly by inserting dock washer then flat washer (4D} onto bolts Secure corner holes of chatroom seat (#2) with bolts (FA).
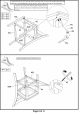
1) Align the front lo; 3L/R) to the holes of the chair seal (42), Insert fal washer then lock [washer (#C) onto threaded bolts of leaps Secure with hex nut but do not tighten. 2) Insert front scorcher (#4) and firefight stressors (#3) legs as shown in the picture. Tighten hex nut (4E) of the [iron legs.