
Installation & Assembly


2of2
Need assistance wit
FINISH: PALLADIAN BRONZE
EARTH BLACK
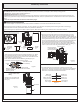
8”Dia.
4.75”
NOTE: ALL DIMENSIONS ARE ROUNDED
UP TO THE NEAREST 1/4"
Fixture can
only be
mounted in
the direction
indicated
9.75”
7”
14.25”
STEP 7 - Apply Silicone Sealer
A. Make sure exterior wall surface and fixture backplate are free of dirt
before applying caulk. Using exterior grade caulk, caulk over top of
backplate and down other side. Do not caulk bottom of fixture
backplate to ensure proper moisture drainage.
Your fixture is now assembled and ready to use. Enjoy!
Figure 7
Exterior
Grade
Caulk
Backplate
Exterior
Grade
Caulk
STEP 6 Install Shade and
Bulb
-
A. Place Shade (D) and Steel
Collar (E) over the Socket,
secure by threading Socket
Collar (F) onto Socket. Hand
tighten until sung.
B. Insert bulb and screw snugly
into place.
Figure 6
STEP 5 Install Fixture
Body
-
A. Carefully tuck all wires
into the outlet box and
position the backplate of
Fixture Body (C) over the
outlet box. Align the holes
in the backplate with the
mounting screws or
alternate short mounting
screws. Place caulk (not
supplied) into the
previously removed
mounting balls and then
attach Fixture Body (C)
using the mounting balls.
Hand tighten until snug.
C
Mounting Ball
A
Backplate
Hex Nut and
Lock Washer
Figure 5
Mounting Screw
or Alternate Short
Mounting Screw
C
D
E
F
Bulb (not
Supplied)
Socket
5.5”Dia.
8.75”
7”Dia.