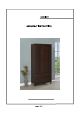
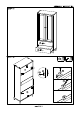
ASSEMBLY INSTRUCTION ASSEMBLY INSTRUCTION ASSEMBLY TIPS: 1. Remove hardware from box and sort by size. 2. Please check to see that all hardware and parts are present prior to start of assembly. 3. Please follow attached instructions in the same sequence as numbered fo assure fast & easy assembly. A warming: 1. Don't attempt to repair or modify parts that are broken or defective. Please contact the store immediately. 2. This product is for home use only and not intended for commercial establishment.
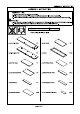
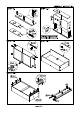
ASSEMBLY INSTRUCTION (M) RIGHT DRAWER SIDE PANEL << PCS | (0) DRAWER BOTTOM PANEL <> PCs {N) DRAWER SUPPORT [a PCS | (P)DOWN BACK PANEL <> 1pC Zz HARDWARE PACKAGE NO| DESCRIPTION FIGURE QTY |[NO| DESCRIPTION FIGURE QTY 1 | GLUE 40g 2 1PG | 11 | HANDLE 5 PCS ‘WOODEN DOWEL 2 | pooh = PCS | 12 | HANDLE BOLT & PCs 3 | CAM BOLT $7x35.5mm & PCS | 13 | HINGE PCS ed HINGE SCREW 4 | CAM LOCK @15x12mm = PCS | 14 4x15mm SS 24 PCS = 5 | BOLT #9.
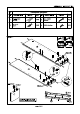
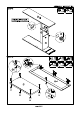
ASSEMBLY INSTRUCTION Zz HARDWARE PACKAGE NO| DESCRIPTION FIGURE QTY |[NO| DESCRIPTION FIGURE QTY ANTI-TIP STRAP WALL SCREW 21 | 470c15mm = PCS | 23 | 405mm prs apes WALL PLUG 22 | WALL 2 PCS | 24 | SCREW sax16mm 2 PCS STEP 1: INCORRECT CORRECT bs 0 "Apply glue on all wooden dowels to ensure integrity of the structure page 4 of 11
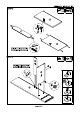
ASSEMBLY INSTRUCTION page 5 of 11 ‘Apply glue on all wooden dowels to ensure integrity of the structure Apply glue on all wooden dowels to ensure integrity of the structure.
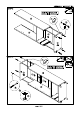
ASSEMBLY INSTRUCTION STEP 4 : Apply glue on all wooden dowels to ensure integrity of the structure page 6 of 11
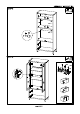
ASSEMBLY INSTRUCTION STEP : ‘Apply glue on all wooden dowels x4 to ensure integrity of the structure.
ASSEMBLY INSTRUCTION STEP 10-2 : ‘Apply glue on all wooden dowels 10 ensure integrity of the stricture.
ASSEMBLY INSTRUCTION STEP 13: ATTENTION: ANTI TIPPING SAFEGUARD Please install the anti-tipping hardware as shown in the drawing. This can help to prevent any tipping issues. (1) WALL So (3) WALL | FURNITURE TIPPING RESTRAINT.