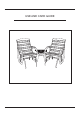
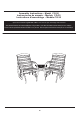
USE AND CARE GUIDE
Contents Do Not Return .....................................................................................03 Use & Care /Wood Care Guide..........................................................04 Instructions ..........................................................................................05 Customer Service Contact Info.........................................................
DO NOT RETURN THIS ITEM TO THE STORE If you experience any difficulty with assembly, missing parts or use, please DO NOT return this item to the store. Retail stores are unable to properly assist you. Contact our Customer Service Department directly for assistance. Our friendly Customer Service Agents will be happy to assist you.
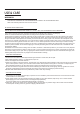
USE & CARE WARNINGS: THIS PRODUCT DESIGNED FOR THE MAXIMUM WEIGHT CAPACITY OF 250 POUNDS PER SEAT . NOTE: Save assembly instruction sheet for future reference. OIL FINISH WOOD CARE GUIDE PLEASE READ THIS INFORMATION CAREFULLY, IT WILL HELP YOU TO MAINTAIN YOUR FURNITURE This furniture has been made from seasoned hard wood and has already been oiled prior to packaging.
Assembly Instructions – Model CG-30 Instrucciones de armado – Modelo CG-30 Instructions d'assemblage – Modèle CG-30 Open outer hardware bag HB-4300 & Blister card . Do not open inner bags until instructed. Abra la bolsa exterior de ferretería HB-4300 & Tarjeta blister . No abra las bolsas internas hasta que se le indique. Ouvrez le sac de quincaillerie extérieure HB-4300 & Carte plastifiée . N'ouvrez pas les sacs intérieurs avant que ceci ne soit indiqué.
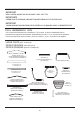
IMPORTANT UNLESS NOTED, DO NOT TIGHTEN ANY BOLTS UNTIL LAST STEP. IMPORTANTE A MENOS QUE SE LE INDIQUE, NO APRIETE NINGúN PERNO HASTA EL úLTIMO PASO. IMPORTANT À MOINS D'INDICATION CONTRAIRE, NE RESSERREZ PAS LES BOULONS AVANT LA DERNIÈRE ÉTAPE. TOOLS . HERRAMIENTAS . OUTIL You will need the following tools: screwdriver, 7/16" wrench, or pliers or adjustable wrench. Necesitará las siguientes herramientas: destornillador, llave de 1,11 cm, o pinza o llave ajustable.
HARDWARE PARTS LIST (SHOWN TO SCALE) *Standard hardware items may be replaced locally. LISTA DE PIEZAS DE FERRETERÍA (SE MUESTRAN A ESCALA) *Los artículos estándar de ferretería se pueden reemplazar en forma local. LISTE DE PIÈCES DE QUINCAILLERIE (À L'ÉCHELLE) *Les articles de quincaillerie standard peuvent être remplacés localement.
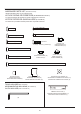
STEPS 1-4 SHOW THE ASSEMBLY OF EACH GLIDER CHAIR. ONCE THE FIRST CHAIR IS ASSEMBLED, REPEAT TO ASSEMBLE THE SECOND CHAIR. LOS PASOS 1 A 4 MUESTRAN EL ARMADO DE CADA SILLA MECEDORA. UNA VEZ QUE LA PRIMERA SILLA ESTÉ ARMADA, REPITA LOS PASOS PARA ARMAR LA SEGUNDA SILLA. LES ÉTAPES 1 À 4 MONTRENT L'ASSEMBLAGE DE CHAQUE FAUTEUIL COULISSANT. APRÈS AVOIR ASSEMBLÉ LE PREMIER FAUTEUIL, RÉPÉTEZ POUR LE DEUXIÈME. STEP 1A Open blister card and plastic parts bag PP-4300 .
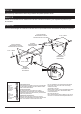
STEP 1B Attach bearing assemblies to base using hardware and plastic spacers shown. PASO 1 B Instale los ensambles de los rodamientos a la base usando la ferretería y los separadores plásticos que se muestran. ÉTAPE 1B Fixez les assemblages de roulement à la base avec la quincaillerie et les entretoises de plastique indiquées.
STEP 2 Open blister card , inner hardware bag IB-4301 and plastic parts bag PP-4300. Attach 2 arm rests with hardware shown. Attach seat brace to arms using hardware shown. Attach end seat supports to arms with hardware shown. DO NOT TIGHTEN HARDWARE. PASO 2 Una los 2 apoyos de los posabrazos con la ferretería que se muestra. Una el tirante del asiento a los posabrazos con la ferretería que se muestra. Una los apoyos laterales del asiento a los posabrazos con la ferretería que se muestra.
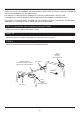
STEP 3 Open inner hardware bag IB-4301 . Attach the shaped top seat slat to the top of the 2 seat supports and a wide slat to the front using the hardware shown. Tap bolt heads into holes in slats until fully seated. Fasten the top 9 slats on all 3 seat supports with acorn nuts and the bottom 6 with hex nuts. MAKE SURE THE ASSEMBLY IS SQUARE. TIGHTEN ALL HARDWARE.
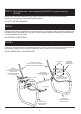
CG-30 STEP 4 Open blister card and plastic parts bag PP-4300. Attach seat to base using hardware shown. TIGHTEN HARDWARE. PASO 4 Una el asiento a la base usando la ferretería que se muestra. APRIETE LA FERRETERÍA. ÉTAPE 4 Fixez le siège à la base avec la quincaillerie indiquée. RESSERREZ LA QUINCAILLERIE. 2-3/8" • 60mm Do not overtighten! Bearing should move freely. ¡No apriete en exceso! El rodamiento debe moverse libremente. Ne resserrez pas trop ! Le palier devrait se déplacer librement.
STEP 5 Open blister card and plastic parts bag PP-4300. Attach tray support braces and tray boards using hardware shown. TIGHTEN HARDWARE. PASO 5 Una los tirantes de soporte de las bandejas y las tablas de la bandeja usando la ferretería que se muestra. APRIETE LA FERRETERÍA. ÉTAPE 5 Fixez les renforts de support du plateau et les planches du plateau avec la quincaillerie indiquée. RESSERREZ LA QUINCAILLERIE.