
Installation & Assembly
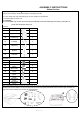

Table Of Contents

Page 2 of 2
Thank you for your purchase
ADDITIONAL NOTE ABOUT SAFETY: BOLTS MAY LOOSEN DURING NORMAL EVERYDAY USE. THEY SHOULD BE
PERIODICALLY INSPECTED AND RE-TIGHTENED TO PREVENT DAMAGE OR INJURY.ALWAYS CHECK TO ENSURE
THAT ALL HARDWARE IS KEPT TIGHTENED.
Step 2.Attach the front legs(P1) to chair seat(P7) with plastic washer (H1) by turning the legs clockwise. Using bolts (H2), lock
washers (H4), flat washers (H6), attach back legs (P2,P3) to chair seat (P7).Tighten bolts (H2) with allen wrench (H8).
Step 3. Attach wings (P4&P5) to the backrest (P6) using bolts(H3) and flat washer (H5) with allen wrench (H7).Fully tighten
them until secure.See insert diagram as below.
Step 4.Align female metal bracket located on the sides of the chair backrest(P6) with the prefabricated slide lock gadget on the
chair seat(P7), Insert the small metal arms and push down to lock it (as shown below).
Step 5.Smoothly pat down the fabric on the chair backrest(P6) on both sides of the flap from top to bottom,allowing the velcro
tape to adhere to the flap under the seat of the chair. Assembly is complete.
P1
H1
H2
H4
H6
H8
Remove the plastic
caps from screw heads
before attaching legs.
H3
H5
H7
P6
P7
P6
P6
P6
P7
P7
P7
P7
P1
P6
P3
P2
P1
P1
P1
P7
P4
P6
P4