
Instruction manual


Build 31 v31.6.16 Beta
© 2007-2011 RED.COM INC. JUNE 22, 2011
30 30
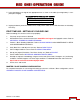
OPERATING CAMERA USING RED CHARGER
1. Plug the RED CHARGER into an AC power source between (120 – 240V).
2. Plug one end of the supplied 6-pin power cable into the AUX power output connector of the charger.
3. Plug the other end of the power cable into the POWER connector on the rear of the camera.
4. Turn on the charger.
5. When the LED above the RED CHARGER AUX power output connector turns green, you can turn on
the camera. Refer to POWER UP / DOWN.
NOTE: The maximum sustainable power load of the RED CHARGER is 100W @13.8V. The output of
the charger is over current protected, and will shut down if an excess load condition occurs. If the
output trips for any reason, remove any external loads from the camera, such as lights, motors etc,
turn off the RED CHARGER and repeat the above procedure.
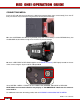
RECHARGING BATTERIES USING RED CHARGER
When using the RED CHARGER, recharge time for a single RED-BRICK battery is 200 minutes. The bat-
tery can also be partially charged, to approximately 80% capacity, in 120 minutes. This RED CHARGER
can sequentially charge two batteries with charging currents of up to 4A.
NOTE: When a cable is plugged into the 6-Pin LEMO auxiliary output connector of the charger, the
battery charging process will suspend (pause). The AUX LED will illuminate and the LEDs on the
charger will blink Green. Once the cable is unplugged, the charger will continue the previous
charging sequence from the point of interruption.
1. Plug AC power cord into charger AC input and power source.
2. Turn the charger power switch ON.
3. Insert a battery into one of the two V-plate adapters. Insert second battery if desired.
4. Observe the charger LED. In addition, the charge status will read in 20% steps through the RED-
BRICK battery LED array.
RED-BRICK battery LED array