Connection Broker Managing User Connections to Workstations, Blades, VDI, and More Quick Start Integrating with Red Hat Enterprise Virtualization Version 8.
Contacting Leostream Leostream Corporation 465 Waverley Oaks Rd. Suite 200 Waltham, MA 02452 USA http://www.leostream.com Telephone: +1 781 890 2019 Fax: +1 781 688 9338 To submit an enhancement request, email features@leostream.com. To request product information or inquire about our future direction, email sales@leostream.com. Copyright © Copyright 2002-2015 by Leostream Corporation This software program and documentation are copyrighted by Leostream.
Quick Start Contents CONTENTS ......................................................................................................................................................................3 CHAPTER 1: INTRODUCTION ...........................................................................................................................................4 LEOSTREAM™ COMPONENTS .............................................................................................................................
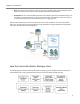
Chapter 1: Introduction Chapter 1: Introduction This document provides information on how to install and configure the Leostream™ Connection Broker for use with Red Hat Enterprise Virtualization for Desktops. See the associated sections of the complete Connection Broker Administrator’s Guide for more information pertaining to each step. Leostream™ Components The Leostream Connection Broker consists of the following four components.
Quick Start End user experience, to provide the optimal working environment for your end users And much more! To set up your Leostream Connection Broker, you define the following concepts: Authentication Servers: A server that provides authentication services to users logging into the Connection Broker. The Connection Broker supports Microsoft Active Directory®, Novell® eDirectory™, or OpenLDAP™ directory services.
Chapter 1: Introduction Roles: Permissions that control the actions an end user is allowed to take on their desktops and the level of access they have to the Connection Broker Administrator Web interface. Assignments: A set of rules that determine which role and policy the Connection Broker assigns to a user, based on the authentication server the user was found in, the attributes of the user’s account in that authentication server, and the location the user is logging in from.
Quick Start 1. User signs into the Connection Broker: End users can log into the Connection Broker from a Web browser, thin client, mobile device, or Leostream Connect. Different clients support different authentication methods, such as user name/password, smart cards, or fingerprints, and different display protocols. Users that connect to their desktops using the SPICE protocol must install the Leostream Connect software client on a Windows client device. 2.
Chapter 2: Quick Setup Chapter 2: Quick Setup You can download all Leostream software from the Leostream Web site http://www.leostream.com/resources/downloads.php You must obtain a Connection Broker license in order to use the Connection Broker. If you do not have a license, register for a trial license, as follows: 1. Click the Free Trial… link in the top right of any page in the Leostream Web site. 2. Enter your contact information into the Free Trial Request form. 3. Click Submit.
Quick Start Older versions of the SPICE client are not compatible with Leostream protocol plans. You must upgrade all spicec.exe files to version 5. Step 2: Installing the Connection Broker Connection Broker 7.5 and later runs as a virtual appliance on the Red Hat Enterprise Virtualization Hypervisor. Use the Import option in the Red Hat Enterprise Virtualization Manager to install the Connection Broker in your environment, as follows. To download the Connection Broker: 1.
Chapter 2: Quick Setup Step 3: Entering License Keys and Updating the Connection Broker Once you have the Connection Broker IP address, open the Administrator Web interface, as follows. 1. Open any Web browser. 2. Enter the Connection Broker IP address in your browser’s URL edit field. The Connection Broker Sign In page opens, as shown in the following figure: 3. Sign into the Connection Broker Web interface using the following default credentials: User name: admin Password: leo 4. Click Sign In.
Quick Start 3.0. Follow the instructions in the email from Leostream you received when you downloaded the Connection Broker from the Red Hat MarketPlace to update your Connection Broker to version 7.8 10. Click the link in the third step to skip the update and go to the Getting Started page, shown in the following figure. This page lists the general steps required to configure your Connection Broker. You can change your default Connection Broker password, as follows. 1.
Chapter 2: Quick Setup 2. Click the Network tab in the System page navigation menu 3. Enter the Connection Broker IP address, in the Connection Broker area: a. Select Static IP => from the Configuration drop-down menu, as shown in the following figure. b. Enter the IP address, Netmask, and Gateway in the appropriate edit fields. 4. To configure the DNS, in the DNS section: a. Enter the domain name in the Domain edit field b.
Quick Start 1. Go to the Resources tab in the main navigation menu. 2. Go to the Centers tab in the Resources page navigation menu. 3. Click Add Center. The Add Center form opens. 4. Select Red Hat Enterprise Virtualization Manager from the Type drop-down menu. The form updates, as follows: 5. Enter a name for the center in the Name edit field. 6. In the URL for REST API edit field, enter the URL to the REST API. This URL typically takes the following form. https://RHEV-M.your_company.
Chapter 2: Quick Setup 10. In the Password edit field, enter this user’s password. 11. Select the Refresh interval. This setting tells the Connection Broker how often to refresh the virtual machines imported from this center. The refresh interval is the length of time between when one refresh action is finished and the next refresh action is invoked. 12.
Quick Start 2. Click the Pools tab in the Resources page navigation menu. 3. Click Create Pool, as shown in the following figure. 4. In the Create Pool form, enter the basic pool characteristics, as follows: a. Name: A unique identifier for this pool. b. Subset of pool: The parent pool from which to draw resources for this pool.
Chapter 2: Quick Setup 5. Based on your selection in part c of step 4, enter the characteristics that define the pool. For this example, the following figure shows how to create a pool that is a subset of all the Windows desktops in the Connection Broker. The figure them selects Centers from the Define pool using drop-down menu, and selects the Red Hat center created in Step 5 to further restrict the contents of the pool to only the Windows desktop hosted in the Red Hat center. 6.
Quick Start number of pools via policies. This step describes three types of plans: 1) Power Control, 2) Release, and 3) Protocol. Protocol plans determine the display protocol used to connect the user to their resources.
Chapter 2: Quick Setup Priority drop-down menu associated with Red Hat SPICE. The form appears as shown in the following figure. 7. The Command line parameters lists the parameters used to launch the spicec.exe client. The default parameters include Connection Broker dynamic tags for the SPICE host IP address, port, and ticket. Do not modify these default values. 8. Click Save.
Quick Start New Connection Broker installations contain one default release plan, called Default. You can create as many additional release plans as needed for your deployment. The default release plan keeps the desktop assigned to the user when they disconnect from their session, but releases the desktop to its pool when the user completely logs out of their desktop. This release plan configuration ensures that the desktop is available for other users after the originally assigned user logs out.
Chapter 2: Quick Setup 5. The Desktop Assignment from Pools section configures the pools from which the Connection Broker offers desktops to users of this policy. From the Number of desktops to offer drop-down menu, select 2 to indicate the number of desktops the Connection Broker offers from this pool. 6. From the Pool drop-down menu, select the pool created in Step 6, containing the Windows desktops hosted in Red Hat. 7.
Quick Start installed and running Leostream Agent. By default, the Connection Broker does not offer a desktop to a user if the desktop does not have an installed Leostream Agent. Because this example does not cover installing Leostream Agents on the remote desktops, select the Yes, regardless of Leostream Agent status option. f. Offer stopped and suspended desktops: Use this option to indicate if the Connection Broker should offer stopped or suspended desktops.
Chapter 2: Quick Setup For this example, add an Active Directory authentication server, as follows. 1. Click the Users tab in the main navigation menu. 2. Click the Authentication Servers tab in the Users page navigation menu. 3. Click Add Authentication Server, as shown in the following figure. 4. In the Authentication Server name edit field, enter a name for this record in the Connection Broker. 5. In the Domain Name edit field, enter the domain name associated with this authentication server.
Quick Start Select Hostname or IP address to manually enter the address information. c. If defining the authentication server using hostnames or IP addresses, enter these values in the Hostname or IP address edit field. To associate multiple authentication servers with this authentication server record, enter multiple authentication server addresses separated by blank spaces. d. If defining the authentication server using hostnames or IP addresses, enter the port number into the Port edit field.
Chapter 2: Quick Setup Connection Broker should match the user’s entered login name against, for example: CN: The user’s common name sAMAccountName: The NT4 logon name userPrincipalName: The user’s email address uid: For OpenLDAP authentication servers, the user’s login ID 10. In the Other section, configure any additional options for this authentication server. The settings in this section allow you to do the following a. Query order: Sets the Position property of this authentication server.
Quick Start The Connection Broker then looks on the > Users > Assignments page, shown in the following figure, for the assignment rules associated with the authentication server that authenticated the user. For example, if the Connection Broker authenticated the user in the Leostream domain in the previous figure, the Connection Broker would look in the Leostream assignment rules in the following figure.
Chapter 2: Quick Setup groupMembership for eDirectory authentication servers You cannot use this method when authenticating users in an OpenLDAP directory. If you modified your groups since you last signed into your Connection Broker, you must sign out and sign back in to have your Connection Broker reflect the authentication server changes. To assign rules based on the user’s group attribute: 1. Select the group attribute from the Group drop-down menu 2.
Quick Start presents a report indicating which role and policy it assigned the user, and what applications it would offer. Please complete a login test prior to contacting Leostream technical support. After you test a login from the Connection Broker, you can use a Leostream Connect client to log in as this user, and ensure that the Connection Broker assigns the same desktops and that the user successfully logs in.
Chapter 3: Managing Your License Chapter 3: Managing Your License The Connection Broker displays the number of your licenses currently in use at the bottom of any page. To manage your Connection Broker license: 1. 2. Click on the System tab in the Connection Broker Web interface’s top navigation menu. Click on the Maintenance tab in the System page navigation menu.
Quick Start new version into production. If the update options are disabled, your Leostream support license has expired and you are no longer eligible for Connection Broker updates. Contact sales@leostream.com to renew your Leostream support license. Automatically Updating the Connection Broker If your Connection Broker can access the Leostream Web site and a new Connection Broker update file is available, the Update Connection Broker to version x.x.x.x option appears on the > System > Maintenance page.
Chapter 3: Managing Your License 2. Click Next. The following Install Update File form opens. 3. Browse for the update file or enter the full path to the update file. 4. Click Upload File. The Connection Broker checks the new file, and opens a form indicating the current version number and the new version number. 5. Click Install version x.x.x.x in this form to finish the installation. Installing a New License To update your support license, or add users to your license: 1.