Secunia Corporate Software Inspector (CSI) Complete – Flexible – Unique The Secunia CSI 7.0 works the way you do Secunia CSI 7.0 – Technical User Guide Rev. 03-Sep-2013 Secunia.
Contents Secunia Corporate Software Inspector (CSI) ................................................. 1 Contents ........................................................................................................ 2 The Secunia CSI 7.0 ....................................................................................... 5 The Scan Process – How Does it Work? ......................................................................... 5 Targeted Patch Management ...........................................
Product Smart Groups ............................................................................................... Overview and Configuration .................................................................................... Configured Product Groups ..................................................................................... Advisory Smart Groups .............................................................................................. Overview and Configuration ...........................
Suggest Software ..................................................................................................... Settings................................................................................................................... Scan Settings ....................................................................................................... Instant Access ...................................................................................................... Collect Network Info ............
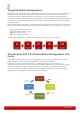
The Secunia CSI 7.0 The Secunia CSI 7.0 is a Vulnerability and Patch Management Software Solution that completes and targets the Patch Management process. It combines Vulnerability Intelligence, Vulnerability Scanning, and Patch Creation with Patch Deployment Tool Integration to enable targeted, reliable, and cost-efficient Patch Management.
Targeted Patch Management Patching of vulnerable software, in particular third-party software which is not supported by Microsoft WSUS, has been a cumbersome and resource intensive process causing many enterprises to either neglect patching or only patch very few non-Microsoft applications. Through the seamless Microsoft WSUS and System Center Configuration Manager integration with the Secunia CSI, the patching process has been simplified and can be conducted with a few simple clicks.
System Requirements To use the Secunia CSI 7.0 console your system should meet the following requirements: Min resolution: 1024x768 The latest version of Internet Explorer (Scan results can also be viewed from other browsers) Internet connection capable of connecting to https://csi7.secunia.com The addresses crl.verisign.net, crl.thawte.com and https://*.secunia.
What‟s New Administration – Create and administer Secunia CSI accounts using role based account management, where each CSI user is created and assigned a set of roles and limitations as appropriate. These roles determine which parts of the Secunia CSI the user has access to and limits what the user can view and scan. Browser Interface (SaaS) – Login to the Secunia CSI from any browser (the latest version of IE recommended) without installing a local console and synchronizing data to a local database.
Superseded Secunia CSI 6 Features Ignore Rules – This feature was previously used to filter out (after a scan) specific content from results and reports. The Secunia CSI 7 allows the user to create Host, Product and Advisory Smart Groups that act as custom filters to display only the content you want to see.
Getting Started The Secunia CSI 7.0 solution is accessible via https://csi7.secunia.com. You will be prompted for authentication with your username/password. Please use the credentials supplied by Secunia personnel. The initial password issued by Secunia is a one-time only password that must be changed upon the first login. The new password must contain a minimum of eight characters, or comply with the criteria defined in your custom Password Policy Configuration.
To install the Secunia Daemon: 1. Double-click the Secunia Daemon installer icon and follow the wizard instructions. 2. Accept the End User License Agreement and click Next. 3. Enter the Secunia Daemon Proxy Settings (host name, port, user name and password), if required. The values in populated fields are fetched from the current user‟s Internet Explorer proxy settings. Click Next. 4. Enter the User Name and Password of your Secunia account and click Install. 5.
Tips Tip! You can define the sorting of both lines and columns in any grid view to create the layout that best suits your needs. Click the right hand side of any of the column headings to view the available display options. The column's position can be modified by dragging and dropping the selected column to the desired position. Tip! You can click Export in any grid view to copy the displayed information to the clipboard or save as a CSV file.
Dashboard The Dashboard provides an overview of your hosts with the help of various “portlets”. Portlets are a collection of components that graphically display key data and allow you to create profiles which can display a unique combination of portlets. The first time you login to the Secunia CSI console the Dashboard page will only display the Overview portlet. Select the Dashboard elements you want to view from the drop-down list on the upper left of the page.
Scanning Scan Types The Secunia CSI allows scanning of target hosts using the following approaches: Single Host Agent-based scans are conducted by the Secunia CSI Agent that can be installed in different modes: Single Host mode, Network Appliance mode, or Command Line mode. Alternatively, you can scan the target hosts by launching a scan from the system where the Secunia CSI console is running. By using this approach, no software is installed in the target hosts.
Administrators must ensure that the Secunia CSI, and its scanning Agent respectively, have access to all necessary system and online resources which allow the application to run as intended. The addresses crl.verisign.net, crl.thawte.com and https://*.secunia.com/ should be white-listed in the Firewall/Proxy configuration to ensure that the client system is allowed access to these online resources.
To create the rule: From Windows Control Panel (View by Category) > System and Security > Windows Firewall, select Advanced settings Select Inbound Rules in the Windows Firewall with Advanced Security on Local Computer pane and then select New Rule in the Actions pane The New Inbound Rule wizard opens Select Custom rule and click Next Select All programs and click Next In the Protocol and Ports window: From the Protocol type: drop-down list, select TCP From the Local port: drop-down list, select RPC Dynamic
Quick Scan Use this page to conduct quick, on-demand, scans from your Secunia CSI console against remote hosts on your network or your local PC. Enter the scan type and IP address range for the hosts you wish to scan in the Enter hosts to scan screen and click Scan Hosts. In order to make sure that you are able to remote scan the target host, please ensure that all the system requirements for the remote scan are in place. The progress can be seen under Scan Progress.
System Center Configuration Manager Inventory Import Use this page to scan and display hosts connected to the upstream System Center Configuration Manager. Scan results are obtained from the data collected by the System Center Configuration Manager software inventory agent, which avoids the need to install the Secunia CSI agent on each client.
In the System Center Configuration Manager Inventory Import page, click Import Selected Hosts or Import All Hosts. Installing the System Center Configuration Manager client for the first time on a host can be time consuming and, in most cases, patience is required. The scan result is based on the data collected by the software inventory agent, which may not be of the same quality as that of the Secunia CSI agent.
Remote Scanning Via Agents You can use Network Appliance Agents for scanning one or more networks at scheduled intervals without having to install the Secunia CSI Agent in every single target host. With the csia.exe installed in Network Appliance mode, you will have the ability to schedule remote scans. The hosts to be scanned can be identified by an IP-range, IP-network or Host-name. The CSI console allows you to easily manage the scans being performed by the Network Appliance Agent.
Network Appliance Agents Use this page to view a list of the hosts which have Network Appliance Agents installed. Rightclick a host to configure the Network Appliance Agent installed on that host. To scan using a Network Appliance Agent you must: Install the agent in Network Appliance mode Create a Network Appliance Scan Group A schedule links the above to perform scans of the group at set intervals.
The user installing the Network Appliance Agent must have admin rights to all the target hosts that will be scanned by the Network Appliance Agent. Example of an installation: Scanning Via Local Agents The Secunia CSI provides different scan approaches, enabling you to select the one that best suits your environment. The Agent-based deployment is more robust and flexible for segmented networks or networks with mobile clients (for example, laptops).
Single Host Agents Use this page to manage configurations and schedule scans for the hosts where the Agent is installed as a service in Single Host mode. Double-click a host to manage the configuration of the selected Agent and change its settings (Inspection type, Check-in frequency, Days between scans). Right-click a host name and select Edit Site Configuration to manage the configuration for all the hosts in that Site. The hosts scanned with the csia.exe will be grouped by Site.
Install the Agent from the command prompt with local Admin account using: >csia.exe -i -L By using the -L parameter, the Agent will be installed as a service running under the LocalService user account. For further information, refer to: http://msdn.microsoft.com/en-us/library/windows/desktop/ms684190%28v=vs.85%29.aspx If you are a member of a domain and you do not use the -L switch, the service will be installed under the user account performing this action, granting the 'logon as a service' privilege.
PSI for Windows and Android PSI for Windows The Secunia Personal Software Inspector (PSI) offers integration with the Secunia CSI 7.0, making it possible to view PSI scan results and approve patches from the Secunia CSI console. This enables an administrator to track all the unmanaged PCs/Laptops/Android Devices connecting to the network and take any remediation actions necessary. The Secunia PSI results are hosted in the Secunia Cloud and fetched from there by the Secunia CSI console.
The PSI Host Configuration settings are not continuously kept in tight synchronization. As a consequence some hosts may become out of sync with the settings displayed here, for example newly added hosts, and PSI users with local administration rights may change the settings locally. For more detailed information regarding the Secunia PSI, please visit: https://secunia.com/vulnerability_scanning/personal/ Configure Link ID Use this page to download the custom Secunia PSI 3.0 setup file.
PSI for Android The Secunia PSI for Android is a free security scanner that allows a user to scan their mobile device and detect any vulnerable products installed. After examining all the products on a user‟s mobile device, the collected data is sent to Secunia's servers, which match the data against the Secunia File Signatures engine to determine the exact applications installed on their device. The Secunia PSI for Android supports Android OS versions from 2.2 onwards.
Scanning Mac OS X To scan Apple Mac OS X machines, you need to deploy the Single Host Agent locally on the target system. The installation can only be done under the MAC Terminal, as the agent will be installed as a daemon (service) under the LocalSystem account. Installation of Local Services on MAC OS X systems requires root privileges. The „root‟ account is disabled by default on MAC systems; therefore you need to enable it in order to proceed.
If you cannot enable the „root‟ account on the MAC, or you prefer to not use it directly, you can alternatively use the „sudo‟ switch before each command associated with Agent activities. For example: „sudo ./csia –i –L’ can be used to install the Agent on the system. Once you are ready with setting/logging the root account you are one step away from installing the Agent. When you download the Agent on a MAC system, normally the file is being set with limited file permissions on the system.
Scanning Red Hat Enterprise Linux (RHEL) Red Hat Enterprise Linux (RHEL) 5 and 6 are the only operating systems officially supported by Secunia for the CSI RHEL scan agent. It may be possible to install the scan agent on operating systems and configurations other than those described. However, these have not been tested and are not supported by Secunia.
Immediately update the RHEL Agent configuration: If you have set the agent check-in time to, for example, 1 day, it will be 1 day until the RHEL Agent picks up any configuration changes. If you want the RHEL Agent to immediately adapt to configuration changes, you can use the commands below to accomplish this by simply restarting the Agent service.
Custom Scan Rules Use the Custom Scan Rules page to create and maintain custom rules for scanning customer created programs, drivers, and plugins. Click New Custom Scan Rule and enter a Name for the rule and the Filename to scan. You can also click Browse to search for the file you want to add to the rule. Right-click a rule in the grid to edit or delete the rule. The file to be scanned must contain valid File Version Information. Completed Scans Use this page to view a summary of the scans conducted.
Results Sites Use this page to view the Sites maintained within your account. You can double-click a Site name to see all the hosts grouped under that Site name. Right-click a Site to view its Hosts or delete the Site. Scanned hosts will be grouped in a Site with the same name as the domain they log on to. Switching to Active Directory will remove your current Sites structure (your existing data will be backed up). Smart Groups Smart Groups are the medium by which a CSI user views scan results.
Click Templates, where available, to open the Smart Group Example Use Cases page. Select an appropriate use case and click Use Template to populate the Smart Group Overview and Configuration page, which you can then edit to match your specific requirements. If you edit a configured Smart Group, all existing log files and notifications for the Smart Group will be deleted. New logs will be created after your changes have been saved. Content can be available in multiple Smart Groups at the same time.
Host Smart Groups Overview and Configuration Use this page to view the existing configured Host Smart Groups and configure new Smart Groups. Right-click an item in the grid to view, edit, compile or delete the Smart Group. All Hosts is the default Smart Group which cannot be edited or deleted. Configured Host Groups Use this page to view the information for each Host Smart Group you created. Right-click an item in the grid to view the scan result or delete the selected host. Secunia.
Product Smart Groups Overview and Configuration Use this page to view the existing configured Product Smart Groups and to configure new Smart Groups. Right-click an item in the grid to view, edit, compile or delete the Smart Group. All Products is the default Smart Group which cannot be edited or deleted. The other default Smart Groups for End-Of-Life Products, Insecure Products, and Patched Products have been pre-created for you by Secunia.
Advisory Smart Groups Overview and Configuration Use this page to view the existing configured Advisory Smart Groups and to configure new Smart Groups. Right-click an item in the grid to view, edit, compile or delete the Smart Group. All Advisories is the default Smart Group which cannot be edited or deleted. Zero-Day Advisories (Optional Module) A Zero-Day advisory is one for which, at the time of release, no patch exists, but an exploit does exist.
Reporting Report Configuration Use this page to view a list of reports that have been configured and scheduled for generation. You can configure a new report by clicking Generate New Report or right-click an existing report to view, edit or delete it. The Secunia CSI reporting capabilities allow the user to schedule and fully customize the intended report.
Smart Group Notifications Use this page to create and configure reminders, notifications, and alerts for a Smart Group based on the current state or changes to a group. Click Configure New Notification, enter the required information and then click Save. Right-click a Notification in the grid to view, edit or delete it. Secunia.
Database Access Database Console Use this page to access Secunia‟s SQL database. You can access the content of each table by selecting the table name in the Tables pane. Expand the table name to view the objects and data types within that table. To create an SQL query, right-click a table and select Show Data to automatically create a SELECT * FROM table query from the specific table.
Scheduled Exports Use this page to view, edit or delete automated data extraction schedules. To schedule exports you must first download and install the Secunia Daemon. You can download the Secunia Daemon from http://secunia.com/downloadcsi/.
Patching Secunia Package System (SPS) The Secunia Package System (SPS) gives administrators the ability to create packages that are capable of doing a wide range of actions; everything from updating and uninstalling third-party applications to handling complex execution flows with multiple files. The Secunia Package System (SPS) page displays a list of products for which the Secunia CSI can automatically create an Update/Uninstall package.
SPS Concepts and Terminology The Secunia CSI user should become familiar with the concepts and terminology described in this section. What does a SPS package consists of? The package consists of two parts; applicability rules and SPS package. The applicability rules are used by WSUS to only execute the package on computers that are applicable for the selected package. The SPS package consists of the payload that is then executed on the computer.
Creating a Patch with the Secunia Package System (SPS) The Secunia Package System (SPS) page displays a list of products that you can create updates for. Click Configure View to customize the list and limit the types of products shown, as well as highlight products for which packages have or have not been created. If highlighted, products for which SPS packages exist will be shown in green. A product will be displayed in blue if the vendor provides unattended/silent installation parameters for its patches.
Create an Update Package A Product will be displayed in blue if the vendor provides unattended/silent installation parameters for its patches. Any Product listed in blue is available to have an update created in a 3 step process. Right-click or double-click one of these Products and select Create Update Package to start the SPS Package Creation Wizard. The Secunia CSI 7 retains Product Family Settings that you previously used. Click Yes to prefill the SPS Package Creation Wizard with the available settings.
Create a Custom Package The Secunia CSI 7.0 allows creating custom packages that can be deployed through WSUS/System Center Configuration Manager. By creating a custom package you can do a wide range of actions; everything from updating and uninstalling third-party applications to handling complex execution flows with multiple files. The creation of a custom package can be done in two different ways. Either: Right-click a product and choose Create Custom Package.
The Import Package feature allows you to import a SPS template in XML format that will automatically populate all the fields of the SPS Package Creation Wizard. This feature will be especially relevant when creating custom updates or when creating update packages for the products in grey. In Step 4 of the wizard you will also have the option to export the XML template for the package being created.
You are also able to change the files that are included in the SPS package, which can either be local files or links to be dynamically downloaded upon publishing of the package. To test a newly created execution flow together with the added files click Create SPS File. A SPS.exe file is created that can be executed locally prior to being published into the WSUS server. This SPS.exe file will include the execution flow script and the files to be included, but not the applicability rules.
Step 4 of 4: Applicability Criteria - Rules In Step 4 you should specify if you want to limit the package to 32-bit or 64-bit systems or computers with specific operating system languages. The patch file to be deployed will be automatically downloaded in the background by the Secunia CSI console. Once this is completed the Secunia CSI console will repackage and publish the update package into the WSUS/System Center Configuration Manager.
Agent Deployment If you choose to scan the target host by using the Secunia CSI Agent in Single Host mode (recommended), you can easily distribute and install the Agent by deploying it through WSUS/System Center Configuration Manager. Click Create CSI Agent Package under Agent Deployment to start the CSI Agent Package wizard. The CSI Agent Package can be created and managed just like any other Secunia SPS package.
WSUS/System Center Configuration Manager Available Use this page to view a list of all the created packages that are currently published into your WSUS. Right-click a package for more options such as Approve, Decline or Delete or double-click a package to display additional status details. Once the updates have been published into the WSUS, the same rules previously configured for the Microsoft updates will apply to the updates created by the Secunia CSI.
Deploying the Update Package Using WSUS In order to deploy the update package using WSUS, the update package must be approved. After publishing the package into the WSUS, and assuming that the update is visible under Available, right-click the package name and select Approve. You will be prompted to select the computer target groups for which you would like to approve the update. These target groups are configured in the WSUS.
Step 1 – Connection Status In Step 1 you should provide the relevant information (NetBIOS name and port number) for the main Upstream WSUS server. After inserting the required information, click Connect. To check the status of the connection, expand Step 1.Connection Status. If you are unsure of which port number to use, check your WSUS configuration as shown.
Step 2 – Certificate Status A code-signing certificate is needed to publish third-party updates to WSUS/System Center Configuration Manager so they can be deployed as patches. In this Step the Secunia CSI can request the WSUS to create and install the WSUS Self-Signed Certificate. To create and install a WSUS Self-Signed Certificate in all appropriate certificate stores, click Automatically create and install certificate.
Expand the Certificate Options to access the import and export certificate features. Be aware that in order to import your own certificate through the Secunia CSI, the WSUS connection must be configured to accept SSL connections. Step 3 – Group Policy Status A Group Policy is required to distribute certificates and locally created packages. The Secunia CSI can easily create this GPO so the WSUS Signing Certificate is distributed to all clients.
If you use Microsoft System Center Configuration Manager please make sure you do not select the first option Use the WSUS Server specified in the CSI. If you already have the Windows Updates being configured through a Group Policy, we suggest you select the first 3 options in the Create a new CSI WSUS Group Policy page. The CSI WSUS Group Policy will be created but not linked to your domain.
Third-Party Integration The Secunia CSI 7.0 provides you with the capability of publishing packages using third-party patch deployment solutions, for example Altiris. In order to support this feature Secunia has enhanced the package export feature.
Administration Overview The Secunia CSI 7.0 uses role based account management. Each CSI user is created and assigned a set of roles and limitations as appropriate. These roles determine which parts of the Secunia CSI the user has access to and limits what the user can view and scan. Every user of the Secunia CSI can receive notifications such as reports, email and SMS.
User Management Use this page to administer your Secunia CSI users. Create a New Administrator To create a new administration user account, click Create New Administrator and fill in the form, providing all the necessary details about the administrative user and include the limits to assign to the user. An email will be sent to the user containing a welcome message and their Secunia CSI login credentials. Right-click an existing account to view, edit or delete the account.
Active Directory (Requires the Secunia CSI Plugin) As a Root Administrator, you can select Enable Active Directory integration to allow your group policies to be automatically updated in the Secunia CSI when changes are made to the Active Directory. Switching to Active Directory will hide your current Sites structure and the Results > Sites menu. For these to be displayed you must disable the Active Directory integration, logout, and then login to the Secunia CSI.
IP Access Management (Requires the Secunia CSI Plugin) As a Root Administrator, you can use this page to configure the IP addresses the Secunia CSI console can be accessed from. Please note that you require administrative privileges to use this feature. The first IP Access Rule you set up must always be a whitelist rule and must include the external (public) IP address of the console you are creating the rule from.
Password Policy Configuration Use this page to configure the password policy for users. This policy should be set on a "global" level, that is, the password policy cannot be configured differently for different users. The Administrator defines the policy based on the options displayed in the Configuration Rules dialog: 62 Secunia.
Configuration Suggest Software Use this page to send details about software that you would like to be added to the Secunia File Signature database. It is important to enter as much information as possible to facilitate the processing and acceptance of your request. Settings Use this page to configure various settings within the Secunia CSI. Scan Settings Define the number of simultaneous scans to be executed. You can set the Scan threads value from 1 to 99 (the default is 5).
Windows Update Settings This setting controls the behavior of the Windows Update Agent (WUA) used by the Secunia CSI and CSI Agents to retrieve update information on Windows and other Microsoft products. You can select: Use a managed Windows Update server Use the official Windows Update server, providing updates to Windows only Use the official Microsoft Update server, providing updates to all Microsoft products including Windows, Word, Excel, and so on Use offline method: path to .
Activity Log Use this page to view information about user activity within the Secunia CSI, for example "write" actions, logins, and so on, with the exception of scans (due to the volume of data generated). You can access a full activity and login log for compliance monitoring and auditing purposes. Click the calendar icon next to the From and To fields to set a specific Activity Log date range to view.
Security Change Password Use this page to change the Secunia CSI account password for the user that is currently logged in. The new password must contain a minimum of eight characters, or comply with the criteria defined in the Password Policy Configuration rules. Password Recovery Settings Use this page to verify your email address and mobile number that will be used for password recovery. If your password is lost you can reset it at login using your verified email address and mobile number.
Further Information For answers to Frequently Asked Questions about the Secunia CSI patch management software, from scanning and patching advice to security compliance information and technical support, please visit: http://secunia.com/vulnerability_scanning/corporate/faq/ To download product information regarding Vulnerability Scanning, Vulnerability Intelligence, Product Reviews, Product Installation and Technical User Guides, please visit: http://secunia.
Disclaimer The contents of the Secunia website and all materials, information, links, documents and quotes (“Material”) are provided “as is”. Secunia does not, unless expressively provided otherwise in an agreement between you and Secunia or except as required by mandatory applicable law, either express or implied for the accuracy, warrant the accuracy, reliability or the contents of the Material.
For further information please visit our website: secunia.com Secunia Mikado House Rued Langgaards Vej 8 DK-2300 Copenhagen S Denmark Email: info@secunia.com Phone: +45 7020 5144 Fax: +45 7020 5145 Copyright 2013 Secunia. All rights reserved. This document may only be redistributed unedited and unaltered. This document may be cited and referenced only if clearly crediting Secunia and this document as the source.