McAfee Host Intrusion Prevention 8.
COPYRIGHT Copyright © 2010 McAfee, Inc. All Rights Reserved. No part of this publication may be reproduced, transmitted, transcribed, stored in a retrieval system, or translated into any language in any form or by any means without the written permission of McAfee, Inc., or its suppliers or affiliate companies.
Contents Installing McAfee Host Intrusion Prevention. . . . . . . . . . . . . . . . . . . . . . . . . . . . . . . . . . . . . . . . . . . 5 Components. . . . . . . . . . . . . . . . . . . . . . . . . . . . . . . . . . . . . . . . . . . . . . . . . . . . . . . . . . . . . . . . . . . . . . . . . . . . . . 6 Installation overview. . . . . . . . . . . . . . . . . . . . . . . . . . . . . . . . . . . . . . . . . . . . . . . . . . . . . . . . . . . . . . . . . . . . . . . . 7 What's new in this release. . . . . .
Contents Installing the Solaris client locally. . . . . . . . . . . . . . . . . . . . . . . . . . . . . . . . . . . . . . . . . . . . . . . . . . . . . . . . . . . . 41 Applying polices and IPS content updates. . . . . . . . . . . . . . . . . . . . . . . . . . . . . . . . . . . . . . . . . . . . . . . . . . . . . 41 Removing the Solaris client. . . . . . . . . . . . . . . . . . . . . . . . . . . . . . . . . . . . . . . . . . . . . . . . . . . . . . . . . . . . . . . . .
Installing McAfee Host Intrusion Prevention This guide provides all the information you need to install and start using Host Intrusion Prevention 8.0 software in a managed environment. The product extension installs on versions 4.0, 4.5, and 4.6 of the ePolicy Orchestrator server. The client installs on Windows workstations and servers and on Solaris and Linux servers.
Installing McAfee Host Intrusion Prevention Components collect event information, and transmit the information back to ePolicy Orchestrator through the McAfee Agent. Figure 1: Host Intrusion Prevention protection Contents Components Installation overview What's new in this release Components Host Intrusion Prevention software requires several components be installed and running to provide protection.
Installing McAfee Host Intrusion Prevention Installation overview • McAfee Agent — Agent installed on a managed system that acts as the intermediary between the Host Intrusion Prevention client and the ePolicy Orchestrator server and database. It sends data to the client from the ePO server and vice versa. • Host Intrusion Prevention extensions — Interface to policy management in the ePolicy Orchestrator console.
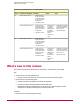
Installing McAfee Host Intrusion Prevention What's new in this release On the ePolicy Orchestrator server On client systems Version Host IPS 8.0 extensions Windows 4.5 Firewall only for ePO 4.5 • – McAfee Agent 4.0 (Patch 3 and later) or McAfee Agent 4.5 (Patch 1 and later) for Windows • Host IPS 8.0 client Firewall and IPS for ePO 4.5 • • Solaris McAfee Agent 4.0 • (Patch 3 and later) or McAfee Agent 4.5 (Patch 1 and later) for Windows Host IPS 8.0 client • 4.6 Firewall only for ePO 4.
Installing McAfee Host Intrusion Prevention What's new in this release • TrustedSource rating and blocking: Firewall rules block or allow incoming or outgoing traffic according to McAfee TrustedSource ratings • IP spoof protection: Firewall rules block outgoing traffic when the local IP address isn't one of the local system's IP addresses, and when a local MAC address is not a VM guest MAC address • Bridged VM support: Firewall rules allow traffic with a local MAC address that is not the local system's MAC
Installing McAfee Host Intrusion Prevention What's new in this release Extension/client functionality • Two versions of Host Intrusion Prevention 8.0: a firewall-only version and a full version containing both firewall and IPS protection • Host IPS extension compatibility with ePolicy Orchestrator versions 4.0, 4.5, and 4.6 • Ability to install the Host IPS 8.0 extension in ePolicy Orchestrator even with earlier versions of Host IPS installed • Host IPS 8.0 extension manages only Host IPS 8.
Best Practices for Quick Success McAfee Host Intrusion Prevention delivers great value to your organization by reducing patching frequency and urgency, preserving business continuity and employee productivity, protecting data confidentiality, and supporting regulatory compliance. It offers signature and behavioral intrusion prevention system (IPS) protection and a stateful firewall to protect all endpoints — desktops, laptops, and servers — from known and unknown threats.
Best Practices for Quick Success 5 Optional adaptive mode 6 Enhanced protection and advanced tuning 7 Maintenance and expansion beyond IPS Both desktops and servers follow a similar rollout process; however, we recommend more conservative protection starting points and phase timings for your more complex and mission-critical power-user desktops and servers.
Best Practices for Quick Success 1. Strategize 1. Strategize 2. Prepare a pilot environment 3. Install and configure 4. Do initial tuning 5. Activate adaptive mode (optional) 6. Refine tuning 7. Perform maintenance and expand 1. Strategize The first step in the tuning process is to think through your system protection strategy. Set realistic goals and create a pilot and deployment plan to match.
Best Practices for Quick Success 1. Strategize • Servers running dedicated database, web, email, or other applications, as well as print and file servers. Lab or real world? Many enterprises require lab testing as a standard step in new product installation. They make images of production systems and test these images in a controlled environment before rollout.
Best Practices for Quick Success 1. Strategize “Patch Tuesday” issues were shielded using the out-of-the-box basic protection level. Activating even default protection offers significant immediate value. We strongly recommend this "start simple" strategy. Servers might be the most critical systems to protect, but they might also be the trickiest.
Best Practices for Quick Success 2. Prepare a pilot environment Choose your option Option 1 helps you gain the most protection benefit from your IPS investment. Option 2 presents a reliable, lightweight strategy. Pick the course that matches your risk position. 2. Prepare a pilot environment After you have defined your priorities, targets, and protection strategy, you should make sure your environment meets technical prerequisites and eliminate any system issues prior to installation.
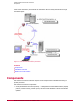
Best Practices for Quick Success 2. Prepare a pilot environment Process overview: Figure 2: Host Intrusion Prevention installation and maintenance using ePolicy Orchestrator • The ePO server works with McAfee Agent on each host to install the IPS client on each target system. • IPS policies are created and maintained within the ePO console. • The ePO server communicates policies to the agent on the host system. • The agent communicates policies to the IPS client.
Best Practices for Quick Success 3. Install and configure Group the clients logically. Clients can be grouped according to any criteria that fit in the ePO System Tree hierarchy. For example, you might group a first level by geographic location and a second level by operating system platform or IP address.
Best Practices for Quick Success 3. Install and configure Refine baseline policies (optional) Some administrators tweak protection defaults immediately, before starting the deployment. You can automatically protect high-risk applications (those that launch as services or open network-facing ports) and in-house applications. Applications developed in-house are frequently excluded from IPS at the beginning of a deployment, especially if they listen for network connections.
Best Practices for Quick Success 4. Do initial tuning 1 Check that the Host IPS services (FireSvc.exe, mfefire.exe, mfevtp.exe) and framework service (McAfeeFramework.exe) are started. 2 Very Important! Run simple applications, such as accounting, document editing, email, Internet access, multi-media, or development tools, to test that they operate correctly. Can your users perform their standard jobs? You are looking to demonstrate and validate proper operational detection.
Best Practices for Quick Success 4. Do initial tuning legitimate activities, most common with internally-developed applications, these false positives can be resolved in the next step. TIP: Often when scanning repetitious log data, you miss specifics that would trigger a different rule decision. During extensive reviews, take occasional breaks to avoid this. Start tuning protection From the event log data, work to: • Elevate protection for logged events that should be blocked.
Best Practices for Quick Success 4. Do initial tuning legitimate applications, and you do not need to permit these behaviors. Validate that the user application functions correctly and continue blocking. TIP: It is common for events to be generated and blocked with no visible effect on the user or the operation of the application. For example, VMware envelopes and Adobe applications frequently exhibit this behavior. It is safe to ignore these events if you can confirm that the user experience is unchanged.
Best Practices for Quick Success 5. Activate adaptive mode (optional) 5. Activate adaptive mode (optional) After completing a business cycle with the software in place, begin to implement well-targeted rules to create custom policy sets. These policies can be defined manually, but adaptive mode provides a powerful tool for creating IPS rules policies based on host activity, without administrator interaction. As an application is used, an exception is created to allow each action.
Best Practices for Quick Success 6. Refine tuning • Track client rules in the ePO console, viewing them in regular, filtered, and aggregated views. • Use automatically created client rules to define new, more detailed policies, or add the new rules to existing policies, then apply the updated policies to other clients. • Select the policy option Retain Client Rules. If not, rules will be deleted after each policy enforcement interval. • Review the exceptions that are created.
Best Practices for Quick Success 7. Perform maintenance and expand Continue tuning Review exceptions and any issues that emerge. Manage these as discussed in the initial tuning step. • Monitor help desk calls and user comments for any complaints or business issues raised by blocked access, false positives, or new application behavior. These issues should be minimal, but there are always new requirements. • Regularly review exceptions that have been generated. • Tune policies accordingly.
Best Practices for Quick Success 7. Perform maintenance and expand computers fit into a few usage profiles. Managing a large deployment is reduced to maintaining a few policy rules. • Repeat the process for power users and servers if you have only been piloting standardized desktops, starting with logging and taking advantage of adaptive mode. • Add new usage profiles and user communities. • Implement firewall rules. Follow the pilot process, but see the product guide for specifics on rules and learn mode.
Installing in ePolicy Orchestrator This version of Host Intrusion Prevention requires that you install one or more extensions in ePolicy Orchestrator depending on the protection coverage you have purchased and the version of ePolicy Orchestrator you are running. The following is the list of required extensions: Table 3: Firewall feature only McAfee ePO version File name Required extensions Functionality 4.0 HOSTIPS_8000.zip Host Intrusion Prevention 8.0.0 Firewall feature help_epo_103x.
Installing in ePolicy Orchestrator Installing the extension McAfee ePO version File name Required extensions Functionality Help Content: hip_800_help ePO Help with Host Intrusion Prevention 8.0 information * Valid only when the Host Intrusion Prevention 8.0.0 extension is installed. The single extensions for use with ePolicy Orchestrator 4.5 and 4.6 contain multiple .zip files that are installed as separate extensions, one for each type of functionality as listed above.
Installing in ePolicy Orchestrator Removing the extension • In ePolicy Orchestrator 4.0, Host Intrusion Prevention 8.0.0 and Host IPS License Extension, if installed, appear in the Managed Products list under extensions. • In ePolicy Orchestrator 4.5 and 4.6, Host Intrusion Prevention appears in the Managed Products list under extensions and all the extensions installed for the product appear in the right pane. Removing the extension To remove the Host Intrusion Prevention 8.
Migrating Policies You cannot use McAfee Host Intrusion Prevention version 6.1 or 7.0 policies with version 8.0 clients without first migrating version 6.1 or 7.0 policies to version 8.0 format. Host Intrusion Prevention 8.0 provides an easy means to migrate policies with the ePolicy Orchestrator Host IPS Policy Migration feature under Automation. This migration involves translating and moving policies. After the policy is migrated it appears under the Policy Catalog's corresponding Host IPS 8.
Migrating Policies Migrating policies from earlier versions To migrate this version of Host Intrusion Prevention... 7.0.x To version 8.0, do this... • Migrate 6.1 policies to 8.0 policies by running the Host IPS 8.0 migration feature. Review the migrated policies and policy assignments. • Deploy Host IPS 8.0 clients to replace Host IPS 6.1 clients. • Deploy the latest content update to Host IPS 8.0 clients. • Install the Host IPS 8.0 extensions in ePolicy Orchestrator. • Migrate 7.
Migrating Policies Migrating policies through an xml file Migrating policies through an xml file If the McAfee Host Intrusion Prevention 6.1 or 7.0 extension is not installed and you have previously exported selected single policies to an xml file, or, if you want to selectively migrate policies, you must migrate through an xml file. The process involves first exporting the 6.1 or 7.0 policies to xml format, converting the contents of the xml file to McAfee Host Intrusion Prevention 8.
Installing the Windows Client This section describes the requirements, properties, and installation of McAfee Host Intrusion Prevention 8.0 Windows client for workstations and servers. Contents Windows client details Installing the Windows client remotely Installing the Windows client locally Applying policies and IPS content updates Removing the Windows client Windows client details This version of the McAfee Host Intrusion Prevention 8.0 client for Windows works with ePolicy Orchestrator 4.
Installing the Windows Client Windows client details • Enterprise Edition • Ultimate Edition Windows Server 2003 SP2, 2003 R2, 2003 R2 SP2 (32- & 64-bit) • All editions Windows Server 2008, 2008 SP1, 2008 SP2, 2008 R2 (32- & 64-bit) • All editions Supported Virtual Private Network (VPN) clients • AT&T Global Network Services Client 7.6, 8.1 • CheckPoint VPN Client R60, R71 • Cisco IPSec VPN Client version 5.0 • Cisco SSL VPN Client 2.4 • Citrix SSL 4.5.6 • F5 Firepass 1200 6.1 (6031.2009.1010.
Installing the Windows Client Installing the Windows client remotely • MED-V 1.0, 1.0 SP1 • App-V 4.5, 4.6 • SCVMM 2008, 2008 R2 • SCCM 2007SP2, 2007 R2 • SCOM 2007, 2007 R2 • Microsoft App-V 4.5, 4.6 • XP Mode Windows 7 32- and 64-bit Supported databases • MS SQL 2000 • MS SQL 2005 • MS SQL 2008, 2008 R2 Installing the Windows client remotely To deploy the client from the ePO server, add its deployment package to the ePolicy Orchestrator master repository, then deploy it to client computers.
Installing the Windows Client Applying policies and IPS content updates Before you begin If a previous version of the client exists, be sure to disable IPS protection before attempting to install. Task 1 Copy the client installation package file to the client computer. 2 Run the installation program (McAfeeHip_ClientSetup.exe) in the package. 3 Follow the on-screen instructions to complete the installation.
Installing the Windows Client How to troubleshoot Windows installation issues Task 1 From the ePO server, select the system from which you want to remove the software. 2 Enforce the Host Intrusion Prevention Client UI policy option Show product in Add/Remove list. 3 Set the deployment task for Host Intrusion Prevention to Ignore. 4 On the client computer, unlock the client interface with a password. 5 Deselect Enable Host IPS.
Installing the Windows Client Stopping the Windows client 3 Set debugging: Select Help | Troubleshooting and enable full debug logging for firewall and IPS). 4 Ensure that both Host IPS and Network IPS are disabled. 5 Open a command prompt and run net start enterceptagent to start the client service. If the service still fails to start, check the FireSvc.log file for any Error or Warning message that may yield clues as to why the service is not starting.
Installing the Solaris Client This section describes the requirements, properties, and installation of McAfee Host Intrusion Prevention 8.0 Solaris client, which identifies and prevents potentially harmful attempts to compromise a Solaris server’s files and applications. It protects the server’s operating system and Apache and Sun web servers, with an emphasis on preventing buffer overflow attacks.
Installing the Solaris Client Solaris client details Policy enforcement Not all Host Intrusion Prevention 8.0 policies are available for the Solaris client. In brief, Host Intrusion Prevention protects the host server from harmful attacks but does not offer firewall protection. The valid policies are listed here. Policy Available options HIP 8.0 GENERAL: Client UI None except administrator or time-based password to allow use of the troubleshooting tool.
Installing the Solaris Client Installing the Solaris client remotely For more information on editing signatures, see Appendix A — Writing Custom Signatures in the product guide or help. Installing the Solaris client remotely To deploy the client from the ePO server, add its deployment package to the ePolicy Orchestrator master repository, and then deploy it to client computers. For more detailed information, see the ePolicy Orchestrator Product Guide.
Installing the Solaris Client Removing the Solaris client You are now ready to monitor and deploy IPS policies for the Solaris client. For details, see the McAfee Host Intrusion Prevention 8.0 Product Guide. To be sure the client has the most current content, download the latest Host Intrusion Prevention content update package and check it in to the ePO Repository for deployment. For details on this operation, see Host IPS protection updates in the McAfee Host Intrusion Prevention Product Guide.
Installing the Solaris Client Stopping the Solaris client Verify the Solaris client is running The client might be installed correctly, but you might encounter problems with its operation. If the client does not appear in the ePO console, for example, check that it is running, using either of these commands: • /etc/rc2.d/S99hip status • ps –ef | grep Hip Stopping the Solaris client You may need to stop a running client and restart it as part of troubleshooting. Task 1 Disable IPS protection.
Installing the Linux Client This section describes the requirements, properties, and installation of McAfee Host Intrusion Prevention 8.0 Linux client, which identifies and prevents potentially harmful attempts to compromise a Linux server’s files and applications.
Installing the Linux Client Linux client details • Red Hat Linux Enterprise 5, 64-bit • 2.6.18-8.el5 • SUSE Linux Enterprise 10, 32-bit • 2.6.16.21-0.8-bigsmp • 2.6.16.21-0.8-default • 2.6.16.21-0.8-smp • SUSE Linux Enterprise 10, 64-bit • 2.6.16.21-0.8-default • 2.6.16.21-0.8-smp • SUSE Linux Enterprise 11, 32-bit • 2.6.27.19-5-default • 2.6.27.19-5-pae • SUSE Linux Enterprise 11, 64-bit • 2.6.27.19-5-default Supported web servers • Apache 1.3.6 and later Web Server • Apache 2.0.
Installing the Linux Client Installing the Linux client remotely Policy Available options • Signatures (default and custom HIPS rules only) NOTE: NIPS signatures and Application Protection Rules are not available. IPS Events All IPS Client Rules All HIP 8.
Installing the Linux Client Applying policies and IPS content updates Task 1 Copy the appropriate .rpm file from the client installation package to the Linux system: • Red Hat Linux Enterprise 4, 32-bit 1 MFEhiplsm-kernel-8.0.0.-.RH4.i386.rpm 2 MFEhiplsm-8.0.0.-.RH4.i386.rpm • Red Hat Linux Enterprise 4, 64-bit 1 MFEhiplsm-kernel-8.0.0.-.RH4.x86_64.rpm 2 MFEhiplsm-apache-8.0.0.-.RH4.x86_64.rpm 3 MFEhiplsm-8.0.0.-.RH4.i386.
Installing the Linux Client Removing the Linux client You are now ready to monitor and deploy IPS policies for the Linux client. For details, see the Host Intrusion Prevention 8.0 Product Guide. To be sure the client has the most current content, download the latest Host Intrusion Prevention content update package and check it in to the ePO Repository for deployment. For details on this operation, see the ePolicy Orchestrator Product Guide.
Installing the Linux Client Stopping the Linux client Verify the Linux client is running The client might be installed correctly, but you might encounter problems with its operation. If the client does not appear in the ePO console, for example, check that it is running, using this command: ps –ef | grep Hip Stopping the Linux client You may need to stop a running client and restart it as part of troubleshooting. Task 1 To stop a running client, first disable IPS protection.