
Specifications

RED DSMC OPERATION GUIDE
COPYRIGHT © 2014 RED.COM, INC 955-0020_V5.2, REV-G | 99
caps are made to protect the lens, not necessarily to block light.)
‒ If possible, use a dark room.
‒ Just closing the aperture is NOT sufficient.
4. Ensure a properly formatted SSD is attached to the camera.
Even if you are not saving the calibration map to the DSMC, an SSD is required to store RAW images during
calibration.
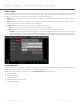
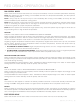
5. Go to Menu > Settings > Maintenance > Calibrate > Sensor.
NOTE: If the calibration map name is “empty”, that means that the only calibration map on your camera is
the factory calibration.
6. For EPIC DRAGON or SCARLET DRAGON, you can create up to four (4) calibration maps at a time. Select
a check box for each calibration map you want, select the exposure you want for each from the drop-down
menus, and go to Step 10.
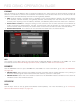
7. For EPIC MYSTERIUM-X or SCARLET MYSTERIUM-X, select one (1) of the following:
‒ Save As user HS: The calibration map created by black shading will overwrite the user HS calibration
map. User HS is the name for the current in-camera user-created calibration map.
‒ Save To Media: The calibration map created by black shading will be saved to an SSD.
‒ Leave both Save check boxes deselected: The calibration will only be applied until the camera turns off,
and will not be saved.
8. For EPIC MYSTERIUM-X or SCARLET MYSTERIUM-X, select the last check box. The label for the check box
is the name of the user-created calibration map you will be overwriting.
NOTE: If the calibration map name is “empty”, that means that the only calibration map on your camera is
the factory calibration.
NOTE: The Start Capture button is disabled until you select this check box.
9. For EPIC MYSTERIUM-X or SCARLET MYSTERIUM-X, select the exposure you want to use for the calibration
from the drop-down menu.
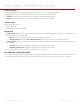
10. Select Start Capture.
11. After selecting Start Capture, a dialog box displays, reminding you to cover the sensor and insert an SSD.
Select OK to continue.
The system initializes and then makes two (2) passes through the following phases of the calibration:
‒ Capturing
‒ Analyzing
‒ Erasing
‒ Programming
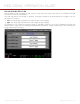
12. When the Calibration Successful dialog displays, select OK to complete black shading.
The new calibration map is automatically selected.