
Operation Manual


955-0002_v3.3, Rev-B COPYRIGHT © 2012 RED.cm, Inc.
219 219
APPENDIX G: 3D SETUP / OPERATION
OVERVIEW
The following information outlines basic procedures to connect two RED DSMC cameras together in a
Master / Slave configuration for 3D operation, operation of cameras in Master / Slave configuration and
clip naming conventions for clips recorded on those cameras. The MASTER camera will control only the
METADATA parameters of both cameras. On the SLAVE camera, any other setting outside of these will
need to be manually changed before recording.
CAMERA SETUP
Select one camera to be designated as Master and a second to be designated as Slave.
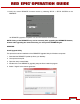
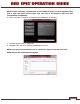
NOTE: Cameras can also be set up in a MASTER / MASTER and SLAVE / SLAVE configuration. To
set as MASTER / MASTER select ALL under TARGET for both cameras. This will allow either
camera to make METADATA changes and control record start/stop of both cameras. To set as
SLAVE / SLAVE select NONE under TARGET for both cameras. This allows each camera to
control its own METADATA.
MASTER CAMERA
Perform the following steps on the Master camera:
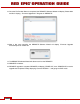
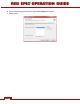
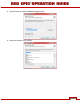
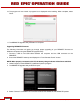
1. Go to SECONDARY MENUS > SETTINGS > SETUP > COMMUNICATION > NAME and give the
camera a unique NAME (CAM A, LEFT, etc…).
2. Under TARGET select ALL.
3. Give the camera a unique IP address.
4. Go to SLAVE CAMERA.