
Installation manual

A
Led1
D
B
E
C
Led-2
Led-1
Led0
Led+2
Led+1
27
4-OPERATION
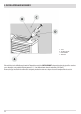
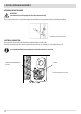
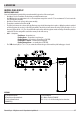
CONTROL PANEL DISPLAY
CONTROL PANEL LOGIC
Some useful information is provided below to understand the logic and use of the control panel:
• Knob A sets 5 levels of ventilation. The knob turns smoothly from min to max.
• Knob B allows the room temperature to be set. The temperature ranges from a min of 15°C to a maximum of 30°C and even in this
case, the knob turns smoothly.
• Knob C sets 5 ame levels (power); the key turns smoothly.
• The product is switched on and o via key D.
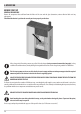
• The pellet load is increased or decreased via key E wit respect to the default setting that is equal to 0. When the product is switched
on for the rst time, the set value is 0 (the LED in the middle). The pellet load can be increased via key E (LED to the right +1/+2) or
decreased (LED to the left -1/-2). The selected LED will remain orange while the appliance works and will go o when the product is
switched o. The last setting will be saved in the memory for the next start-up.
• Led 1 – descriptions.
Fixed Green – the product is on.
Flashing Green – the product is on or being set.
Flashing Orange – the product is o (even due to ECO-STOP).
Flashing Red + buzzer – an alarm has been triggered.
Flashing Orange/Green – on stand by due to ECO-STOP.
• The 5 LEDs above key E (0/-1/-2/+1/+2) are activated to indicate the type of alarm and the pellet loading type selected.
LEGENDA
A. Fan adjustment knob.
B. Temperature adjustment knob.
C. Power adjustment knob.
D. ON/OFF key.
E. Pellet loading key
LED 1. Multi-coloured LED ON/OFF.
LEDs -2/-1/0/+1/+2 Pellet loading level or alarm alert.
Technical Dept. - All rights reserved - Reproduction is prohibited