
Operation Manual

Build 31 v31.6.16 Beta
JUNE 22, 2011 © 2007-2011 RED.COM INC.
141
CONNECTING
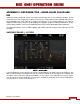
After mounting the master and slave cameras in the final configuration, use a USB A to B Device Cable to
connect the cameras together. Ensure the cameras are set up as desired and powered down before con-
necting. The top USB port on the side of the camera defines that camera as the master; the lower USB
port on the side of the camera defines that camera as the slave.
NOTE: DO NOT connect the same cable to both connectors on the same camera.
IMPORTANT: The cameras should be powered down before plugging, unplugging or swapping
master / slave status to ensure the menus and capabilities of the cameras switch to the proper
configurations. The USB cable can be “Hot Plugged” and takes up to 10 seconds to establish
communication (indicated by blinking “M” and “S”). However if this is done, the TRIM menu will not
expand to allow adjustment of the slave camera (if hot plugging to set master / slave configuration)
or allow adjustment of the single camera (if hot un-plugging to set stand alone configuration).
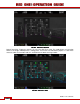
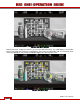
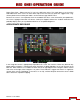
After connecting the cameras together, power them both up. After they have booted, the UI will display a
blinking "M" and "S" respectively on the Master and Slave camera. Once the communications link is es-
tablished and verified the "M" and "S" icons will stop blinking.
NOTE: The communication link may take a while to connect between the 2 cameras and in some
instances, the cameras may need to be powered off and back on while connected more than once
to establish communication.
Additional items:
• The USB cable can be “Hot Plugged” and takes up to 10 seconds to establish communication (indi-
cated by blinking “M” and “S”). However if this is done, the TRIM menu will not expand to allow ad-
justment of the slave camera (if hot plugging to set master / slave configuration) or allow adjustment of
the single camera (if hot un-plugging to set stand alone configuration).
• To reverse the master / slave relationship, reverse the USB cable physical connection.
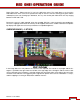
JAM SYNC
Interconnecting the Master and Slave cameras via USB cable does NOT sync timecode between the
cameras. DO NOT interconnect the Master and Slave camera with a 5-pin LEMO timecode cable in order
to JAM SYNC the timecode of the Slave Camera to the Master camera. Such a configuration will led to
timecode errors between the cameras. The correct configuration for JAM SYNC is to supply each camera
an external SMPTE analog timecode source and then enable JAM SYNC for each camera.