BCDC Mounting Bracket Suitable For Toyota Landcruiser 200 200 Series (11/2008 - On) BCDCMB-001
THE BCDC MOUNTING BRACKET The REDARC BCDC Mounting Bracket is designed to install your BCDC in the cool airflow at the front of your vehicle, away from high temperature areas for maximum performance. The BCDC Mounting Bracket is constructed from durable stainless steel and has been designed to fit existing mounting points in your vehicle for ease of installation.
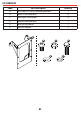
KIT CONTENTS Code A B C D E F Part Description BCDCMB-001 BCDC Mounting Bracket M6x12 Pan Head Bolt M6 Nylon Locking Nut M6x20 Hex Head Bolt M6 Spring Washer M6 Flat Washer Quantity 1 4 5 1 1 2 A B C E 2 D F
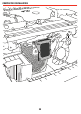
COMPLETED INSTALLATION 3
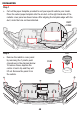
INSTALLATION Step 1 • Cut out the paper template provided to suit your specific vehicle year model. Place the cutout paper template into the air duct on the right hand side of the radiator cover panel as shown below. After aligning the template edge with the duct, mark the hole centres indicated. DUCT EDGE LIFT Step 2 • Remove the radiator cover panel by removing the 7 plastic push clips shown in the diagram below. To remove these, depress the center of each clip and they will lift out.
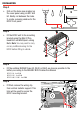
INSTALLATION Step 3 • Drill out the holes now marked on the cover panel using an M12 drill bit. Neatly cut between the holes to create a viewing window for the BCDC front panel. Step 4 • Fit the BCDC unit to the mounting bracket using the M6x12 Pan Head Bolt and M6 Nylon Locking Nuts. Note: You may want to carry out any additional wiring for the BCDC before fitting to vehicle.
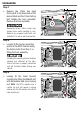
INSTALLATION Step 7 • Remove the 10mm hex head factory bolt to the driver side of the bonnet latch and the 12mm factory bolt holding the horn assembly. Remove the horn assembly. Removing factory fitted screws may expose bare metal resulting in rust. Retouch any exposed metal with rust inhibitor if it is not an earth connection. Step 8 • Loosely fit the top two mounting points of the BCDC bracket using the factory bolts from Step 7, refitting the horn assembly.
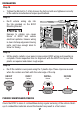
INSTALLATION Step 10 • Tighten the M6 bolt to 7.5 Nm. Ensure the factory bolts are tightened correctly to the vehicle manufacturers torque specifications. Step 11 • Re-fit vehicle wiring clip into the tab provided on the BCDC Mounting Bracket. Damage to cabling can cause failure of BCDC and vehicle electrical systems. Ensure wiring is clear of sharp edges and moving parts, and have enough slack to allow for flexing.
NOTES 8
NOTES 9
TWO YEAR PRODUCT WARRANTY Over the last three decades our company has established a reputation as the power conversion specialist. A 100% Australian-owned company, we have met the needs of customers in transport and other industries through exciting, innovative thinking.
Free technical assistance! For product and technical support contact your regional distributor, call our head office between 8:00am to 5:30pm Australian Central Standard Time, Monday to Friday or send an email using the regional specific details outlined below. Australia (and other Global regions) power@redarc.com.au www.redarc.com.au +61 8 8322 4848 New Zealand power@redarcelectronics.co.nz www.redarcelectronics.co.nz +64-9-222-1024 North America power@redarcelectronics.com www.redarcelectronics.