Man-Portal-Axle-Upgrade-Kit- pd£ 11/11/18 MAN-PORTAL-AXLE-UPGRADE-KIT-18-11-13 •Link to the most recent version of this manual with exploded views and parts lists: www.redcatracing.com/manuals/MAN-PORTAL-AXLE-UPGRADE-KIT.pdf •For a video demonstration on how to install the Portal Axle Upgrade Kit and Slipper Clutch visit: www.RedcatRacing.
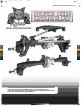
Parts Included Front portal axle assembled with servo plate installed. Rear portal axle, assembled.
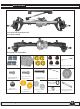
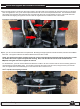
Portal Axle Upgrade Kit Installation Instructions 1) Using your stock Everest Gen 7 Sport or Pro model, start by removing the wheels and tires as well as the body. Once that is complete, we’ll start with the front end. 2) The first step will be to start removing the front axle assembly. Remove the screws and nuts that secure the upper and lower links and shocks to the axle housing. You’ll need to remove the screw pin that secures the drive shaft to the input shaft.
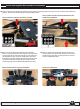
Installation Portal Axle Upgrade Instructions Kit Installation Instructions 5) The next step will be to change the position of the bumper mount to clear the new portal axle servo plate. If you haven’t moved your bumper mount before, it should be in the stock position. This is the position you will need to move it to: This is the stock location: 6) Now, we can start the process of installing the front portal axle.
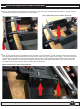
Installation Portal Axle Upgrade Instructions Kit Installation Instructions 7) The next step will be to connect the drive shaft coupler to the input shaft on the portal axle by using the screw pin you removed from the original axle. Now, you’ll need to adjust the direction the curves in the suspension links face. This will ensure all links will properly clear the frame rails and drive shaft. All 3 links will need to be curved outward, as shown.
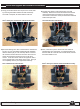
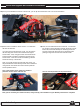
Installation Portal Axle Upgrade Instructions Kit Installation Instructions 9) Now, let’s move on to the rear of the vehicle. 10) Go ahead and remove the screws and nuts that secure the upper and lower links and shocks to the axle housing, as well as the screw pin that secures the drive shaft to the input shaft. The end result will look like this: Here’s what you should be starting with: 11) Next, unbolt the top of the shocks from the chassis to separate them from the vehicle.
Installation Portal Axle Upgrade Instructions Kit Installation Instructions 13) Now is a good time to change the chassis mounting position of the upper links. Currently, they are mounted in the low/forward position. We recommend starting with the upper/middle position. Here is where the links need to be mounted for the portal axles instillation: Here is where the links are most likely mounted: 14) Now, you can go ahead and install the rear portal axle.
Installation Portal Axle Upgrade Instructions Kit Installation Instructions 16) Once you’ve installed the bottoms of the shocks, you can flip the vehicle back over to its correct orientation. Your vehicle should now look like this: 17) Now it’s time to install the shock mounts. Let’s start with the rear end this time. If you are using the tilt rear body mount, you can remove the rear body post mount from in between the original shock towers.
Slipper Clutch PORTAL KIT SLIPPER CLUTCH INFO The Redcat Portal Axle Kit includes a slipper clutch upgrade, with gearing change, intended for the Everest Gen7. This is an optional upgrade. Because of the additional gear reduction present in the portal axles, without a gearing change, the Everest Gen7’s top speed will be reduced by about 50%. When properly installed and adjusted, the slipper clutch will prevent drive-train damage, and should return the top speed of the vehicle to the stock levels.
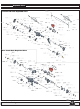
Exploded View Front Portal Axle Exploded View Rear Portal Axle Exploded View Redcat Racing 10
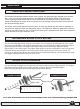
Parts List RER11339-Portal Center Gearbox Housing RER11335-Caster Mounts (L/R) RER11348-Front Portal CVA Shafts w/Couplers RER11349-Rear Portal Axle Shafts RER11351-Steering Link (105mm) RER11347-Portal Axle Spool (1pc) RER11346-Differential Cover (1pc) RER11420 -Shaft for 17T Gear RER11421-Shaft for 11T Gear (2pcs) RER11362-Portal Axle Ring Gear (32T) (2PCS) RER11366-Front Portal CVA Input Gears w/Pins (2*12) RER11356-Metal Slipper Plate (2pcs) RER11357-Slipper Pads (2pcs) RER11367-12*18*4mm
Parts List RER11362-Portal Axle Ring Gear (32T) (2PCS) RER11420 -Shaft for 17T Gear RER11421-Shaft for 11T Gear (2pcs) RER11363-Portal Axle Pinion RER11364-Portal Axle Output RER11365-Rear Portal Axle Gear (17T) (2pcs) Gear (11T) (2pcs) Input Gear (8T) (2pcs) RER11356-Metal Slipper Plate (2pcs) RER11357-Slipper Pads (2pcs) RER11366-Front Portal CVA Input Gears w/Pins (2*12) 11177-Brass Motor Pinion Gear (17T) (0.
Parts List RER11465 - Spur Gear for Slipper 50T RER11466 - Top Shaft For Slipper RER11470 - 47mm Links RER11471 - Spacer For Slipper Clutch RER11467 - Chassis Mounted Servo Plate RER11468 - Shock Mounts RER11469 - 3*23mm Button Head Screw (8pcs) Optional Parts List RER11407-Aluminum RER11405-Aluminum Portal RER11406-Aluminum Front Outer Portal Housing Set (L/R) Rear Outer Portal Housing Center Gearbox Housing Set Redcat Racing 13 RER11408-Aluminum Caster Mounts (L/R) RER11414-Aluminum Lower Lin
1 Man-Portal-Axle-Upgrade-Kit- pd£ 11/11/18 www.redcatracing.con, Follow us on social media Take a photo, create a video, post and share your Redcat experience. Stay up to date on the latest Redcat news, products, and creative content. While these profiles are not customer service channels, you might find that one of our subject experts or another member of the community is able to assist you.