
Installation Guide


RDQCI5285 Rev. 0 Page 9 Cered 06/01/2016
RDQCI5285 Rev 0 Page 9 Cered 06/17/2016
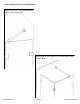
A Support Bar was included w/ your package, we recommend it be installed to make the enclosure
rigid. Please see the various mounting configurations and choose one that best suits your shower
enclosure arrangement. First, loosen the screw on top of the Panel Mount just enough so that it is
able to swivel, then place the Support Bar Panel Mount onto the Return Panel Glass within 6” of the
door opening. Temporarily tighten set-screw to keep in place. Place the Support Bar in a Wall
Mount or a second Panel Mount. Temporarily tighten set screws to hold it in place. Hold up the Wall
Mount/Panel Mount (with bar attached) within 6” of the end of the Panel (about where it will be in-
stalled). Mark on the support bar where the bar meets the opening of the Panel Mount.
NOTE: If Support Bar is too long to hold up while trying to mark it, it can be trimmed down. When
trimming the bar make sure it is at least 6” longer than what you think you will need.
Add 1/2” to this mark and cut the support bar. Note: It is better to have the bar longer rather than
shorter because it can always be trimmed down.
Now place the Support Bar into the Panel Mount and tighten set screws. Place the Wall Mount on
one end and the Panel Mount on the other end. The position of the bar can be readjusted by rotat-
ing the panel mounts, moving the Panel Mounts on the Panel, or by trimming the support bar as
long as ALL Panel Mounts are within 6” of the end of the panel. Find where the Wall Mount is flat
against the wall, make sure it is level, then mark its location. Once marked, take down support bar.
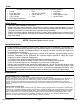
If possible, locate the Wall Mount such that measuring 9/16” in from the panel side of the mark
lands the mounting screw on a wall stud (see illustration). Measure 9/16” toward the inside of the
shower from the panel side of the trace; drill a
3/16” diameter hole approximately 1-1/2” deep
at this location (see illustration). Insert a Wall
Anchor into this hole.
NOTE: This must be done before the Support
Bar installation.
Carefully cut the head off the Wall Anchor with
a razor blade. Fasten the Bushing to the wall
using the screw provided (see illustration).
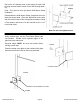
Place the Wall Mount over the Bushing such
that the Wall Mount surface is flush to the
wall. Holding the Mount to the wall, slide the
support bar into the Wall Mount and tighten all
set screws. Then place in panel mount and
readjust the angle and position. Tighten all set
screws
Panel to Wall at 45° shown