redi DOO R DOO R ® ® INSTALLATION INSTRUCTIONS tile redi ® ® TM TM RediScreen SwingTM . . .
Tools: To install your New Shower Enclosure, you may need the following: Drill Pencil Hack Saw 1/8” & 3/16” Drill Bit Low Tack Tape Caulk Gun Center Punch Tape Measure Clear Silicone Caulk Files 4’ & 6’ Levels Suction Cups #2 Phillips Screwdriver Safety Notes: This unit is best installed by two people. Handle the glass panels carefully and protect the edges.
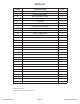
PARTS LIST ITEM 1 2 3 4 5 6 7 8 9 10 11 DESCRIPTION GLASS DOOR PANEL FIXED GLASS PANEL WALL MOUNT CLAMP GLASS TO GLASS HINGE U-CHANNEL PULL VINYL BOTTOM SWEEP #8 X 1 1/2 TRUSS HEAD SCREW PLASTIC WALL ANCHOR 1/8 SETTING BLOCK SUPPORT BAR QTY. 1 1 1 2 1 1 1 4 4 1 1 *Quantities may vary. **Support bar only included if necessary. RDQCI5285 Rev.
EXPLODED VIEW RDQCI5285 Rev.
If a continuous unit centerline does not exist from the original measuring process, it will be necessary to create one. Referencing the Measuring Guide included with this unit, lightly mark a continuous unit centerline on the threshold. Next, mark a continuous unit centerline up each wall, starting where the threshold centerline meets the wall. Use a level to ensure the wall centerline is plumb and straight. The wall centerlines should be a minimum of the unit height from the threshold.
* Remove u-channels from the hardware box and countersink holes in the u-channels. Each piece of u-channel requires a minimum of two (2) screws, 3” from each end for lengths less than 18”. Lengths 18” or greater also require screws approximately every 18”-24. Each piece of u-channel is cut to length and mitered as necessary. Position each piece of u-channel along the threshold centerline and use low-tack tape to hold in place.
Insert a small amount of silicon into each drilled hole, then insert a wall anchor into each hole. (Note: Drill hole, then insert a wall anchor.) This must be done just before u-channel installation. Carefully cut the heads off the wall anchors with a razor blade. Place the U-Channel in correct position and secure it with #8 x 1-1/2” truss head screws. WALL ANCHORS lic Si e on ho ld / S resho ase wer b Th Note: Do not over tighten screws.
Drill one 3/16” diameter hole at the mark just made. Drill through tile and backer board. Do not drill through blocking. Note: This must be done just before Wall Mount Clamp installation. Disassemble the Wall Mount Clamp, and place the cover plate and screw aside. Place the Wall Mount on the wall, with the finished side of the clamp plate toward the inside of the shower, and secure it to the wall with a #8 x 1-1/2” truss head screw. Note: Do not over tighten screw.
A Support Bar was included w/ your package, we recommend it be installed to make the enclosure rigid. Please see the various mounting configurations and choose one that best suits your shower enclosure arrangement. First, loosen the screw on top of the Panel Mount just enough so that it is able to swivel, then place the Support Bar Panel Mount onto the Return Panel Glass within 6” of the door opening. Temporarily tighten set-screw to keep in place.
Other Configurations for the Support Bar: Panel to Wall at 45° using a Panel Mount and an angled Wall Mount: Panel to Wall at 180° using a Panel Mount and a Regular Wall Mount: RDQCI5285 Rev 0 RDQCI5285 Rev.
Using alcohol pads, wipe down the hinge notches and notch gasket areas on both sides of the Fixed Panel Glass and the Door Panel Glass. Allow glass to dry before continuing. Remove the back plates from both Glass to Glass Hinges. Place a gasket on the Hinge and place the fixed part of hinge onto the Fixed Panel Glass. Note: The Hinge with the logo must be the top Hinge. NOTE: Your hinges may differ in external shape than what’s shown. However, installation procedures are the same.
Place the Drip Vinyl onto the bottom of the door panel. Line it up on the hinge side of the door and cut it off flush with the strike edge of the door. NOTE: The sweep may be pulled up or down on the glass to adjust how much of the sweep contacts the threshold TIP: Run a small bead of silicone on the inside edge of the drip vinyl and the glass to secure the vinyl sweep and prevent water from collecting inside the sweep if adjusted.
Appendix — A Notch Panel If your unit has been purchased with a notch panel option, two additional pre-cut pieces of u-channel will be provided. These two pieces of u-channel will be mitered and cut to size based on the opening dimensions provided with your order. Please follow the same instructions provided for mounting threshold and wall u-channels, to mount the notch panel u-channels. Below are illustrations to clarify the mounting orientations. RDQCI5285 Rev 0 RDQCI5285 Rev.
Installing Handles: Assemble parts as shown. Screw washers, end plates, and gaskets into one side of the handle through the glass. Then align the other side of the handle onto the bushing and tighten the set screws. RDQCI5285 Rev 0 RDQCI5285 Rev.
Installing Towel Bars: Assemble parts as shown. Screw the threaded back plate or screw into the towel bar holding the washers, end plates, and gaskets in place. Align other side of towel bar on opposite side of glass and tighten set screws RDQCI5285 Rev 0 RDQCI5285 Rev.
Installing Combination Towel Bars with Handle: Assemble parts as shown. Screw washers, end plates, and gaskets into the towel bar through the glass using either a screw or the threaded back plate. Then align the handle on the other side of the glass. Tighten the set screws to hold the handle in place. RDQCI5285 Rev 0 RDQCI5285 Rev.
Installing Knobs: Assemble parts as shown. Tighten each side of the knob onto the stud or tighten one side with screw and place other side of the knob on opposite side of glass and tighten with set screws. RDQCI5285 Rev 0 RDQCI5285 Rev.
Tile Ready® Brand Shower Pan Installation Addendum SPECIAL INSTRUCTIONS FOR REDI DOOR® ENCLOSURE INSTALLATIONS WITH TILE READY® BRAND SHOWER PANS Designated screw pack for Tile Ready® Brand Shower Pans: For Redi Door® enclosure installations with a Tile Ready® brand shower pan, a special screw pack containing eight (8) #8x¾” pan-head screws is included with your door. These #8x¾”screws replace curb screws included in the main hardware package, and their use is mandatory.