
Installation Guide


RDQCI5285 Rev. 0 Page 11 Cered 06/01/2016
RDQCI5285 Rev 0 Page 11 Cered 06/17/2016
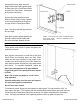
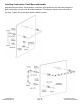
Using alcohol pads, wipe down the
hinge notches and notch gasket areas
on both sides of the Fixed Panel Glass
and the Door Panel Glass. Allow glass
to dry before continuing.
Remove the back plates from both
Glass to Glass Hinges. Place a gasket
on the Hinge and place the fixed part
of hinge onto the Fixed Panel Glass.
Note: The Hinge with the logo must be
the top Hinge.
Next, place another gasket against the
glass and attach the back plate with
the screw provided. Repeat on both
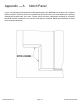
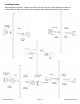
Place two 7/16” shims on the curb or threshold.
These shims must remain in place throughout the
installation process.
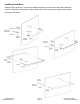
Next, position one person on each side of the Door
Panel Glass and carefully place the Door Panel
Glass over the hinge notches. As the person to the
outside of the door holds the Door Panel Glass, the
other person installs the gaskets, hinge back plates
and screws. To complete installation, repeat the
Note: The screws may begin to “creak” when
fully tightened.
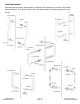
Carefully and slowly close the door and inspect
the door panel gaps for interference.
Do not force door closed.
If interference exists, hinges can be loosened to adjust gaps. The gap should be 3/16” on
each side of the door, 7/16” between the door and threshold at the highest point with the Door
Panel Glass and Fixed Panel Glass flush at the top. Re-tighten all screws after final adjust-
ment. If a hinge is scratched in the tightening process, touch up paint may be used.
7/16” SHIMS
NOTE: Your hinges may differ in external shape
than what’s shown. However, installation proce-
dures are the same.
Note: Use setting blocks to fill gaps between
hinges and glass. Fixed panels and door should
be flush