
How to Guide
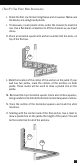

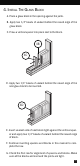
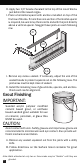


Table Of Contents

23
H. Apply two 1/4” beads of sealant to the top of the row of blocks
just behind the raised edges.
I. Place a horizontal spacer with anchors installed on top of the
first row of blocks. If more than one section of horizontal spacer
is required, be sure to lay them end to end with the joint directly
above a vertical spacer. Stagger these joints on each following
row.
J. Remove any excess sealant. If necessary, adjust the size of the
sealant beads to prevent squeeze out on the following rows. The
joint areas must be kept clean of sealant.
K. Install the remaining rows of glass blocks, spacers, and anchors.
Check each row for alignment.
Note: Walls attached at only two or three sides may be “exible” until they are
grouted.
4 I
4 H
4 G
Grout Finishing
IMPORTANT:
Sanded acrylic polymer modified
cement based grout, or urethane
based sanded grout suitable for use
on ceramic, porcelain, or glass tiles
MUST be used.
CAUTION:
Avoid contact with skin. Safety glasses and impervious gloves are
recommended to minimize skin and eye contact. Also provide suf-
ficient mechanical ventilation.
B. Follow directions on the Surface Grout container for grout
application.
A. Remove any sealant squeezed out from the joints with a utility
knife.