
How-To Guide


● Repeat the operation until the application notifies you that the configuration has been
successful.
Note :
It is important to hit the center of the area in a natural and consistent way (do
not change the grip of the drumstick or the hitting area or the angles of the wrists
during configuration).
● Return to the previous screen to add more items to your drum kit.
You can add several items, but remember to respect the rules for the play area we
saw above: the larger your drum kit is, the more space you will need to use it
optimally.
● You can also watch this video, which summarizes the different steps of configuring a
drum kit with Senstroke:
5.2 - Configuring the elements with the feet
● Bass Drum Pedal: The bass drum pedal is very easy to configure: press the element,
then configure, and you're done !
● Hi-hat pedal : You will need to configure both positions of the hi-hat pedal: closed
and open position. This step is important in order to be able to modify the opening of
your hi-hat thanks to the inclination of your foot with the ground.
● Press the hi-hat pedal of the drumkit, then press configure.
● The closed position corresponds to the closed position of the hi-hat. Keep your foot
on the ground for this step without moving for a few seconds.
● Once the closed position is validated on the screen, put your foot in the " hi-hat open
" position for a few seconds, which will finish configuring the hi-hat pedal. To do this,
simply create with your foot an angle corresponding to the angle that your foot would
form on the hi-hat pedal if you had to release the cymbals.
● Hold the position for a few seconds. The application will confirm the correct
configuration.
Note :
The "semi-open" position of the hi-hat (when the cymbals barely touch each other) is
calculated automatically.
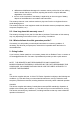
5.3 - Examples of well-configured play areas
[minti_image img="16486"][vc_column_text]These different zones, well spaced, allow the
optimal configuration of a kit without any risk of error.[/vc_column_text][minti_image
img="16487"][vc_column_text]This configuration of play areas is also functional: the
elements are not vertically aligned.[/vc_column_text][minti_image
img="16498"][vc_column_text]This configuration is perfect: with a silent drumkit, it is very
easy to reproduce the layout of an acoustic kit.
On the other hand, here are some examples of play areas that can cause problems with the
sensors :[/vc_column_text][minti_image img="16488"][vc_column_text]In this configuration,
the two central zones are aligned vertically, which can cause problems when playing with the
sensors.
Indeed, the angle formed by your wrists will be the same between the central zone and the
central zone located on top.