848-B5B-93A0 (803) OWNER / OPERATOR MANUAL MODE D’EMPLOI MANUAL DE INSTRUCCIONES BRUSHCUTTERS DEBROUSSAILLEUSE DESBROZADOR BCZ2610S BCZ2610SU BCZ2610S-CA BCZ2610SU-CA BCZ2610SW BCZ2610SW-CA BCZ2610S BCZ2610SU BCZ2610SW BCZ2610S-CA BCZ2610SU-CA BCZ2610SW-CA WARNING AVERTISSEMENT ADVERTENCIA The engine exhaust from this product contains chemicals known to the State of California to cause cancer, birth defects or other reproductive harm.
English SAFETY FIRST Instructions contained in warnings within this manual marked with a symbol concern critical points which must be taken into consideration to prevent possible serious bodily injury, and for this reason you are requested to read all such instructions carefully and follow them without fail. ■ WARNINGS IN THE MANUAL WARNING This mark indicates instructions which must be followed in order to prevent accidents which could lead to serious bodily injury or death.
Français Español SECURITE LA SEGURIDAD PRIMERO Les instructions contenues dans les mises en garde de ce mode d’emploi portant le symbole concernent les points critiques qui doivent être pris en considération pour éviter les blessures corporelles graves, c’est pourquoi ces précautions doivent être rigoureusement suivies.
English 1. Parts location 1. 2. 3. 4. 5. 6. 7. 8. 9. 10. 11. 12. 13. 14. 15. 16. 17. 18. BCZ2610S BCZ2610SU BCZ2610S-CA BCZ2610SU-CA 16 15 14 BCZ2610SW BCZ2610SW-CA 6 3 11 3 18 5 2 2 4 13 12 Loop handle Shoulder strap hanger Ignition switch Throttle cable Throttle lever Throttle set button Drive shaft housing Debris guard Cutting line head Gear case Spark arrester Starter knob Fuel tank Primer pump Choke lever Air cleaner cover Handle Protector 1 5 17 4 6 7 7 10 10 9 2.
Français 1. Emplacement des pieces 1. 2. 3. 4. 5. 6. 7. 8. 9. 10. 11. 12. 13. 14. 15. 16. 17. 18. Poignée Fixation du harnais Bouton d’allumage Câble d’accélérateur Levier d’accélération Manette des gaz Tube de l’arbre d’entraînement Cache de protection Tête avec fil de coupe Boîtier du renvoi d’angle Pare-étincelles du silencieux Poignée de démarrage Réservoir de carburant Pompe d’amorçage Levier de starter Capot du filtre à air Poignée Protecteur 2. Fiche technique Español 1.
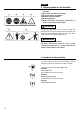
English 3. Warning labels on the machine (1) (2) (3) (4) (1) Read owner's manual before operating this machine. (2) Wear head, eye and ear protection. (3) Warning! Danger of kickback. (4) Beware of thrown objects.
Français Español 3. Etiquettes d’avertissement sur la machine 3. Etiqueta de advertencia en la máquina (1) Lire le mode d’emploi avant d’utiliser cette machine. (2) Porter un casque de sécurité, des lunettes de sécurité et un casque antibruit. (3) Avertissement! Phénomène de rebond dangereux. (4) Attention aux objets qui volent ou ricochent. (5) Avertissement/Attention (6) Interdire aux enfants ou à toute personne de s’approcher dans un rayon de 15 mètres de la débroussailleuse.
English 5. For safe operation 1. Read this manual carefully until you completely understand and follow all safety and operating instructions. 2. Keep this manual handy so that you may refer to it later whenever any questions arise. Also note, if you have any questions which cannot be answered herein, contact the dealer from whom you purchased the product. 3. Always be sure to include this manual when selling, lending, or otherwise transferring the ownership of this product. 4.
Français 5. Consignes de securite Español 5. Instrucciones de seguridad 1. Lire ce manuel attentivement jusqu’à une compréhension totale et suivre toutes les instructions de sécurité et d’utilisation. 2. Conserver ce mode d’emploi à portée de la main pour le consulter au moindre doute. Si une question reste sans réponse, contacter le revendeur. 3. Ne pas oublier de donner le manuel avec la machine en cas de revente ou de prêt. 4.
English 5. For safe operation other times when weather conditions might make it unsafe to use the product. ■ WORKING PLAN 1. You should never use the product when under the influence of alcohol, when suffering from exhaustion or lack of sleep, when suffering from drowsiness as a result of having taken cold medicine or at any other time when a possibility exists that your judgment might be impaired or that you might not be able to operate the product properly and in a safe manner. 2.
Français 5. Consignes de securite Español 5. Instrucciones de seguridad c. Pendant les averses, les orages avec éclairs, par grands vents ou toute autre condition climatique rendant l’utilisation de la machine dangereuse. otra circunstancia en que las condiciones climáticas puedan hacer inseguro el uso del producto. ■ PLAN DE TRAVAIL 1.
English 5. For safe operation IMPORTANT Remove any obstacle before beginning work. 3. Inspect the entire unit for loose fasteners and fuel leakage. Make sure that the cutting attachment is properly installed and securely fastened. 4. Be sure the debris guard is firmly attached in place. 5. If the cutting head is the metal blade, change the guard and handle, and attach the shoulder strap (see p42).
Français Español 5. Consignes de securite 5. Instrucciones de seguridad IMPORTANT IMPORTANTE Retirer tout obstacle avant de commencer le travail. Quite todos los obstáculos antes de iniciar el trabajo. 3. Vérifier que la machine ne comporte aucun élément desserré ou de fuite de carburant. S’assurer que l’outil de coupe est monté correctement et bien serré. 4. S'assurer que le cache de protection anti-débris est fermement attaché. 5.
English 5. For safe operation 1. Grip the handles firmly with both hands using your whole hand. Place your feet slightly apart (slightly further apart than the width of your shoulders) so that your weight is distributed evenly across both legs, and always be sure to maintain a steady, even posture while working. 2. Keep cutting attachment below waist level. 3. Maintain the speed of the engine at the level required to perform cutting work, and never raise the speed of the engine above the level necessary.
Français 5. Consignes de securite Español 5. Instrucciones de seguridad deux mains. Ecarter légèrement les jambes (pour que les pieds reposent sur une largeur un peu plus importante que celle des épaules) et avoir une posture de travail stable et répartir le poids du corps également sur chaque jambe. 2. Maintenir l’outil de coupe toujours plus bas que le niveau de la taille. 3. Faire tourner le moteur à la vitesse appropriée à la coupe sans jamais accélérer inutilement au dessus du niveau nécessaire. 4.
English 5. For safe operation manual must be performed, please contact a representative from the store nearest RedMax authorized servicing dealer for assistance. 5. Do not use any accessory or attachment other than those bearing the RedMax mark and recommended for the unit. 6. Under no circumstances should you ever take apart the product or alter it in any way. Doing so might result in the product becoming damaged during operation or the product becoming unable to operate properly. ■ HANDLING FUEL 1.
Français 5. Consignes de securite Español 5. Instrucciones de seguridad 5. Ne pas utiliser d’accessoires ou d’outils de marque autres que RedMax ou non agréés. 6. Ne jamais démonter ou modifier la machine, quelles que soient les circonstances. Dans le cas contraire, la machine risque d’être endommagée en cours d’utilisation ou de ne pas fonctionner correctement. reparación no descrito en este manual, tome contacto con un representante del centro de servicio RedMax autorizado más cercano. 5.
English 6. Set up ■ INSTALLING HANDLE • Mount the handle to the shaft tube and clamp it at a location that is comfortable to you. (SE1) SE1 (1) [BCZ2610S] [BCZ2610SU] [BCZ2610S-CA] [BCZ2610SU-CA] (1) About 19 inches (48cm) (2) About 14.5 inches (37cm) [BCZ2610SW] [BCZ2610SW-CA] SE2 SE3 ■ INSTALLING DEBRIS GUARD • Put the debris guard on the gear box, attach it with the screws and hardware provided. (SE2) ■ INSTALLING CUTTING HEAD (SE3) 1.
Français Español 6. Assemblage 6. Montaje ■ MISE EN PLACE DE LA POIGNEE • Monter la poignée sur le bras de l'appareil et la positionner pour avoir une prise confortable et sûre (SE1). ■ INSTALACIÓN DEL MANGO • Instale el mango en el tubo del eje y asegúrelo en la posición que le sea más cómoda.
English 7. Fuel WARNING • Gasoline is very flammable. Avoid smoking or bringing any flame or sparks near fuel. Make sure to stop the engine and allow it cool before refueling the unit. Select outdoor bare ground for fueling and move at least 3m (10ft) away from the fueling point before starting the engine. • The RedMax engines are lubricated by oil specially formulated for air-cooled 2-cycle gasoline engine use.
Français Español 7. Carburant 7. Combustible AVERTISSEMENT ADVERTENCIA • L’essence est un produit hautement inflammable. S’abstenir de fumer et ne tolérer aucun flamme ou source d’étincelles à proximité de l’endroit où est entreposée l’essence. Arrêter le moteur puis le laisser refroidir un peu avant de remplir le réservoir. Remplir le réservoir à l’extérieur sur une surface nue et éloigner le bidon d’essence d’au moins 3 mètres avant de mettre le moteur de la tronçonneuse en marche.
English 7. Fuel ■ HOW TO MIX FUEL IMPORTANT Agitate carefully. 1. Measure out the quantities of gasoline and oil to be mixed. 2. Put some of the gasoline into a clean, approved fuel container. 3. Pour in all of the oil and agitate well. 4. Pour In the rest of gasoline and agitate again for at least one minute. As some oils may be difficult to agitate depending on oil ingredients, sufficient agitation is necessary for the engine to last long.
Français Español 7. Carburant 7. Combustible participer ainsi à la protection de l’environnement et de votre santé. • De l’essence ou de l’huile de basse qualité risque d’endommager les joints, les conduites d’essence ou le réservoir d’essence du moteur. • Gasolinas o aceites de mala calidad puede dañar los anillos de sellado, las líneas o el tanque de combustible del motor. ■ COMMENT OBTENIR UN BON MELANGE ■ COMO MEZCLAR EL COMBUSTIBLE IMPORTANT IMPORTANTE Agiter avec précautions.
English 7. Fuel cause severe damage to the internal engine parts very quickly. 2. GASOHOL – It can cause deterioration of rubber and/or plastic parts and disruption of engine lubrication. 3. OIL FOR 4-CYCLE ENGINE USE – It can cause spark plug fouling, exhaust port blocking, or piston ring sticking. 4. Mixed fuels which have been left unused for a period of one month or more may clog the carburetor and result in the engine failing to operate properly. 5.
Français Español 7. Carburant 7. Combustible 1. ESSENCE SANS HUILE (ESSENCE PURE) – L’essence pure est capable d’endommager très rapidement les pièces du moteur. 2. ESSENCE-ALCOOL – Ce mélange risque de très rapidement détruire les pièces en caoutchouc et/ou en plastique et d’empêcher la lubrification du moteur. 3. HUILE POUR MOTEURS 4 TEMPS – Elles risquent d’encrasser les bougies, de bloquer l’échappement ou d’endommager les segments des pistons. 4.
English 8. Operation ■ STARTING ENGINE OP1 WARNING The cutting head will start rotating upon the engine starts. OP2 (1) (2) (3) OP3 1. Rest the unit on a flat, firm place. Keep the cutting head off the ground and clear of surrounding objects as it will start rotating upon starting of the engine. 2. Push the primer pump several times until overflown fuel flows out in the clear tube. (OP1) 3. Move the choke lever to the closed position. (OP2) 4. Set the ignition switch to the “Start” position.
Français Español 8. Fonctionnement 8. Uso ■ MISE EN MARCHE DU MOTEUR ■ ARRANQUE DEL MOTOR AVERTISSEMENT ADVERTENCIA Faire attention que la lame de coupe se mette à tourner dès que le moteur démarre. Tenga presente que el cabezal cortador comenzará a girar cuando el motor sea arrancado. 1. Poser la machine dans un endroit plat et ferme. Ne pas poser la tête de coupe sur le sol et dégager tout objet pouvant être projeté par la lame qui se met à tourner dès que le moteur démarre. 2.
English 8. Operation ■ STOPPING ENGINE (OP3) 1. Release the throttle lever and run the engine for a half minute. 2. Shift the ignition switch to the STOP position. IMPORTANT OP5 • Except for an emergency, avoid stopping the engine while pulling the throttle lever. .04 in (1~2mm) ■ ADJUSTING THROTTLE CABLE • The normal play is 1 or 2mm when measured at the carburetor side end. Readjust with the cable adjuster as required. (OP5) (1) (1) cable adjuster OP6 (1) ■ ADJUSTING IDLING SPEED (OP6) 1.
Français Español 8. Fonctionnement 8. Uso ■ ARRET DU MOTEUR (OP3) 1. Relâcher la manette d’accélérateur et laisser tourner le moteur pendant encore 30 secondes. 2. Placer le bouton de contact sur “(Arrêt) O”. (OP3) ■ CÓMO PARAR EL MOTOR (OP3) 1. Libere la palanca del acelerador y mantenga el motor en marcha durante medio minuto. 2. Mueva el interruptor de encendido a la posición “(parar) O”. (OP3) IMPORTANT • Sauf en cas d’urgence, ne jamais couper le contact lorsqu’on accélére.
English 8. Operation OP7 1. Hold the unit so the head is off the ground and is tilted about 20 degrees toward the sweep direction. (OP7) 2. You can avoid thrown debris by sweeping from your left to the right. 3. Use a slow, deliberate action to cut heavy growth. The rate of cutting motion will depend on the material being cut. Heavy growth will require slower action than will light growth. 4. Never swing the unit so hard as you are in danger of losing your balance or control of the unit. 5.
Français Español 8. Fonctionnement 8. Uso 1. Tenir la machine de manière à ce que la tête de coupe à fil ne touche pas le sol et qu’elle soit inclinée à environ 20° en direction du balayage. (OP7) 2. Il est possible d’éviter de recevoir des projections de débris en balayant toujours de gauche à droite. 3. Lors de la coupe d’herbe épaisse, ralentir délibérément la progression. La rapidité de coupe dépend de la nature de l’objet de la coupe.
English 9. Maintenance Maintenance, replacement, or repair of the emission control device and systems may be performed by any non-road engine repair establishment or individual. ENGINE ■ MAINTENANCE CHART system/compornent procedure fuel leaks, fuel spillage fuel tank, air filter, fuel filter wipe out inspect/clean see ■ADJUSTING IDLING SPEED (p.
Français 9. Entretien L’entretien, le remplacement ou la réparation du dispositif et des systèmes de lutte contre les émissions peuvent être effectués par toute société ou individu spécialisé dans la réparation des moteurs hors-route.
English 9. Maintenance ■ REFILLING TRIMMING LINE (MA1) 1. For replacement line, use a diameter of .095in (2.4mm). The spool is capable for a line upto 20ft (6m) on the 4” head. Avoid using a larger line as it may cut down the trimming performance. MA1 WARNING For safety reasons, do not use metalreinforced line. 2. Pinch the slotted area on the both sides of the spool housing to unhook the bottom cap. 3. Take out the spool and pull off the old line. Fold new line so that one half line is 4.7in.
Français Español 9. Entretien 9. Mantenimiento ■ REMPLACEMENT DU FIL DE COUPE (MA1) 1. Pour le renouvellement, utiliser du fil de 2.4 mm de diamètre. La tête de 4’’ de diamètre peut contenir jusqu'à 6m de fil. Eviter d’utiliser un fil plus gros car cela risque de diminuer les performances de coupe. ■ RELLENADO DE LA LÍNEA DE DESBROCE (MA1) 1. Para la línea de reemplazo, utilice un diámetro de 0,095pulgadas (2,4mm). La bobina es apta para una línea de hasta 20pies (6m) en la cabeza de 4pulgadas.
English 9. Maintenance ■ SPARK PLUG • Starting failure and mis-firing are often caused by a fouled spark plug. Clean the spark plug and check that the plug gap is in the correct range. For a replacement plug, use the correct type specified by RedMax. (MA4) MA4 .025 in 0.655mm • REPLACEMENT PLUG IS A NGK CMR7H. IMPORTANT • Note that using any spark plug other than those designated may result in the engine failing to operate properly or in the engine becoming overheated and damaged.
Français Español 9. Entretien 9. Mantenimiento ■ BOUGIE D’ALLUMAGE • Les démarrages sans succès et les ratés d’allumage du moteur sont souvent causés par une bougie encrassée. Vérifier l’état de la bougie et le jeu de ses électrodes. Comme bougie de rechange, n’utiliser que le type approprié spécifié par RedMax. (MA4) ■ BUJÍA • Los fallos de arranque son causados a menudo por bujías en mal estado. Limpie la bujía y compruebe que la distancia de la misma se encuentra dentro del margen correcto.
English 9. Maintenance ■ GEAR CASE (MA6) • The reduction gears are lubricated by multipurpose, lithium-based grease in the gear case. Supply new grease every 25 hours of use or more often depending on the job condition. • Remove the side bolt in gearcase opposite of grease nipple before installing new grease to arrange for old grease to exit. MA6 ■ INTAKE AIR COOLING VENT WARNING • Never touch the cylinder, muffler, or spark plugs with your bare hands immediately after stopping the engine.
Français Español 9. Entretien 9. Mantenimiento ■ BOITIER DE RENVOI D’ANGLE (MA6) • Les engrenages du renvoi d’angle sont lubrifiés par de la graisse au lithium se trouvant dans le carter. Effectuer un graissage toutes les 25 heures d’utilisation ou plus souvent suivant les conditions de travail. • Retirer le boulon latéral dans le boîtier du renvoi d’angle face à l’embout de graissage avant d’appliquer de l’huile neuve afin de permettre à l’ancienne huile de s’évacuer.
English 9. Maintenance MA8 ■ PROCEDURES TO BE PERFORMED AFTER EVERY 100 HOURS OF USE 1. Remove the muffler, insert a screwdriver into the vent, and wipe away any carbon buildup. Wipe away any carbon buildup on the muffler exhaust vent and cylinder exhaust port at the same time. 2. Tighten all screws, bolts, and fittings. 3. Check to see if any oil or grease has worked its way in between the clutch lining and drum, and if it has wipe it away using oil-free, lead-free gasoline. English 10.
Français Español 9. Entretien 9. Mantenimiento ■ PROCEDURE A EFFECTUER TOUTES LES 100 HEURES D’UTILISATION 1. Démonter le silencieux et insérer un tournevis dans la fente pour retirer tous les dépôts éventuels de calamine. Retirer également tous les autres dépôts sur le silencieux. 2. Serrer les vis, boulons et fixations. 3. Vérifier si de l’huile ou de la graisse s’est introduite entre les mâchoires et le tambour d’embrayage ; si s’est le cas, les nettoyer à l’essence sans plomb.
English 12. Optional blade usage OPT1 IMPORTANT Change to the debris guard which is suitable for the metal blade. (OPT1) (1) TIGHTENING TORQUE : 26~43.5 in-lbs (2.94~4.9 N.m.) (1) Guard : T3246-24110 OPT2 IMPORTANT Change the loop handle to the J-handle for safe operation.
Français Español 12. Utilisation de la lame optionnelle IMPORTANT Changer de cache et installer le cache spécialement étudié pour les débris, adapté à la lame en métal. (OPT1) COUPLE DE SERRAGE : 26 – 43,5 pouces-livres (2,94 – 4,9 N.m.) 12. Uso de hoja opcional IMPORTANTE Elija el protector contra desechos adecuado para la hoja metálica. (OPT1) PAR TORSOR : 26 – 43,5 pulg.-lbs (2,94 – 4,9 N.m.
English 12. Optional blade usage WARNING • When sharpening, removing, or reattaching the blade, be sure to wear thick, sturdy gloves and use only proper tools and equipment to prevent injury. OPT3 (1) (2) (3) (4) (5) (6) (7) ■ CHOOSE THE BLADE Choose a suitable recommended cutting attachment according to the object to be cut. (OPT3) • When replacing blade always be sure to use products which have been certified by RedMax.
Français Español 12. Utilisation de la lame optionnelle AVERTISSEMENT 12. Uso de hoja opcional ADVERTENCIA • Lors de l’affûtage, du retrait ou de la pose de la lame, porter des gants épais et utiliser des outils appropriés pour éviter toute blessure. • Al afilar, desmontar o instalar la hoja, asegúrese de usar guantes gruesos y resistentes, y emplee las herramientas y equipos necesarios para evitar lesiones.
English 12. Optional blade usage OPT6 OPT7 rotate as soon as the engine is started. When starting the engine, place the product onto the ground in a flat clear area and hold it firmly in place so as to ensure that neither the cutting part nor the throttle come into contact with any obstacle when the engine starts. (OPT6) ■ CUTTING METHOD a) Use the front left side cutting. b) Guide the blade from your right to left with it tilted slightly to your left.
Français 12. Utilisation de la lame optionnelle Español 12. Uso de hoja opcional centrifuge et l’outil de coupe se met à tourner dès que le moteur est mis en route en plaçant l’accélérateur en position de démarrage. Pour mettre le moteur en route, poser et maintenir fermement la machine à plat sur le sol dans un endroit dégagé où aucun obstacle ne peut entrer en contact avec l’outil de coupe ou la manette d’accélérateur une fois que le moteur sera en marche.
English 12. Optional blade usage ■ By using the shoulder strap, hang the unit on your right side. Adjust the strap length so that the cutting head may become parallel to the ground. (OPT9) WARNING Make sure to use shoulder strap and debris guard. If not, it is very dangerous when you slip or lose your balance. WARNING ■ CONTROLLING BLADE THRUST • Blade thrust can cause serious personal injury. Carefully study this section.
Français Español 12. Utilisation de la lame optionnelle 12. Uso de hoja opcional ■ Mettre le harnais sur l’épaule gauche et placer la machine sur le côté droit. Régler le harnais pour que la tête de coupe soit bien parallèle au sol. (OPT9) ■ Utilizando el arnés para el hombro, cuelgue la unidad en el lado derecho de su cuerpo. Ajuste la longitud de la correa de manera que el cabezal cortador quede paralelo al suelo.
English 12. Optional blade usage OPT10 3. How you can maintain the best control: a. Keep a good, firm grip on the unit with both hands. A firm grip can help neutralize bounce. Keep your right and left hands completely around the respective handles. b. Keep both feet spread apart in a comfortable stance and yet braced for the possibility that the unit could bounce. Do not overreach. Keep firm footing and balance. ■ MAINTENANCE BLADE • Check the blade and the fasteners for looseness, cracking, or bending.
Français 12. Utilisation de la lame optionnelle d’herbe déjà coupée ou d’autre sorte de débris. Español 12. Uso de hoja opcional g. Mantenga el área de trabajo despejada de material cortado y de otros desechos. 3. Comment conserver le meilleur contrôle de la machine : a. Tenir la machine fermement des deux mains. Le fait de la tenir le plus fermement possible peut éviter les coups de recul. Il faut bien saisir les poignées. b.
English 13. Troubleshooting guide Case 1. Starting failure CHECK fuel tank fuel filter carburetor adjustment screw sparking (no spark) PROBABLE CAUSES incorrect fuel fuel filter is clogged out of normal range spark plug is fouled/wet plug gap is incorrect disconnected ➞ ➞ ➞ ➞ ➞ ➞ spark plug ➞ ➞ ➞ ➞ ➞ ➞ ACTION drain it and with correct fuel clean adjust to normal range clean/dry correct (GAP: 0.6 – 0.
BRUSHCUTTERS 14. Parts list 14. Liste des pièces 14. Lista de piezas DEBROUSSAILLEUSE DESBROZADOR BCZ2610S/BCZ2610S-CA NOTE : 1. Use RedMax/ZENOAH genuine parts as specified in the parts list for repair and/or replacement. 2. RedMax/ZENOAH does not warrant the machines, which have been damaged by the use of any parts other than those specified by the company. 3.
14. Parts list Fig.
Fig.1 DRIVE UNIT BCZ2610S/BCZ2610S-CA (S/N 70060101 and up) Key# Description 1 2 4 5 6 7 8 9 10 11 12 13 14 15 16 17 18 19 20 21 22 23 24 25 26 27 28 29 30 31 32 33 34 35 36 37 38 39 40 41 42 43 44 45 PIPE-COMP SHAFT GEARCASE ASSY • GEARCASE • BEARING • BEARING • RING • SEAL • SHAFT • GEAR • NUT, M10 • PINION • BEARING • BEARING • RING • RING • BOLT • HOLDER (A) • FITTING, grease • WASHER • BOLT GRIP LEVER ASSY • LEVER • • STAY • • COVER COMP.
14. Parts list Fig.
Fig.
CALIFORNIA EMISSION CONTROL WARRANTY STATEMENT YOUR WARRANTY RIGHTS AND OBLIGATIONS The California Air Resources Board and ZENOAH AMERICA, INC. are pleased to explain the emission control system warranty on your 2007 and later small off-road engine. In California, new small off-road engines must be designed, built and equipped to meet the state’s stringent anti-smog standards. ZENOAH AMERICA, INC.
ENONCE DE GARANTIE DE CONTRÔLE DES EMISSIONS DE CALIFORNIE VOS DROITS ET OBLIGATIONS DE GARANTIE La Commission des ressources en air de Californie et ZENOAH AMERICA, INC. sont heureux d'expliquer la garantie du système de contrôle des émissions de votre petit moteur hors route de 2007 et ultérieur. En Californie, les nouveaux petits moteurs hors route doivent être conçus, construits et équipés pour respecter les normes anti-pollution strictes de l'Etat. ZENOAH AMERICA, INC.
DECLARACIÓN DE GARANTÍA DE CONTROL DE EMISIONES DE CALIFORNIA SUS DERECHOS Y OBLIGACIONES DE ACUERDO CON ESTA GARANTÍA La Comisión de Recursos del Aire de California y ZENOAH AMERICA, INC. tienen el agrado de explicar la garantía del sistema de control de emisiones para motores “todo terreno” modelo 2007 y posteriores. En California, los nuevos motores “todo terreno” deben ser diseñados, construidos y equipados para cumplir con las estrictas normas antiesmog del estado. ZENOAH AMERICA, INC.
LIMITED WARRANTY EMISSION-RELATED PARTS, FOR TWO (2) YEARS FROM THE DATE OF ORIGINAL DELIVERY OF THE UNIT, RedMax / ZENOAH AMERICA, INC., THROUGH ANY RedMax DEALER, WILL REPAIR OR REPLACE, FREE OF CHARGE, FOR THE ORIGINAL AND EACH SUBSEQUENT PURCHASER, ANY PART OR PARTS FOUND TO BE DEFECTIVE IN MATERIAL AND/OR WORKMANSHIP.
Garantie limitée Pièces en rapport avec les émissions de gaz d'échappement : RedMax / ZENOAH AMERICA, INC., par l'intermédiaire de n'importe quel revendeur RedMax, réparera gratuitement ou remplacera gratuitement pour l'acheteur initial et chaque acheteur successif toute(s) pièce(s) se révélant de constitution et/ou de montage défectueux pendant deux (2) ans à compter de la date initiale de livraison d’une unité.
GARANTÍA LIMITADA PIEZAS REALACIONADAS CON LAS EMISIONES, POR DOS (2) AÑOS A CONTAR DE LA FECHA DE ENTREGA ORIGINAL DEL UNIDAD, RedMax / ZENOAH AMERICA, INC., A TRAVÉS DE CUALQUIER DISTRIBUIDOR RedMax, REPARARÁ O REEMPLAZARÁ, GRATUITAMENTE, PARA EL COMPRADOR ORIGINAL Y CUALQUIER COMPRADOR POSTERIOR, CUALQUIER PIEZA O PIEZAS QUE PRESENTEN DEFECTOS EN SUS MATERIALES Y/O DE FABRICACIÓN.
■ EMISSION CONTROL An emission control label is located on the engine. ■ MESURES DE LUTTE CONTRE LES EMISSIONS Une étiquette de mesures de lutte contre les émissions se trouve sur le moteur. ■ CONTROL DE EMISIONES El motor lleva una etiqueta de control de emisiones. BCZ2610S/BCZ2610SU/ BCZ2610SW BCZ2610S/BCZ2610SU/ BCZ2610SW BCZ2610S/BCZ2610SU/ BCZ2610SW IMPORTANT ENGINE INFORMATION THIS ENGINE CONFORMS TO 2008*1 U.S. EPA REGULATIONS FOR SMALL NONROAD ENGINES.