T2040-93110(010) OWNER / OPERATOR MANUAL CHAINSAWS G2500TS WARNING WARNING The engine exhaust from this product contains chemicals known to the State of California to cause cancer, birth defects or other reproductive harm. Before using our products, please read this manual carefully to understand the proper use of your unit.
SAFETY FIRST Instructions contained in warnings within this manual marked with a symbol concern critical points which must be taken into consideration to prevent possible serious bodily injury, and for this reason you are requested to read all such instructions carefully and follow them without fail. ■ WARNINGS IN THE MANUAL WARNING This mark indicates instructions which must be followed in order to prevent accidents which could lead to serious bodily injury or death.
1. Parts location 1. 2. 3. 4. 5. 6. 7. Guide Bar Saw Chain Front Guard Front Handle Rear Handle Fuel Tank Cap Oil Tank Cap 2. Specifications ■ G2500TS Power unit : Dis placement ····················································································· 1.6(25.4) cu-in(cm3) Fuel ············································································· Mixture(Gasoline 32 : 2-cycle oil 1) Fuel tank capacity ················································································· 7.
3. Symbols on the machine For safe operation and maintenance, symbols are carved in relief on the machine. According to these indications, please be careful not to make a mistake. (a). The port to refuel the "MIX GASOLINE" Position: Upper-front at the left side of the power unit (near the fuel cap ) (b). The port to refuel the chain oil Position: Lower-front at the left side of the power unit (near the oil cap) (c). Flipping the switch to the "O" position, immediately the engine stops.
4. For safe operation 1. Never operate a chain saw when you are fatigued, ill, or upset, or under the influence of medication that may make you drowsy, or if you are under the influence of alcohol or drugs. 2. Use safety footwear, snug fitting clothing and eye, hearing and head protection devices. 3. Always use caution when handling fuel. Wipe up all spills and then move the chain saw at least ten(10)feet (three(3) m) from the fueling point before starting the engine.
4. For safe operation 16. Operate the chain saw only in well ventilated areas. Never start or run the engine inside a closed room or building. Exhaust fumes contain dangerous carbon monoxide. 17. Do not operate a chain saw in a tree unless specially trained to do so. 19. When transporting your chain saw, make sure the appropriate guide bar scabbard is in place. 20. This chain saw is equipped with a spark arrester built-in muffler. Periodically check the arrester to keep it in good order. 18.
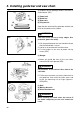
5. Installing guide bar and saw chain SE1 A standard saw unit package contains the items as shown below. (SE1) (1) Power unit (2) Guide bar (3) Saw chain (4) Plug wrench Open the box and install the guide bar and the saw chain on the power unit as follows. WARNING SE2 The saw chain has very sharp edges. Use protective gloves for safety. 1. Pull the guard towards the front handle to check that the chain brake is not on. 2. Loosen a nut and remove the chain cover. 3.
5. Installing guide bar and saw chain SE5 6. While holding up the tip of the bar,adjust the chain tension by turning the tensioner screw until the tie straps just touch the bottom side of the bar rail. (SE5) (1) Chain tension adjusting screw (a) Loosen (b) Tighten SE6 7. Tighten the mounting nut securely with the bar tip held up (TORQUE: 11.8~14.7 N.m./120~150 kg-cm). Then check the chain for smooth rotation and correct tension while moving it by hand. If necessary, readjustment.
6. Fuel and chain oil ■ FUEL The RedMax engines are lubricated by oil specially formulated for air-cooled 2-cycle gasoline engine use. If RedMax oil is not available, use an antioxidant added quality oil expressly labeled for aircooled 2-cycle engine use. RECOMMENDED MIXING RATIO GASOLINE 32 : OIL 1 Exhaust emission are controlled by the fundamental engine parameters and components (eq.
6. Fuel and Chain oil ■ CHAIN OIL Use motor oil SAE 10W-30 all year round, or SAE 30-40 in summer and SAE 20 in winter. NOTE Do not use waste or regenerated oil that can cause damage to the oil pump.
7. Operation OP1 ■ STARTING ENGINE 1. Feed fuel and chain oil into their respective tanks and tighten the caps securely. (OP1) (1) Fuel (2) Chain oil OP2 OP3 2. Continuously push the priming bulb until fuel comes in the bulb. (OP2) 3. Put the switch to the "I" position. (OP3) (1) Switch OP4 OP5 4. Pull out the choke knob to the second-stage position. The choke will close and the throttle lever will then be set in the starting position.
7. Operation NOTE OP6 Once the choke knob has been pulled out, it will not return to the operating position even if you press down on it with your finger. When you wish to return the choke knob to the operating position, pull out the throttle lever instead. 5. While holding the saw unit securely on the ground, pull the starter rope vigorousl y. (OP6) 6. When firing occur, push in the choke knob and pull the starter again to start the engine. 7.
7. Operation ■ ADJUSTING CARBURETOR (OP9) The carburetor on your unit has been factory adjusted, but may require fine tuning due to change in operating conditions. Before adjusting the carburetor, make sure that provided are clean air/fuel filters and fresh, properly mixed fuel. When adjusting, take the following steps: NOTE Be sure to adjust the carburetor with the bar chain attached. 1. H and L needles are restricted within the number of turn as shown below. OP9 H needle –1/4 L needle –1/4 2.
7. Operation WARNING • When the brake operates, release the throttle lever to slow down the engine speed. Continuous operation with the brake engaged will generate heat from the clutch and may cause trouble. • At machine inspection prior to each job, check the operating condition of the brake following the steps below. OP10 1. Start the engine and grasp the handle securely with both hands. 2.
8. Sawing WARNING • Before proceeding to your job, read "For Safe Operation" section It is recommended to first practice sawing easy logs. This also helps you get accustomed to your unit. • Always follow the safety regulations. The chain saw must only be used for cutting wood. It is forbidden to cut other types of material. Vibrations and kickback vary with different materials and the requirements of the safety regulations would not be respected.
8. Sawing SA2 ■ FELLING A TREE (SA2) WARNING When you fell a tree, be sure to warn your neighboring workers of the danger. 1. Decide the felling direction considering the wind, Iean of the tree, location of heavy branches, ease of job after felling, and other factors . 2. While clearing the area around the tree, arrange a good foothold and retreat path. 3. Make a notch cut one-third of the way into the tree on the felling side. 4.
8. Sawing SA4 ● Cutting a pillowed log In the area A in the picture right above, saw up from the bottom one-third and finish by sawing down from the top. In the area B, saw down from the top one-third and finish by sawing up from the bottom. (SA4) ● Limbing a felled tree SA5 WARNING Be alert to the spring back of a cut limb. First check which way the limb is bent. Then make a shallow cut into the compressed side to prevent the limb from being torn. Cut through from the tensed side.
9. Maintenance WARNING MA1 Make sure the engine is stopped . ■ DAILY CHECK POINTS 1. Air filter Loosen the knob and remove the air cleaner cover. Take off the filter elements and tap off attached sawdust. When they are extremely dirty, shakewash with gasoline. Dry them completely before reinstalling. (MA1) MA2 2. Oiling port Dismount the guide bar and check the oiling port for clogging. (MA2) (1) Oiling port MA3 3. Guide bar Remove sawdust in the bar groove and the oiling port.
9. Maintenance WARNING This saw is equipped with one of the following low kickback bar/chain combinations: RedMax Part Number Bar Size Guide Bar Saw Chain 12inch (30cm) G2512 91VG45X For replacement, use only above bar and chain, or the following; OREGON BAR 12 inch S/N DOUBLE GUARD BAR, Mount code #A041. (120 SDEA 041) GB BAR 12 inch MINI LAMINATED BAR (PO12-50CR) MA5 OREGON CHAIN 91VG ■ PERIODICAL CHECK POINTS 1. Cylinder fins 1. Remove the starter case. 2. Remove sawdust between the cylinder fins.
9. Maintenance WARNING When returning the filter, use a pinch not to be folded the suction pipe. MA8 4. Spark plug Clean the electrodes with a wire brush and adjust the gap to 0.6mm. (MA8) Replacement plug: Champion RCJ-7Y WARNING MA9 After spark plug maintenance, reinstall the plug and plug cap firmly. (TORQUE: 14.7~17.6 N.m./150~180 kg-cm) Or it may cause the fire accident. (MA9) (1) Plug (2) Plug cap MA10 MA11 5. Sprocket Check for extensive wear, and replace it when the teeth are worn over 1.0mm.
9. Maintenance 7. Saw Chain WARNING MA12 It is very important for smooth and safe operation to keep the cutters always sharp. Your cutters need to be sharpened when: • Sawdust becomes powder-like. • You need extra force to saw in. • The cut way does not go straight. • Vibration increases. • Fuel consumption increases. Cutter setting standards: WARNING Be sure to wear safety gloves. Before filing: • Make sure the saw chain is held securely. • Make sure the engine is stopped.
9. Maintenance MA14 Make sure every cutter has the same length and edge angles as illustrated. (MA14) (4) Cutter length (5) Filing angle (6) Side plate angle (7) Top plate cutting angle 8. Way of the cooling air WARNING MA15 • The engine metal parts can burn your skin. Never touch the cylinder, muffler or ignition plug etc. during operation or right after stopping the engine. • Before starting the engine, check around the muffler and take off sawdust.
9. Maintenance 9. Muffler (MA16) WARNING If you do not attach the muffler correctly, after engine starts, the muffler will be loosen and the hightemperature exhaust gas spout. After cleaning the muffler, pay attention to fit up the muffler according to the explanation as follows. MA16 1. Muffler body, muffler cover and baffle will be combined correctly. 2. Be sure the gasket is not broken. If it is broken, change to the new one. 3. Before tightening the screw, rub the gross on it. 4.
10. Storage 1. Empty the fuel tank and run the engine out of fuel. 2. Empty the oil tank. 3. Clean the entire unit. 4. Store the unit in a dry place out of the reach of children.
11. Troubleshooting Guide Case 1. Starting failure: Make sure the icing prevention system is not working. Check fuel for water or substandard mixture. Replace with proper fuel. ➜ Remove and dry the spark plug. Then pull the starter again with no choke. ➜ Replace with a new plug. ➜ ➜ Check for engine flooding. ➜ Check the spark. Case 2. Lack of power/Poor acceleration/Rough idling Check fuel for water or substandard mixture. Replace with proper fuel. ➜ Clean. ➜ Readjust speed needles.
12. Parts list CHAINSAWS G2500TS NOTE : 1. Use KOMATSU ZENOAH genuine parts as specified in the parts list for repair and/or replacement. 2. KOMATSU ZENOAH does not warrant the machines, which have been damaged by the use of any parts other than those specified by the company. 3. When placing parts orders for repair and/or replacement, check if the model name and the serial number are applicable to those specified in the parts list, then use parts number described in the parts list. 4.
12. Parts list ❲ 28 ❳ Fig.
PART NUMBER Q'TY /UNIT CYLINDER COMP • ELBOW PIPE CLIP ELBOW CRANKCASE BOLT, hexagon hole PISTON RING, piston PIN RING, snap BEARING WASHER SHAFT COMP BEARING OIL SEAL OIL SEAL NUT KEY PIPE SET PLATE SCREW MUFFLER ASSY • SPARK ARRESTER GASKET SCREW MUFFLER COVER ROTOR ASSY • PAWL • SPRING • SCREW • WASHER MODULE ASSY • CORD • CAP • CAP • SPRING • GROMMET SPACER BOLT, hexagon hole SPARK PLUG SWITCH ASSY CORD CORD CASE COMP • SCREW SCREW PIPE ASSY • PIPE • GROMMET • FILTER • CLIP BREATHER ASSY GROMMET PUMP
12. Parts list Fig.
G2500TS Fig.
CALIFORNIA EMISSION CONTROL WARRANTY STATEMENT YOUR WARRANTY RIGHTS AND OBLIGATIONS THE CALIFORNIA AIR RESOURCES BOARD AND KOMATSU ZENOAH Co. ARE PLEASED TO EXPLAIN THE EMISSION CONTROL SYSTEM WARRANTY ON YOUR 1995 AND LATER LAWN AND GARDEN EQUIPMENT ENGINE. IN CALIFORNIA, NEW UTILITY AND LAWN AND GARDEN EQUIPMENT ENGINES MUST BE DESIGNED, BUILT AND EQUIPPED TO MEET THE STATE'S STRINGENT ANTI-SMOG STANDARDS.
RedMax CHAINSAW MODEL G2500TS 1-YEAR LIMITED WARRANTY EMISSION-RELATED PARTS, FOR TWO (2) YEARS FROM THE DATE OF ORIGINAL DELIVERY OF THE MODEL G2500TS UNIT, KOMATSU ZENOAH AMERICA INC. (THE COMPANY), THROUGH ANY RedMax DEALER, WILL REPAIR OR REPLACE, FREE OF CHARGE, FOR THE ORIGINAL AND EACH SUBSEQUENT PURCHASER, ANY PART OR PARTS FOUND TO BE DEFECTIVE IN MATERIAL AND/OR WORKMANSHIP.
RedMax CHAINSAW Modèle G2500TS Garantie limitée à 1 ans Pièces en rapport avec les émissions de gaz d'échappement : KOMATSU ZENOAH AMERICA INC., par l'intermédiaire de n'importe quel revendeur RedMax, réparera gratuitement ou remplacera gratuitement pour l'acheteur initial et chaque acheteur successif toute(s) pièce(s) se révélant de constitution et/ou de montage défectueux pendant deux (2) ans à compter de la date initiale de livraison d’une unité du modèle G2500TS.
KOMATSU ZENOAH AMERICA INC.