
User's Manual
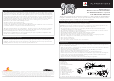
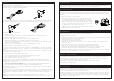

Table Of Contents

SETTING UP
Connect the neck to the controller body.
Slide the neck into the controller body and push in to lock. Make sure the lever on the rear of the
controller body rotates fully to the locked position.
To detach the neck, rotate the lever on the rear of the controller body to the unlocked symbol and hold in
this position. Carefully slide the neck out from the controller body taking care not to twist the neck.
Connect the strap to the controller.
1. Unwrap the strap.
2. Attach the strap to the controller’s strap buttons using the holes at each end of the strap.
3. Adjust the length of the strap as necessary.
Insert the batteries. Make sure the neck is connected to the controller body.
1. Slide the tab on the battery cover and lift to detach it from the controller.
2. Insert two new AA (LR6) batteries with their positive (+) and negative (-) ends positioned as shown
inside the battery compartment.
3. Slide the battery cover back into place on the controller and push in to lock.
Connect the Wireless Les Paul Controller to the console
Up to four Les Paul controllers can be actively connected to a PLAYSTATION
®
3 at one time. The number
of controllers supported within a game may be different, refer to the instruction manual supplied with the
game.
Each connected controller gets a controller status light. Before you can connect a controller, at least one
status light must be available (unlit).
To wirelessly connect your controller to your console:
1. Insert the Wireless Receiver into an available USB connector on the console.
2. Press and hold the PS button to turn on the controller.
3. Press the Power button to turn on the console.
NOTE: Turning the console on using a SIXAXIS™ Wireless Controller will automatically assign that
controller as #1. Turn the console on by pressing the on/off button on the console to make sure the Les
Paul controller is assigned as #1.
4. Press the connect button on the Wireless Receiver. The Status light will flash, indicating that the
receiver is searching for the controller.
5. Press the PS button on the controller to establish a connection with the receiver.
The controller and wireless receiver are connected when the status light on the receiver and the guitar
are continuously illuminated.
NOTE: Game menus can only be navigated by the controller assigned as #1. If the controller you wish to
use is assigned to a different position (refer to the controller status lights above the strum bar), press the
PS button, select “Reassign the Controller”, select “1”, and press the red Fret button to return to the
game.
NOTE: The status indicator on the controller will blink slowly when the battery level is low.
NOTE: When the console is turned off, the controller will still be connected the next time it is turned on.
TROUBLESHOOTING
If you encounter problems, try the possible solutions provided below.
The controller does not respond.
• Make sure the controller is wirelessly connected to the console. See the “Connect the Wireless Les Paul
Controller to the console” section of the manual.
• Move the controller closer to the console.
• Check the batteries still have some charge.
• Make sure the controller is not in “sleep mode”. See the “Power Save Mode” section of the manual
for more details.
• Keep the console and controller at least two feet away from large metal objects.
• Make sure the front of the console is positioned in the direction of the controller.
• Cordless phones (2.4GHz), wireless LANs, microwave ovens and some cell phones can cause
interference. Turn these products off or unplug and try reconnecting the controller.
If none of these solutions work, turn the console off, remove and reinsert the batteries into the controller
and repeat the steps for connecting the controller to the console.
POWER SAVE MODE
If the controller is turned on but has not been used for more than 5 minutes it will automatically enter a
“sleep mode” to prolong battery life. To turn the power back on, press the PS button.
WARRANTY / TECHNICAL SUPPORT
Every RedOctane branded product comes with a 60 day warranty (U.S. only). RedOctane will replace or
repair any defective component(s) at no charge to you within 60 days of the purchase date. You must
retain a copy of your original receipt for warranty support.
For warranty, setup, troubleshooting, and repair information, check out our website at:
www.redoctane.com/support.html
ABOUT REDOCTANE
RedOctane, Inc. is a leading international publisher of interactive entertainment software. The company
maintains a diverse portfolio of products that primarily spans the dance/music genre and can be used on
a variety of game hardware platforms and operating systems.
RedOctane's headquarters is located at 955 Benecia Avenue, Sunnyvale, California 94085. The company
maintains operations in the U.S., with a development studio in India and hardware accessory manufactur-
ing in China. More information about RedOctane and its products can be found on the company website,
which is located at www.redoctane.com.
DETACHABLE FACEPLATES
Customize the controller with distinctive faceplates to match your personal style. Faceplates pull off and
press on, no tools required. A standard faceplate ships with the controller; additional faceplates are sold
separately.
To attach your faceplate to your controller:
1. Remove the existing faceplate by first removing the Neck from
the controller body. Then locate the faceplate lever on the rear
of the controller body. Slide the lever until the faceplate detaches.
Make sure you keep the controller from falling by firmly holding
it in place as you pull on the faceplate. Take care not to damage
the Whammy bar as the faceplate is detached.
2. Align the tabs on the new faceplate with the slots on the controller
body and press it in place until it locks.