Powerstream-Eco REDRING POWERSTREAM-ECO UNVENTED INSTANTANEOUS WATER HEATER Installation and User Guide IMPORTANT: This booklet should be left with the user after installation and demonstration.
CONTENTS Section Page Introduction . . . . . . . . . . . . . . . . . . . . . . . . . . . . . . . . . . . . . . . . . . . . . . . . . . . . . 2 Redring After Sales Service . . . . . . . . . . . . . . . . . . . . . . . . . . . . . . . . . . . . . . . . . . . 2 Important Safety Information . . . . . . . . . . . . . . . . . . . . . . . . . . . . . . . . . . . . . . . . . 3 How to install your Powerstream-Eco . . . . . . . . . . . . . . . . . . . . . . . . . . . . . . . . . . . .
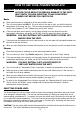
IMPORTANT SAFETY INFORMATION Your Powerstream-Eco has been designed for convenience, economy and safety of use, provided that it is installed, used and maintained in good working order and in accordance with our instructions and recommendations. All wiring and installation must be supervised by a suitably qualified person. THIS APPLIANCE MUST BE EARTHED. The installation must be in accordance with the current edition of BS.
HOW TO INSTALL YOUR POWERSTREAM-ECO WARNING: ALL WIRING AND INSTALLATION MUST BE SUPERVISED BY A SUITABLY QUALIFIED PERSON. WARNING: DO NOT INSTALL THIS UNIT WHERE IT MAY BE SUBJECTED TO FREEZING CONDITIONS.
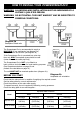
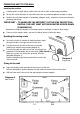
FIXING THE UNIT TO THE WALL Deciding the position If being used in a public place, position the unit out of reach to discourage vandalism. Fit the unit onto a flat piece of wall, well away from any potential splashes of water or spray. Position the unit either upright or lengthways (diagram 1a/b), whichever is most convenient for plumbing and wiring.
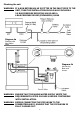
Plumbing the unit WARNING: IF A NON RETURN VALVE IS FITTED IN THE INLET FEED TO THE UNIT, THEN THE INSTALLATION SHOULD ALSO INCLUDE A 3.5 BAR PRESSURE REDUCING VALVE AND A 6 BAR PRESSURE RELIEF (EXPANSION) VALVE Diagram 4a Plumbing with Non-Return Valve Diagram 4b Unit serving Basin and shower WARNING: ENSURE THAT THE MAINS WATER SUPPLY MEETS THE REQUIREMENTS LISTED ON PAGE 4 BEFORE CONTINUING WITH INSTALLATION.
Fitting the pipes The unit should be connected directly to the main cold water supply. We recommend that you use Ø15mm copper or stainless steel pipe for the inlet and outlet connections. (See addendum sheet for local installation requirements). Use PTFE tape for making screw joints. Do not use a jointing compound. Remember to keep the hot water pipe runs as short as possible.
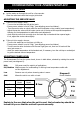
MAKING THE ELECTRICAL CONNECTIONS WARNING: THIS WATER HEATER MUST BE EARTHED. The electrical installation must be in accordance with the current BS.7671 (IEEE Wiring Regulations) and “Part P” of the Building Regulations and/or local regulations Wiring to the mains (Check the unit rating to see which applies) Rating Fuse/MCB Isolating Switch Cable Size 9.5 kW 40 amps 40 amps 6 mm² / 10 mm² * 10.
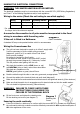
COMMISSIONING YOUR POWERSTREAM-ECO CHECKING FOR LEAKS Let the water run through the unit for a few seconds. Close the outlet and check that no pipe joints leak. ADJUSTING THE SERVICE VALVE If the unit is to supply a basin, - Turn on the hot water tap fully at the basin. - Ensure power selector is set to “High” (see adjusting power level below). - Turn the service valve on slowly until the neon illuminates on the product (max temperature).
HOW TO USE YOUR POWERSTREAM-ECO WARNING: DO NOT USE THE UNIT IF YOU THINK IT MAY BE FROZEN, AS THIS COULD RESULT IN SERIOUS DAMAGE TO THE UNIT. WAIT UNTIL YOU ARE SURE THAT IT HAS COMPLETELY THAWED OUT BEFORE YOU SWITCH ON. Basin Check that the power is switched on at the mains isolator switch. Turn on the hot water tap FULLY. If you do not turn the tap on fully, you will find that the temperature of the water will vary. The hot water temperature will have been set using the service valve (diagram 5).
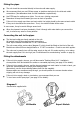
Diagram 9 Mixer Units WARNING: YOU MUST REGULARLY INSPECT THE SHOWER HOSE FOR WEAR AND DAMAGE. REPLACE IF NECESSARY, OR EVERY TWO YEARS, WITH OUR APPROVED PART. WARNING: IN ORDER TO MAINTAIN THE PERFORMANCE OF YOUR UNIT, YOU MUST CLEAN THE SHOWER HANDSET REGULARLY. All water contains particles of lime-scale, which build up in the shower handset and unit reducing the performance.
WHAT TO DO IF THINGS GO WRONG (1) SELF HELP If the unit is not working satisfactorily, make the following checks before calling out the installer. Any one of these adjustments could restore the performance. Symptom Cause What to do Little or no water flow. The main water supply is turned off. Turn on the main supply fully at the stop valve. Set up unit as per commissioning instructions. Cold water only - neon light off. The main water supply is not turned on enough. Power selector set to “cold”.
WHAT TO DO IF THINGS GO WRONG (2) PROFESSIONAL SERVICE If the previous “Self Help” checks fail to restore the performance, you should seek professional help. The person who installed the Powerstream-Eco is probably the best one to investigate and correct it and is certainly the person to contact if you have had a problem in the guarantee period. The following additional checklist is provided for the benefit of the qualified service person.
HOW YOUR POWERSTREAM-ECO WORKS Water comes in through the inlet, via a flow switch. The flow switch measures how much water is passing through the unit. If it detects more than the preset level of:2.7 litres/minute for the 9.5kW model and 3.3 litres/minute for the 10.8kW. The units heating elements are switched on. This is shown by the neon light glowing. The water is heated instantly as it passes through the copper heat exchanger tube.
ADDITIONAL ACCESSORIES AND COMMON SPARE PARTS Please Note :- The fitting of Spare Parts must be supervised by a suitably qualified person. Chrome and White Shower Mixer Unit Complete with full accessories Catalogue No.
GUARANTEE AND CONTACT DETAILS GUARANTEE Terms and Conditions for UK (outside UK contact your local distributor) We guarantee this product for a period of 24 months from the date of purchase.