THE BOILING WATER DISPENSER INSTALLATION & OPERATING INSTRUCTIONS IMPORTANT: This booklet should be left with the user after installation and demonstration
Thank you for choosing a quality Redring product manufactured in Peterborough, England Contents Installation Instructions Page Important notes . . . . . . . . . . . . . . . . . . . . . . . . . . . . . . . . . . . . . . . . . . . . . . . . . . . . . . . . . What the installer will need . . . . . . . . . . . . . . . . . . . . . . . . . . . . . . . . . . . . . . . . . . . . . . . . Where to locate the SB² . . . . . . . . . . . . . . . . . . . . . . . . . . . . . . . . . . . . . . . . . . . . . . . . . .
Important Notes This appliance is intended to be used in household and similar applications such as:- staff kitchen areas in shops, offices and other working environments; - farm houses; - by clients in hotels, motels and other residential type environments; - bed and breakfast type environments. All installations must be undertaken by a competent installer. If in any doubt, advice and assistance should be sought from a qualified plumber and/or electrician.
What the installer will need A means for disconnecting the fixed wiring in all poles in accordance with the wiring rules (ie. 13A fused double pole isolating switch). Suitable length of 1.0mm² 3-Core multi-strand PVC insulated mains cable that complies with BS.6500. Suitable lengths of Ø15mm copper pipe. Where to locate the SB² We recommend that the unit is installed on a suitable wall, at shoulder height and over a sink, with accessible area to maintain unit if and when required.
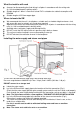
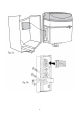
Installing the mains supply If a mains supply is not already available. Install a means for disconnecting the fixed wiring in all poles (ie. 13A fused double pole isolating switch) adjacent to where the unit will be fixed. Removing the front cover Remove the screw from the bottom and top edge of the unit (Fig.3). Support the front cover and remove the flow knob (Fig.4). Pull the front cover away form the unit and carefully remove the flying-lead and plug from the back-plate connector (Fig 5a and Fig.5b).
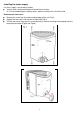
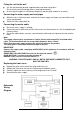
Fixing the unit to the wall Use the wall mounting bracket supplied and the two lower fixing holes. Ensure that the wall mounting bracket is mounted horizontally. An extra top fixing point is available by temporarily removing the condenser assembly. Connecting the water supply and vent pipes When the unit is fixed to the wall, make the final water supply and steam vent connections and secure the pipework. Switch the water supply back on. Connecting the mains cable Ensure the mains supply is isolated.
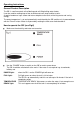
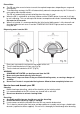
Operating Instructions General Product Description The SB² is a wall mounted, self-calibrating and self-filling boiling water heater. It can be used for making cups of tea or coffee and even soups and hot snacks. A special condenser traps steam and returns droplets to the tank, minimising waste and saving energy. The water temperature is set and automatically maintained by the SB² and the unit is powered down with the “Power” button. Water is dispensed by rotating the front cover knob clockwise.
Please Note: The SB² can take several minutes to reach the required temperature, depending on usage and tank capacity. To avoid energy wastage, the SB² will automatically reduce the temperature by 10°C if the unit is not used for more than 60 minutes. The SB² will automatically go back to boiling when the water is used. When the SB² is switched on at the local isolator and the POWER button is pressed, it will start by self-calibrating.
Trouble Shooting SELF HELP: If the SB² is not working satisfactorily, make the following checks before calling out the contractor. Any one of these adjustments could restore the performance. a) TEMPERATURE READY light is not on This is normal: The water has not yet reached the set temperature. (See Table 3 on page 11 for approximate heat up times).
PROFESSIONAL SERVICE: If the SELF HELP checks do not cover the symptom, you should seek professional help. The following additional checklist is provided for the benefit of the qualified service person. WARNING: SWITCH OFF THE ELECTRICITY AT THE ISOLATING SWITCH BEFORE REMOVING THE COVER TO MAKE CHECKS Check that the water supply is on and that its pressure is between 0.069 MPa (0.7 bar / 10 psi) and 1.0 MPa (10.0 bar / 140 psi). Check circuit through solenoid coil.
GUARANTEE Terms and Conditions for UK (outside UK contact your local distributor) We guarantee this product for a period of 24 months from the date of purchase. Within the guarantee period we will resolve, free of charge, any manufacturing defects in the product resulting from faulty workmanship or material on condition that:a) The product has been correctly installed and commissioned in accordance with our instructions and is being used on the supply circuit or voltage printed on the rating plate.