¨ Model No. RBTL19991 Serial No. USER'S MANUAL Serial Number Decal QUESTIONS? As a manufacturer, we are committed to providing complete customer satisfaction. If you have questions, or if there are missing parts, we will guarantee complete satisfaction through direct assistance from our factory. PLEASE CALL DIRECT TO OUR TOLL-FREE CUSTOMER HOT LINE. The trained technicians on our customer hot line will provide immediate assistance, free of charge to you. CUSTOMER HOT LINE: 1-800-999-3756 Mon.ÐFri.
¨ TABLE OF CONTENTS IMPORTANT PRECAUTIONS . . . . . . . . . . . . . . . . . . . . . . . . . . . . . . . . . . . . . . . . . . . . . . . . . . . . . . . . . . . . . . . . .3 BEFORE YOU BEGIN . . . . . . . . . . . . . . . . . . . . . . . . . . . . . . . . . . . . . . . . . . . . . . . . . . . . . . . . . . . . . . . . . . . . . . .5 HOW TO SET UP THE TREADMILL . . . . . . . . . . . . . . . . . . . . . . . . . . . . . . . . . . . . . . . . . . . . . . . . . . . . . . . . . . . .
IMPORTANT PRECAUTIONS DANGER: To reduce the risk of burns, fire, electric shock, or injury to persons, read the following important precautions and information before operating the treadmill. 1. It is the responsibility of the owner to ensure that all users of this treadmill are adequately informed of all warnings and precautions. 13. Keep the power cord and the surge protector away from heated surfaces. 14. Never move the walking belt while the power is turned off.
27. Never drop or insert any object into any opening. 24. When using iFIT.com CDÕs and videos, an electronic ÒchirpingÓ sound will alert you when the speed and/or incline of the treadmill is about to change. Always listen for the ÒchirpÓ and be prepared for speed and/or incline changes. In some instances, the speed and/or incline may change before the personal trainer describes the change. 28. This treadmill is intended for home use only.
BEFORE YOU BEGIN Thank you for selecting the new REEBOK¨ ACD4 treadmill. The ACD4 treadmill combines advanced technology with innovative design to let you enjoy an excellent form of cardiovascular exercise in the convenience and privacy of your home. And when youÕre not exercising, the unique ACD4 can be folded up, requiring less than half the floor space of other treadmills. at 1-800-999-3756, Monday through Friday, 6 a.m. until 6 p.m. Mountain Time (excluding holidays).
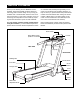
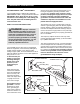
HOW TO SET UP THE TREADMILL Set the treadmill in a cleared area and remove all packing materials. Make sure that all parts are included before you dispose of the packing materials. 1. With the help of a second person, carefully raise the Uprights (39) until the treadmill is in the position shown. 1 39 2. Make sure that all parts are tightened before you use the treadmill. Place a mat under the treadmill to protect the floor or carpet.
HOW TO USE THE HEART RATE MONITOR HOW TO PUT ON THE HEART RATE MONITOR HEART RATE MONITOR CARE AND MAINTENANCE Before you use the heart rate monitor, please read all instructions on this page and the following page. ¥ Thoroughly dry the heart rate monitor after each use. The heart rate monitor is activated when the electrode areas are wetted and the heart rate monitor is put on; the heart rate monitor shuts off when it is removed and the electrode areas are dried.
¥ The heart rate monitor is designed to work with people who have normal heart rhythms. Heart rate reading problems may be caused by medical conditions such as premature ventricular contractions (pvcs), tachycardia bursts, and arrhythmia. Locate the battery cover on the back of the sensor unit. Insert a coin into the slot in the cover and turn the cover counterclockwise to the ÒopenÓ position. Remove the cover.
TREADMILL OPERATION THE PERFORMANT LUBETM WALKING BELT electric shock. This product is equipped with a cord having an equipment-grounding conductor and a grounding plug. Plug the power cord into a surge protector, and plug the surge protector into an appropriate outlet that is properly installed and grounded in accordance with all local codes and ordinances. Important: The treadmill is not compatible with GFCI-equipped outlets.
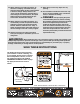
H P A B Q G C R G D I E S M L N T J F G K Note: If there is a thin sheet of clear plastic on the face of the console, remove it. O The console also features new iFIT.com interactive technology. iFIT.com technology is like having a personal trainer right in your home. Using the included audio cable, you can connect the treadmill to your home stereo, portable stereo, or computer and play special iFIT.com CD programs (CDÕs are available separately). iFIT.
DIAGRAM OF THE CONSOLE down, the speed will change in increments of 0.5 mph. The speed range is 0.5 mph to 12 mph. Refer to the drawing on page 10. K. STOP ButtonÑThis button stops the walking belt. When the button is pressed, the LED displays will pause and the TIME display will flash. A. CUSHION ButtonsÑThese buttons control the firmness of the walking platform. There are ten different firmness levels. L. MODE ButtonÑThis button is used to select the manual mode, workout programs, and the iFIT.
To use the manual mode, follow the steps beginning on page 13. To use a fat burn, aerobic, or performance program, see page 15. To use a pulse program, see page 16. To use the fitness test program, see page 17. To create and use a custom program, see pages 19 and 20. To use the workout history mode, see page 21. To use an iFIT.com CD or video program, refer to page 24. To use an iFit.com program directly from our internet site, see page 26.
3 Enter your age if desired. HOW TO USE THE MANUAL MODE The current age setting will be shown in the PULSE display. Press the + or Ð button to enter your age. Each button press will change the age setting by 1 year; if a button is held down, the age setting will change in increments of 5 years. When your age is shown, press the ENTER button. Note: Once your age is entered, it will be saved in memory, even when the power cord is unplugged. 4 1 Insert the key into the console.
6 SPEED/PACE displayÑ This display shows the speed of the walking belt and your current pace (pace is measured in minutes per mile). The display will alternate between one number and the other every seven seconds. Note: When either of the SPEED buttons is pressed, the display will show the speed setting. Adjust the incline as desired.
matrix.) The speed settings for the next eighteen periods will be shown in the eighteen columns to the right. HOW TO USE FAT BURN, AEROBIC, AND PERFORMANCE PROGRAMS The ten fat burn, aerobic, and performance programs automatically control the speed and incline of the treadmill as they guide you through effective workouts designed to help you achieve specific exercise goals. Follow the steps below to use a fat burn, aerobic, or performance program.
To stop the program temporarily, press the STOP button. The TIME display will begin to flash. To restart the program, press the START button or the SPEED + button. To end the program, press the STOP button, remove the key, and then reinsert the key. 6 5 Follow your progress with the LED displays. When the program is completed, remove the key. Make sure that the incline of the treadmill is at the lowest setting.
As the program progresses, the speed and/or incline of the treadmill will change automatically to keep your heart rate near the heart rate setting shown in the CURRENT PERIOD column. The program will continue until the heart rate setting for the last period is shown in the CURRENT PERIOD column and the TIME display counts down to zero. The walking belt will then slow to a stop.
6 At the beginning of each four-minute level, the speed and/or incline of the treadmill will automatically increase. The fitness test program will continue in this way until your heart rate reaches 70% of your estimated maximum heart rate, and the current four-minute segment is completed. The fitness test program will then be completed, regardless of how many segments remain. Press the START button or the SPEED + button to start the program.
programmed CURRENT PERIOD for each period. The speed setting for the first period is shown in the flashing CURRENT PERIOD column of the LED matrix. (The incline settings are not shown in the matrix.) To program speed and incline settings for the first period, simply adjust the speed and incline of the treadmill to the desired levels with the SPEED and INCLINE buttons. Every few times the SPEED buttons are pressed, one additional indicator will light or darken in the CURRENT PERIOD column.
When only three seconds remain in the first period of the program, both the CURRENT PERIOD column and the column to the right will flash and three tones will sound. All speed settings will then move one column to the left. The speed setting for the second period will then be shown in the CURRENT PERIOD column and the speed and incline of the treadmill will adjust to the second settings that you programmed previously. HOW TO USE CUSTOM PROGRAMS 1 Insert the key into the console.
pressed, the TIME display will show the total number of hours you have exercised. Note: The total will be rounded off to the nearest hour. If the total reaches 10,000 hours, the display will reset to zero. THE WORKOUT HISTORY MODE The console features a workout history mode that keeps track of the total hours you have exercised, the miles you have walked or run, the calories and fat calories you have burned, and your average speed.
HOW TO CONNECT YOUR PORTABLE STEREO HOW TO CONNECT THE TREADMILL TO YOUR CD PLAYER, VCR, OR COMPUTER Note: If your stereo has an RCA-type AUDIO OUT jack, see instruction A below. If your stereo has a 3.5mm LINE OUT jack, see instruction B. If your stereo has only a PHONES jack, see instruction C. To use iFIT.com CDÕs, the treadmill must be connected to your portable CD player, portable stereo, home stereo, or computer with CD player. See pages 22 and 23 for connecting instructions. To use iFIT.
HOW TO CONNECT YOUR HOME STEREO HOW TO CONNECT YOUR COMPUTER Note: If your stereo has an unused LINE OUT jack, see instruction A below. If the LINE OUT jack is being used, see instruction B. Note: If your computer has a 3.5mm LINE OUT jack, see instruction A. If your computer has only a PHONES jack, see instruction B. A. Plug one end of the audio cable into the jack on the front of the treadmill near the power cord. Plug the other end of the cable into the included adapter.
HOW TO CONNECT YOUR VCR HOW TO USE IFIT.COM CD AND VIDEO PROGRAMS Note: If your VCR has an unused AUDIO OUT jack, see instruction A below. If the AUDIO OUT jack is being used, see instruction B. If you have a TV with a built-in VCR, see instruction B. If your VCR is connected to your home stereo, see HOW TO CONNECT YOUR HOME STEREO on page 23. To use iFIT.com CDÕs or videocassettes, the treadmill must be connected to your portable CD player, portable stereo, home stereo, computer with CD player, or VCR.
¥ adjust the volume of your CD player or VCR. If the volume is too high or too low, the console may not detect the program signals. If the speed or incline settings are too high or too low, you can manually override the settings at any time by pressing the SPEED or INCLINE buttons on the console. However, when the next ÒchirpÓ is heard, the speed and/or incline will change to the next settings of the CD or video program.
7 HOW TO USE PROGRAMS DIRECTLY FROM OUR INTERNET SITE When you start the program, an on-screen countdown will begin. Our new internet site at www.iFIT.com allows you to access a selection of programs that interactively control your treadmill to help you achieve your specific exercise goals. In addition, you can play iFIT.com audio and video programs directly from the internet. By adding an optional iFIT.com module to the console, you can use virtually endless features from our internet site. Explore www.
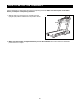
HOW TO FOLD AND MOVE THE TREADMILL HOW TO FOLD THE TREADMILL FOR STORAGE 1 Before folding the treadmill, adjust the incline to the lowest position. If this is not done, the treadmill may be permanently damaged. Next, unplug the power cord. CAUTION: You must be able to safely lift 45 pounds (20 kg) in order to raise, lower, or move the treadmill. 1. Hold the treadmill with your hands in the locations shown at the right.
TROUBLE-SHOOTING Most treadmill problems can be solved by following the steps below. Find the symptom that applies, and follow the steps listed. If further assistance is needed, please call our Customer Service Department tollfree at 1-800-999-3756, Monday through Friday, 6 a.m. until 6 p.m. Mountain Time (excluding holidays). PROBLEM: The power does not turn on SOLUTION: a.
PROBLEM: The walking belt is off-center SOLUTION: a. If the walking belt has shifted to the left, first remove the key and UNPLUG THE POWER CORD. Using the allen wrench, turn the left rear roller adjustment bolt clockwise, and the right bolt counterclockwise, 1/4 of a turn each. Be careful not to overtighten the walking belt. Plug in the power cord, insert the key and run the treadmill for a few minutes. Repeat until the walking belt is centered. b.
PROBLEM: The displays and indicators on the console remain lit after the key is removed SOLUTION: a. Hold down the STOP button while inserting the key into the console. Make sure that there is not a letter ÒdÓ in the CALS/FAT CALS display. If a ÒdÓ appears in the display, the console is in the ÒdemoÓ mode. This mode is intended to be used only when a treadmill is displayed in a store.
REEBOK UNIVERSITY WALKING AND REDUCED RISK FOR CARDIOVASCULAR DISEASE Reebok University was launched in 1993 to fulfill a vision to establish a Òuniversity without wallsÓ that develops quality, researched, state-of-the-art fitness programming for the fitness industry throughout the world.
Several studies have reported that regular walking at moderate to brisk speeds appears to increase bone density. Specifically, Fradin and his colleagues6 found that 70-year-old subjects who walked at least 30 minutes per day had higher bone mineral content than subjects who walked less than 30 minutes per day. Jones and his colleagues7 reported that sedentary women (aged 30 to 61 years old) who began a regular walking program and continued for one year increased their bone density.
EXERCISE GUIDELINES During the first few minutes of exercise, your body uses easily accessible carbohydrate calories for energy. Only after the first few minutes does your body begin to use stored fat calories for energy. If your goal is to burn fat, adjust the speed or incline of the treadmill until your heart rate is near the lowest number in your training zone. WARNING: Before beginning this or any exercise program, consult your physician.
PART LISTÑMODEL NO. RBTL19991 R0700A To locate the parts listed below, refer to the EXPLODED DRAWING attached in the center of this manual. Key No. Qty. 1 2 3 4 5 6 7 8 9 10 11 12 13 14 15 16 17 18 19 20 21 22 23 24 25 26 27 28 29 30 31 32 33 34 35 36 37 38 39 40** 41 42 43 44 45 46 47 48 49 50 2 1 1 1 2 1 16 2 2 8 1 2 1 1 1 1 1 1 1 1 1 2 5 1 5 1 1 1 1 1 1 1 1 2 12 1 1 1 1 1 36 2 2 1 1 1 2 3 1 2 Description Key No. Qty.
Key No. Qty. 101 102 103 104 105 106 107 108 109 110 111 112 113 114 115 116 117 118 119 120 121 122 123 124** 125 126 2 2 1 2 1 1 1 1 2 2 2 1 1 1 1 1 2 1 1 2 1 2 1 1 8 1 Description Key No. Qty.
28 47 50 51 50 52 49 77 47 110 12 122 10 11 111 97 96 116 64 27 29 110 12 10 22 122 77 41 25 23 100 111 80 22 41 23 41 20 21 15 24 10 32 35 41 18 17 1 41 7 16 31 30 41 35 14 41 41 115 3 81 93 32 41 7 8 EXPLODED DRAWINGÑMODEL NO. RBTL19991 37 38 35 35 9 34 112 13 7 5 R0700A 6 56 41 35 35 8 41 1 7 5 93 81 9 34 41 41 40** 124** 130** ll OUP erga. GR Nieb LIT K.
107 4 53 73 118 19 117 99 119 114 39 98 103 99 92 10 120 89 125 90 42 99 102 125 98 41 92 10 101 94 125 43 91 77 57 99 55 57 113 92 10 77 41 44 94 95 125 101 92 10 102 74 70 109 77 60 72 59 120 125 43 45 108 64 41 46 42 41 64 88 90 89 76 76 71 104 47 77 82 75 104 54 126 77 75 105 EXPLODED DRAWINGÑMODEL NO.
LIMITED WARRANTY WHAT IS COVEREDÑThe entire REEBOK¨ ACD4 (ÒProductÓ) is warranted to be free of all defects in material and workmanship. WHO IS COVEREDÑThe original purchaser or any person receiving the Product as a gift from the original purchaser. HOW LONG IS IT COVEREDÑICON Health & Fitness, Inc. (ÒICONÓ), warrants the hood, covers, belly pan, and decals for six months after the date of purchase. The motor is covered for three years after the date of purchase.