
User manual


21
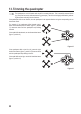
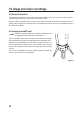
12. Starting the quadcopter
You must learn how to use and control a remote-controlled quadcopter. If you have not driven such models
before, proceed with caution and learn how the model reacts to remote control commands. Be patient!
Refer to the instructions in section 11.
Do not take any risks when using the product! Always use the model responsibly, otherwise you may
endanger yourself and your surroundings.
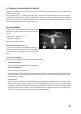
Charge the quadcopter battery and insert it into the battery compartment. Connect the battery and close the battery
compartment.
Switch on the quadcopter (press the button above the LEDs). The LEDs will ash quickly and then ash once per
second.
Place the model on a level, smooth surface (e.g. stone oor). Carpets/rugs are not suitable, as the landing arms may
get caught in the material. The (green) LEDs should point backwards and indicate "backwards".
Switch on the remote control using the on/off switch. The remote control will beep to indicate that it is switched on and
the LED indicator on the switch will start to ash.
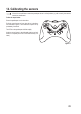
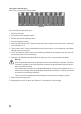
Push the left-hand lever (gure 7, position 4) forwards, and then pull it backwards. The LEDs on the remote control
and quadcopter will stay constant. Move the left-hand lever back into the neutral position.
The quadcopter is now paired with the remote control and ready for use.
Press the "Start rotors/automatic landing" button (gure 7, position 5) to start the rotors.
Slowly move the left-hand lever forwards to increase the rotor speed. Wait until the quadcopter takes off and hovers
in front of you approximately 1.5 m above the ground. Avoid sudden and excessive movements. Observe whether the
quadcopter drifts, and if so, in which direction it drifts. If the quadcopter drifts sideways ("roll") or forwards/backwards
("pitch"), move the right-hand lever in the opposite direction.
To land the quadcopter, slowly pull the left-hand lever backwards when the quadcopter is in the desired landing posi-
tion and wait until the quadcopter reaches the ground. A rm landing is permissible and should not be corrected with
abrupt commands.
To turn off the rotors, pull the left-hand rotor (gure 7, position 4) downwards for approximately two seconds until the
rotors stop moving. Alternatively, press the "Start rotors/automatic landing" button (gure 7, position 5) again.
Try to land the quadcopter in a vertical position (like a helicopter). Avoid landing at high horizontal speeds (like an
aeroplane). If you have not already done so, switch off the motors after landing.
Practice take-off and landing a few times to get a feel for the quadcopter. Once you are reasonably condent, you
can start controlling the ight direction using the yaw, pitch and roll functions (see instructions in section 11). Always
move the controls slowly and practice a few times before attempting a new manoeuvre. The rst ights should not last
longer than 30 to 60 seconds.
Once you are familiar with how the quadcopter responds to your commands, you can practice other manoeuvres.
Start with simple manoeuvres (e.g. moving 1 metre forwards/backwards (pitch function)), and then practice tilting left/
right (roll function). Once you have practised these manoeuvres, you can practice circles and gures of eight.
To switch off the quadcopter, switch off the rotors after landing and move the on/off switch on the quadcopter to the
"OFF" position (the LEDs will turn off). Then switch off the remote control.