
User manual


30
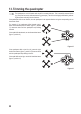
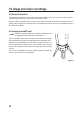
Play symbol = Start the app (3)
Select "Play" (3) to access the following interface:
Figure 25
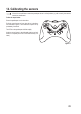
These icons have the following functions:
1 Exit the current screen
2 Take a photo with the quadcopter camera
3 Record a video with the quadcopter camera
4 View saved images and videos
5 Select the ight mode (rst level = beginner mode, second level = advanced mode, third mode = professional
mode, see section 11. e).
6 "Gravity sensor mode": Controls the quadcopter with the position sensors on your smartphone; only available
when the control icons are shown.
7 "OFF"/"ON": Display or hide the control icons (for starting rotors/landing, rotor emergency stop, control icons for
the rotor speed, yaw, roll, pitch and trimming).
8 Flight route: The quadcopter automatically ies in the shape (e.g. circle) or route indicated on the display.
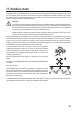
Warning!
When using automatic ight mode, the quadcopter must not be surrounded by any obstacles. This feature
is therefore only suitable or use in large rooms/halls or outdoors. People and objects must be at least 10 m
away from the take-off position.
The automatic ight route feature is a preprogrammed sequence and requires the quadcopter to be in a
stable position (hovering). Ideally, the quadcopter's altitude should not exceed 1.5 m and the route should
be at least 10 m from obstacles and people.
If this is not the case, the quadcopter may be damaged or may cause injury or damage to property!
9 Rotates the camera image by 180°
10 Display/hide the icons for "VR mode" and "calibration" – see instructions on the next page.
1
10
2
3
4
5
6
7
8
9