
User manual
34
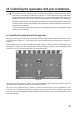
To control the quadcopter with your smartphone and in-app controls, follow the steps below:
• Switch the quadcopter on. The LEDs in the outrigger arms will start to ash and the quadcopter will emit a Wi-Fi
signal.
• Switch on your smartphone. Go to "Settings/Wi-Fi" and connect your smartphone to the quadcopter's Wi-Fi network.
• Open the "Rocket Drone" app on your smartphone.
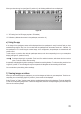
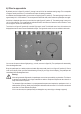
• Select "Play". The in-app control icons will be displayed (see gure 25) together with the video image from the
built-in camera.
• Place the quadcopter in a suitable take-off position. Refer to the instructions in sections 11 and 12.
• Select the icon in gure 25, position 7. The control icons (which correspond to the control levers on the remote
control) will appear as "points". The trim controls will also be displayed.
• The LEDs on the outrigger arm should now be constant. This indicates that the quadcopter is connected to the app.
• Select the icon in gure 26, position 13. The rotors will start to turn.
• Move the left-hand control icon (gure 27, position 15) forwards slightly. The quadcopter will take off and hover
approximately 1.5 above the ground.
• The two control icons (see gure 27, positions 15 and 16) function like the control levers on the remote control.
Keep your smartphone in your hands. Touch each "point" with your nger (for best results, use your thumb) and
control the quadcopter in the same way as you would with the remote control (see section 11 and 12).
• To land the quadcopter, move the left-hand control icon (gure 27, position 15) backwards slightly. Alternatively,
initiate an automatic landing by selecting the icon in gure 27 (position 13). To switch off the rotors in the event of an
unsuccessful landing, select the icon in gure 27 (position 14). This switches the rotors off immediately.
• To move the camera upwards, touch the icon in gure 27 (position 20). To move the camera downwards, use the
icon in gure 27 (position 21).