Operating Instructions Electrical quadrocopter “Foldable Drone G-Sense” RtF Item No.
Table of contents 1. Page Introduction...........................................................................................................................................................4 2. Explanation of symbols.........................................................................................................................................4 3. Intended use.....................................................................................................................................
Page 19. Recording photos and videos.............................................................................................................................31 20. Using the smartphone as a remote control.........................................................................................................32 a) Enabling smartphone control........................................................................................................................32 b) App control functions...................
1. Introduction Dear customer, Thank you for purchasing this product. This product complies with statutory, national and European regulations. To ensure that the product remains in this state and to guarantee safe operation, always follow these operating instructions! These operating instructions are part of this product. They contain important information on setting up and using the product. Do not give this product to a third party without the operating instructions.
3. Intended use The “Foldable Drone G-Sense RtF” electric quadrocopter is an electrically driven helicopter-like model that is wirelessly controlled using the included wireless remote control or a suitable smartphone (not included). The quadrocopter is designed solely for private use within the domain of model construction with the associated operating times. The model is designed for operation indoors, but it may also be used outdoors in windless conditions. It is not suitable for any other operation.
5. Product description The ready-to-fly “Foldable Drone G-Sense RtF” quadrocopter features 4 separately controlled motors, each of which drives its own propeller. Using the simultaneous acceleration of all propellers, the quadrocopter can lift off the ground and hover steadily in the air at appropriate propeller speeds.
6. Safety instructions Damage caused by failure to observe these operating instructions will void the warranty. We shall not be liable for any consequential damage. We shall not be liable for damage to property or personal injury caused by improper handling or failure to observe the safety instructions! Such cases will void the warranty/guarantee. Normal wear and tear during operation (e.g. worn motor shaft bearings) and accidental damage (e.g.
b) Before first use • Select a suitable location to operate your model. • When switching on the quadrocopter, follow the procedure described below in a separate chapter. This ensures that the transmitter and receiver connect properly and that your model responds reliably to remote control commands of your transmitter. • Ensure that there are no other models operated on the same transmission frequency (2.4 GHz) within range of the remote control. Always check whether there are any other 2.
7. Information on non-rechargeable and rechargeable batteries Although handling non-rechargeable and rechargeable batteries in daily life is a matter of course today, there are numerous hazards and problems. Therefore, always observe the following general information and safety instructions when handling non-rechargeable and rechargeable batteries. • Keep non-rechargeable/rechargeable batteries out of the reach of children.
8.
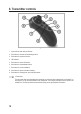
9. Using the transmitter The numbers used in these operating instructions refer to the figure alongside the text or the figures within the respective section. Cross references to other figures are indicated with the corresponding figure number. The figures of the remote control and the model in these operating instructions are for illustrative purposes only. The label, design and colour scheme of the products supplied in series may differ completely from the figures in these operating instructions.
b) Switching on the transmitter Press and hold down the push button for the on/off function (see also Figure 1, no. 5). The transmitter will emit two short beeps and the LED indicator (see also Figure 1, no. 4) will start to flash. Then push the joystick for the pitch and yaw function (see also Figure 1, no. 1) all the way up. The transmitter will emit a beep. Now move the joystick all the way down. The transmitter will emit another beep and the LED indicator will now glow steadily.
10. Operating the quadrocopter a) Charging the flight battery The flight battery can be charged using the included USB charging cable. The charging cable in Figure 4 is wound up for photo-technical reasons. Before first use, remove the cable tie and fully unwind the charging cable. Charging: Connect the USB plug of the charging cable (1) to a USB port of a computer/laptop or a USB charger plug.
b) Folding the rotor arms in and out The propeller arms with the propellers and guards can be folded in for space-saving transport (see Figure 5A). The front and rear propeller arms on each side are mechanically interconnected and folded in and out together (see Figure 5B). When both sides are unfolded, the quadrocopter lies flat on the surface (see Figure 5C). Figure 5 c) Checking the drive Before starting the quadrocopter, you must test the drive.
d) Inserting the flight battery Mount the flight battery (1) on the quadrocopter from above. It is important that the connection contacts (2) of the quadrocopter engage securely in the connection socket (3) of the flight battery. The flight battery lock is taken over by two locking latches (4) on the sides of the flight battery. To remove the rechargeable battery, slightly press the two grooved surfaces (5) on the right and left of the flight battery inwards and lift off the rechargeable battery.
e) Switching on the quadrocopter So that the receiver in the quadrocopter can respond to the transmitter signals, the receiver and the transmitter must have the same digital coding (pairing). For this reason, it is important that you switch on the quadrocopter as described below. First insert the charged flight battery into the quadrocopter as described above and place the quadrocopter on a level surface.
f) Basic information on steering quadrocopters Before starting your model for the first time, you should first familiarise yourself with the control features available to you to be able to control the model in a safe manner. The quadrocopter is controlled using the joystick on the remote control transmitter and the movement of the transmitter. The following functions are available: Pitch function With the pitch function, you can control the flight altitude of the quadrocopter (see Figure 9).
Yaw function The torques that act on the model are balanced by the two right-rotating and the two left-rotating propellers, and the quadrocopter hovers steadily in the air. When the joystick is moved to the left (see also Figure 1, no. 1), the model electronics speed up the propeller rotating to the right (clockwise) as viewed from above and simultaneously slow down the propeller rotating to the left (counterclockwise).
Pitch function The pitch function allows you to move your quadrocopter forward and backward (see Figure 12). Move the remote control transmitter for steering. When the front of the transmitter is tilted downwards, the quadrocopter electronics change the propeller speeds so that the model tilts slightly forward and thus also flies forward (see arrows in Figure 12). When the front of the transmitter is lifted up, the propeller speeds are changed exactly the opposite and the model flies backward.
g) Practical flight tips for the first start Calibrate the position sensors before each start. The exact procedure is described in the following chapter. Although the model can be flown in a very confined space, we recommend using an unobstructed space of approx. 3 x 3 m for the first flight attempts. When flying the quadrocopter outdoors for the first time, there should be absolutely no wind. Place yourself directly behind your quadrocopter.
11. Calibrating the position sensors Before starting the quadrocopter, you should calibrate the position sensors. This ensures that the quadrocopter hovers smoothly at one spot and does not fly in one direction spontaneously and without a control command. Proceed as follows: First switch on the quadrocopter with the function button (2) and then place it on a flat, level horizontal surface. Then turn on the transmitter and push the joystick (1) completely forward and then pull it back again.
12. Lifting off the quadrocopter With the quadrocopter and transmitter switched on and the sensors successfully calibrated, the quadrocopter can be lifted off. Push the joystick completely forward and then pull it back again. The propellers will start to rotate at low speed. To stop the rotating propellers, move the joystick to the lowest position and hold it until the propellers stop.
13. Landing the quadrocopter There are two methods for landing the quadrocopter: Method 1: When the quadrocopter is hovering, carefully reduce the flight altitude with the joystick (see Figure 14, no. 1) until the quadrocopter stands safely on the ground. Once the quadrocopter has landed, move the joystick to the lowest position and hold it in this position until the propellers stop. The quadrocopter can now be switched off.
14. Beginner/sport/expert mode switching With beginner/sport/expert mode switching, the remote control allows you to individually adjust the control sensitivity of the quadrocopter (dual rate function). The following modes are available: • Beginner mode Beginner mode is automatically enabled when the remote control transmitter is switched on. In this flight mode, the quadrocopter responses less sensitively to the control commands from the transmitter and can therefore be controlled very delicately.
15. Flip function The quadrocopter can perform sideways flips, if necessary. You should perform the first flips outdoors when there is absolutely no wind. For this purpose, allow the quadrocopter to ascend to a safe altitude of approx. 2 – 3 m and then hover at one spot. To switch the transmitter to flip mode, press the joystick from above (see also Figure 1, no. 1). To indicate that the transmitter has switched to flip mode, it emits short beeps continuously.
16. Flying in headless mode The quadrocopter's direction of movement always depends on the direction in which the model is oriented with respect to the pilot or the side from which the pilot is looking at the quadrocopter. Therefore, you can be confused quickly when you see the model from the side or the front, not from behind. For this reason, the quadrocopter has been equipped with headless mode.
17. Return function The quadrocopter has a return function which causes it to fly backwards automatically. Thus exactly in the opposite direction, which has been set as the forward direction when switching on (see white arrow in Figure 19A). As with headless mode, it does not matter in which direction the front of the quadrocopter is currently oriented (see Figure 19B).
18. Installing the smartphone app The quadrocopter has a Wi-Fi function and can thus be connected to a smartphone. For this purpose, you first need to install a special app on your smartphone. The only costs incurred will be the normal costs incurred through downloading. The app itself is free. Scan one of the following QR codes depending on the operating system of your smartphone (iOS or Android). After scanning the QR code, you will be automatically linked to the current version of the app.
b) Making settings If the gearwheel symbol (see Figure 20, no. 1) is enabled, a new screen will appear, in which you can set the following functions: 1 Music volume adjustment 2 Sound effects volume adjustment 3 Menu language selection 4 Back to app's home page Figure 21 c) Help function You can call up the current help function using the question mark symbol (see Figure 20, no. 2). This function is useful if the current version of the app differs from the one described in this manual.
d) Operation If you select the “FLY” button (see Figure 20, no. 4), the following user interface will open: The background image shown in Figure 23 only appears if the app has been activated with the quadrocopter switched off. When the quadrocopter is connected to WiFi, the camera image is shown in the background. Figure 23 The symbols shown in Figure 23 have the following function: 1 Return to the app’s home page 2 Capture a photo with the quadrocopter camera. The images are stored in the smartphone.
19. Recording photos and videos The quadrocopter has a built-in HD camera that is oriented diagonally downwards in flight direction. You can use this camera to record videos or photos on a smartphone (not included) during the flight. Start up the quadrocopter and then the transmitter. The LEDs on the quadrocopter and the transmitter must glow steadily. Then call up the settings menu for Wi-Fi connections in the settings area on your smartphone.
20. Using the smartphone as a remote control Please note! The quadrocopter's steering is significantly more sluggish when it is controlled by smartphone compared to when the supplied remote control transmitter is used. Therefore, it requires some practice until you get used to the steering. Perform the first test flights on a sufficiently large area in order to avoid flying the quadrocopter close to people, animals or objects.
b) App control functions When the quadrocopter stands on a flat start surface, calibrate the position sensors. For this purpose, press the respective button (see Figure 25, no. 9) on the display. The button will get brighter and the green LED at the rear of the quadrocopter (see Figure 8, no. 3) will start to flash. As soon as the calibration process is completed, the button will get darker and the LED on the quadrocopter will glow steadily. Use both virtual joysticks for steering.
c) Quadrocopter take-off via smartphone If the propellers are rotating at low speed, carefully move the left virtual joystick (13) forward. The quadrocopter will significantly increase the propeller speeds and take off. Alternatively, you can also use the button for the automatic take-off (16). Then use both virtual joysticks for steering. Figure 27 d) Landing the quadrocopter via smartphone To land the quadrocopter, carefully reduce the flight altitude with the left joystick (see Figure 27, no.
e) Other control options In addition to the control using both virtual joysticks, there are other quadrocopter control options. Voice control If the button for the voice control (5) has been enabled, the quadrocopter can be controlled by voice commands. The possible voice commands such as “take-off”, “landing”, “forward”, “backward”, “right side”, and “left side” are briefly displayed when voice control is enabled.
21. Augmented reality game In addition to the control functions and the photo or video recording, the app also offers an augmented reality game. In this game, virtual aeroplanes are displayed in the real camera image. To start the game, the quadrocopter must be connected to Wi-Fi. Only then the “PVE” button (see Figure 20, no. 5) can be selected. Select the image of the “Foldable Drone G-Sense RtF” quadrocopter on the home screen.
22. Maintenance and cleaning Clean the exterior of the model and the remote control with a soft, dry cloth or brush. Never use aggressive cleaning agents or chemical solutions, as these may damage the surface of the housing. The propellers must move smoothly and motor shafts should not be bent or have any play in the bearing. Propellers that are cracked or bent or from which small pieces have broken off must always be replaced.
23. Disposal a) Product Electronic devices are recyclable waste and must not be placed in household waste. At the end of its service life, dispose of the product according to the applicable statutory regulations. Remove any inserted non-rechargeable/rechargeable batteries and dispose of them separately from the product. b) Non-rechargeable/rechargeable batteries As the end user, you are required by law to return all used non-rechargeable/rechargeable batteries (Battery Directive).
25. Troubleshooting This model and the remote control were built using the latest technology. However, faults and malfunctions may still occur. We would, therefore, like to show you how to rectify potential faults. Problem Solution The transmitter does not respond, the LED does not go on. • Check the non-rechargeable batteries in the transmitter. • Check the polarity of the non-rechargeable batteries in the transmitter. • Check the on/off switch. The transmitter LED flashes.
26. Technical data a) Transmitter Frequency range ����������������������������������������������2.450 – 2.478 GHz Transmission power �����������������������������������������9 dBm Control channels �����������������������������������������������4 Transmitter range ���������������������������������������������approx. 30 – 50 m Operating voltage ���������������������������������������������3.
This is a publication by Conrad Electronic SE, Klaus-Conrad-Str. 1, D-92240 Hirschau (www.conrad.com). All rights including translation reserved. Reproduction by any method, e.g. photocopy, microfilming, or the capture in electronic data processing systems require the prior written approval by the editor. Reprinting, also in part, is prohibited. This publication represent the technical status at the time of printing. Copyright 2018 by Conrad Electronic SE.