
Instructions


9
10. Setting up the Transmitter
Inthefurthercourseoftheseinstructions,guresinthetextalwaysrefertotheadjacentgureorthegures
withinthesection.Referencestootherguresareindicatedwiththecorrespondinggurenumber.
a) Inserting the Batteries
Forthepowersupplyofthetransmitteryouwillneed4alkaline
batteries (e.g. Conrad item no. 652507, pack of 4, order 1) of the
sizeAA/mignon.
Proceed as follows to insert the batteries:
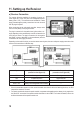
The battery compartment lid (1) is located at the bottom of the
transmitter. Press the corrugated area (2) and push off the lid
sideways in the direction of the arrow.
Now put the 4 batteries in the battery compartment. Always make
sure the polarity of the batteries is correct. The minus pole of the
battery (3) must be in contact with the spiral spring (4).
A corresponding note (5) is located on the bottom of the battery
compartment.
Once the four batteries have been inserted in the proper polarity,
push the battery compartment lid on again and let the latch catch.
b) Switching on the Transmitter
When new batteries are inserted, switch on the transmitter with
thefunctionswitch(seegure2,item10)fortestpurposes.For
this, slide the operating button from the left (OFF) to the right
(ON).
TheredoperatingcontrolLED(seegure2,item13)islitand
indicatestheon/offstate ofyour transmitter.Thegreenunder-
voltagedisplayLED(alsoseegure2,item8)remainslittoindi-
catesufcientpowersupplyofthetransmitter.
Ifthesupplyvoltagedropsbelow4,3V,thegreenunder-voltage
LEDstartsashing.Inthiscase,stopoperationofyourmodelas
quickly as possible. Insert new batteries again for further opera-
tion of the transmitter.
Afteryou haveveried the correctfunction of yourtransmitter,
switch it off.
Figure 3
Figure 4