
Owner manual

Installation Instructions
Part Numbers:
33094
75278
87410
Rev. D4-11-0775278NSheet 2 of 6
z 2005, 2007 Cequent Towing Products
Note: check hitch frequently, making sure all fasteners and ball are properly tightened. If hitch is removed, plug all holes in trunk pan or other body panels to
prevent entry of water and exhaust fumes. A hitch or ball which has been damaged should be removed and replaced. Observe safety precautions when working
beneath a vehicle and wear eye protection. Do not cut access or attachment holes with a torch.
This product complies with safety specifications and requirements for connecting devices and towing systems of the state of New York, V.E.S.C. Regulation V-5
and SAE J684.
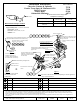
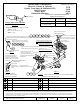
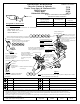
1. Lower vehicle exhaust by lowering the exhaust hanger on the passenger side.
2. If present, lower load leveling compressor on driver’s side, (1) M10 bolt & (2) M6 nuts.
Note: If necessary, trim vertical tab on compressor bracket to clear adjacent M10 bolt.
3. Raise hitch into position. Install M10 X 1.50 X 45mm CL9.8 bolts into existing weldnuts, both sides.
4. Using rearmost holes in hitch side brackets as a template drill 1/2” holes in vehicle frame rails.
On 2004’ and older long wheel base models: It will be necessary to drill a 1/2” hole thru frame at forward most hole on passenger’s
side bracket.
On 2004’ and older short wheel base models: Forwardmost hole in passenger’s side bracket will line up with existing slot in vehicle
frame rail.
0n 2005’ and newer models: Forwardmost slot in passenger’s side bracket will line up with existing weldnut in vehicle frame rail.
5. On passenger’s side, fishwire carriage bolt and blocks thru existing slot in frame rail down into forwardmost hole as shown.
Secure using blocks, lock washers and nuts as follows:
2004’ & older short wheel base models only: Place (2) blocks between frame rail and hitch as shown.
2004’ and older long wheel base models only: Place (2) blocks between hitch and lock washer as shown.
2005’ and newer models only: Install M10 X 45mm CL9.8 bolt thru vehicle fender support bar then thru slot in hitch and into existing
weldnut in vehicle frame.
6. Install handle nut thru square hole inside of vehicle frame rail and install hex bolt and lock washer thru rearmost hole (drilled in
step 4) as shown, both sides.
7. Remove M10 fasteners to reattach exhaust hanger and load leveling compressor and reinstall fasteners.
Note:
On all wheel drive models, it will be necessary to pass exhaust hanger thru 3” long slot in side bracket and use (2) 1/4”
blocks as shown in figure 2 and figure 3, to reattach exhaust hanger bracket.
Chevrolet Venture & Uplander
Pontiac Trans Sport & Montana & SV6
Buick Terraza
Saturn Relay
Oldsmobile Silhouette
44574
Tighten all M6 CL8.8 fasteners with torque wrench to 5 Lb.-Ft. (7 N-M)
Tighten all 1/2 GR5 fasteners with torque wrench to 75 Lb.-Ft. (102 N-M)
Tighten all M10 CL9.8 fasteners with torque wrench to 42 Lb.-Ft. (57 N-M)