
Residential DIY Applications


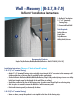

4. Wall - 2”x 4” R-14.0 Total Assembly
(R-3.9 and a Vapor Moisture Barrier for the Reflectix
®
)
• Refer to the Reflectix
®
Webpage “DIY Wall - Exterior - 2”x 4””.
Review These Important Safety Guidelines Prior to Installation:
• ALWAYS check local building codes before installing Reflectix
®
.
• ALWAYS check the area you are insulating and make any needed repairs. Any worn wiring should be replaced before you begin installing Reflectix
®
.
• ALWAYS make sure work areas are well ventilated and well lighted.
• ALWAYS use eye protection when operating a staple gun.
• ALWAYS use caution and common sense when using a staple gun. Be aware of where electrical wiring is located. Stapling into a wire can cause
severe shock or death. NEVER staple into electrical wiring.
• ALWAYS be careful when working with large pieces of Reflectix
®
on windy days.
• When installing Reflectix
®
on bright sunny days, it is best to wear sun glasses.
• Do not work in areas such as attics when temperatures are too hot.
• Visit our website at www.reflectixinc.com for additional product and installation information.
Please Note:
The intention of these Installation Instructions and 3-D renderings are for the sole purpose of illustrating the correct location and relative position of the
Reflectix
®
products in specific building assemblies. The correct construction methods and techniques are the responsibility of the installer or contractor.
The methods outlined are recommendations on location of the Reflectix
®
products as a guideline. There are no claims on the part of Reflectix, Inc. that
these building assemblies are finite standards or meet building code requirements (as they can vary by region).
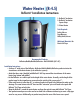
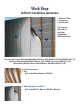
3. Wall - 2”x 4” R-6.6 (no fiberglass)
• Determine if studs are 16” or 24” on center (This will determine whether
Reflectix
®
16” or 24” product is utilized).
• Place one corner edge of the Reflectix
®
in an upper corner of the stud cavity.
At a point that splits the stud cavity; staple the product to the side of the
stud (creating a 3/4” tab on the product).
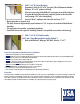
• Proceed “down”, stapling to the side of the stud every 2”- 3”.
• Repeat procedure on opposite stud.
• The Goal: Create two approximately equal continuous 1 3/4” air spaces on each side of the Reflectix
®
Insulation.
• This application also provides a vapor/moisture barrier.
• Finish wall interior with a panel or sheathing (Product is not specified as an interior wall covering).
USA
WITH DOMESTIC AND
IMPORTED COMPONENTS
# MADE IN THE #