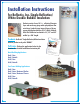
Installation Instructions for Reflectix, Inc. Single Reflective/ White Double Bubble Insulation Product consists of one, 94% + reflective film outer layer and one heavy gauge white polyethylene film outer layer, bonded to two internal layers of heavy gauge polyethylene bubbles (5/16” thick). Reflectix offers this Reflective Insulation in 16”, 24” and 48” widths by a 100’ length.
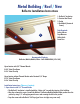
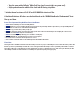
Metal Building / Roof / New Reflectix Installation Instructions 1. 2. 3. 4. Reflectix® Insulation Exterior Roof Panel Purlin Red Metal (Structural Frame) 2 1 3 Tools Required: Safety Glasses Tape Measure Utility Knife Screw Gun 4 Recommended Products: Reflective/Bubble/Bubble/White - Roll: RDBW48100 (48”x 100’) Open Interior with 3/4” Thermal Breaks R-5.5* Heat Flow Down R-3.4* Heat Flow Up Open Interior without Thermal Breaks and a Nominal 3/4” Drape R-7.5* Heat Flow Down R-3.
• Install at least a 3/4” thermal break. If installing a standing seam roof, use clips with thermal breaks. • Install roofing either by screwing corrugated metal screws through the thermal break and insulation to the purlin or install a standing seam roof. 2. Open Interior without Thermal Breaks and a Nominal 3/4” Drape • Per instructions above without the thermal break. * Includes thermal resistance of 0.61 UP and 0.92 DOWN for interior air film.
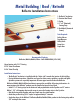
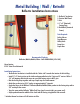
Metal Building / Roof / Retrofit Reflectix Installation Instructions Reflectix® Insulation Exterior Roof Panel Purlin 1”x 2” (Nominal) Furring Strip 5. Red Metal (Structural Frame) 1. 2. 3. 4. 2 3 4 1 5 Tools Required: Safety Glasses Tape Measure Utility Knife Screw Gun Staple Gun Recommended Products: Reflective/Bubble/Bubble/White - Roll: RDBW48100 (48”x 100’) Open Interior with 1”x 2” Furring R-7.5* Heat Flow Down R-3.
• Tape the seams with a Reflectix® White Poly Tape (goal is an air-tight, snug seam seal). • Staple product down the middle of the sheet into the furring strip above. * Includes thermal resistance of 0.61 UP and 0.92 DOWN for interior air film. Calculation Disclaimer: All values are calculated based on the “ASHRAE Handbook of Fundamentals” heat flow up and down. Review These Important Safety Guidelines Prior to Installation: • • • • • • • • • ALWAYS check local building codes before installing Reflectix®.
Metal Building / Wall / New Reflectix Installation Instructions 1. 2. 3. 4. 3 4 1 2 Reflectix® Insulation Exterior Wall Panel Girt Red Metal (Structural Frame) Tools Required: Safety Glasses Tape Measure Utility Knife Screw Gun Staple Gun Recommended Products: Reflective/Bubble/Bubble/White - Roll: RDBW48100 (48”x 100’) Open Interior with a 3/4” Thermal Break • R-4.6* Heat Flow Horizontal Open Interior with a Nominal 3/4” Drape in Product (No Thermal Break) • R-3.
* Includes thermal resistance of 0.68 interior air film. Calculation Disclaimer: All values are calculated based on the “ASHRAE Handbook of Fundamentals”. Review These Important Safety Guidelines Prior to Installation: • • • • • • • • • ALWAYS check local building codes before installing Reflectix®. ALWAYS check the area you are insulating and make any needed repairs. Any worn wiring should be replaced before you begin installing Reflectix®. ALWAYS make sure work areas are well ventilated and well lighted.
Metal Building / Wall / Retrofit Reflectix Installation Instructions Reflectix® Insulation Exterior Wall Panel Girt 1”x 2” (Nominal) Furring Strip 5. Red Metal (Structural Frame) 1. 2. 3. 4. 3 4 5 2 1 Tools Required: Safety Glasses Tape Measure Utility Knife Screw Gun Staple Gun Recommended Products: Reflective/Bubble/Bubble/White - Roll: RDBW48100 (48”x 100’) Open Interior R-3.
Calculation Disclaimer: All values are calculated based on the “ASHRAE Handbook of Fundamentals”. Review These Important Safety Guidelines Prior to Installation: • • • • • • • • • ALWAYS check local building codes before installing Reflectix®. ALWAYS check the area you are insulating and make any needed repairs. Any worn wiring should be replaced before you begin installing Reflectix®. ALWAYS make sure work areas are well ventilated and well lighted. ALWAYS use eye protection when operating a staple gun.
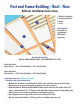
Post and Frame Building / Roof / New Reflectix Installation Instructions 1. 2. 3. 4. 2 Tools Required: Safety Glasses Tape Measure Utility Knife Staple Gun 1 3 Reflectix® Insulation Exterior Roof Panel Purlin Truss 4 Recommended Products: Reflective/Bubble/Bubble/White - Roll: RDBW48100 (48”x 100’) Below the Purlins Open Interior • R-6.4* Heat Flow Down | R-3.7* Heat Flow Up Above the Purlins Open Interior • R-3.8* Heat Flow Down | R-3.
• Install purlins over the insulation. Nail or screw to the trusses through the product. • Install the metal roof to the purlins. 2. Metal Roof with Product above Purlin (illustration on page 1) • Per instructions above except install Reflectix® Reflective/Bubble/Bubble/White Insulation after installing the purlins. • When installing product, insure that a minimum of a 3/4” drape (middle of cavity) is present. * Includes thermal resistance of 0.61 UP and 0.92 DOWN for interior air film.
PF Bldg / Roof / Retro / Bottom of Purlins Reflectix Installation Instructions 2 1. 2. 3. 4. 3 Reflectix® Insulation Exterior Roof Panel Purlin Truss Tools Required: Safety Glasses Tape Measure Utility Knife Staple Gun 1 4 Recommended Products: Reflective/Bubble/Bubble/White - Roll: RDBW48100 (48”x 100’) Bottom of the Purlins Open Interior R-6.4* Heat Flow Down | R-3.
* Includes thermal resistance of 0.61 UP and 0.92 DOWN for interior air film. Calculation Disclaimer: All values are calculated based on the “ASHRAE Handbook of Fundamentals” heat flow up and down. Review These Important Safety Guidelines Prior to Installation: • • • • • • • • • ALWAYS check local building codes before installing Reflectix®. ALWAYS check the area you are insulating and make any needed repairs. Any worn wiring should be replaced before you begin installing Reflectix®.
PF Bldg / Roof / Retro / Bottom of Trusses Reflectix Installation Instructions 1. 2. 3. 4. 5. 3 Reflectix® Insulation Exterior Roof Panel Purlin Truss 1”x 2” (Nominal) Furring Strip 4 5 1 2 Tools Required: Safety Glasses Tape Measure Utility Knife Staple Gun Recommended Products: Reflective/Bubble/Bubble/White - Roll: RDBW48100 (48”x 100’) Bottom of the Trusses Open Interior R-6.6* Heat Flow Down | R-3.
• Tape the seams with a Reflectix® White Poly Tape (goal is an air-tight, snug seam seal). • Tape any butt seams with Reflectix® White Poly Tape, insure taped seam has a good full continuous bond. • Staple product down the middle of the sheet into the furring strip above. * Includes thermal resistance of 0.61 UP and 0.92 DOWN for interior air film. Calculation Disclaimer: All values are calculated based on the “ASHRAE Handbook of Fundamentals” heat flow up and down.
Post Frame Building / Wall / New Reflectix Installation Instructions 1. 2. 3. 4. 2 4 3 Reflectix® Insulation Exterior Wall Panel Girt Post Tools Required: Safety Glasses Tape Measure Utility Knife Staple Gun 1 Recommended Products: Reflective/Bubble/Bubble/White - Roll: RDBW48100 (48”x 100’) Inside the Girts Open Interior • 4.2* Heat Flow Horizontal Outside the Girts Open Interior • R-3.7* Heat Flow Horizontal Installation Instructions: (There are 2 options) 1.
2. Product Outside the Girts • The Reflectix® Insulation is installed with the “white side” towards the interior of the building. • Attach the product using 5/16” staples at approximately 4” intervals. • Staple the Reflectix® Reflective/Bubble/Bubble/White product to the outside of the top girt. • Staple the product to the outside of the remaining girts. Insure there is a drape of at least 3/4” (towards the interior of the building) at the center of each cavity.
Post Frame Building / Wall / Retrofit Reflectix Installation Instructions 1. 2. 3. 4. 2 1 4 3 Reflectix® Insulation Exterior Wall Panel Girt Post Tools Required: Safety Glasses Tape Measure Utility Knife Staple Gun Recommended Products: Reflective/Bubble/Bubble/White - Roll: RDBW48100 (48”x 100’) Inside the Girts Open Interior • R-4.2* Heat Flow Horizontal Installation Instructions: • The Reflectix® Insulation is installed with the “white side” towards the interior of the building.
Review These Important Safety Guidelines Prior to Installation: • • • • • • • • • ALWAYS check local building codes before installing Reflectix®. ALWAYS check the area you are insulating and make any needed repairs. Any worn wiring should be replaced before you begin installing Reflectix®. ALWAYS make sure work areas are well ventilated and well lighted. ALWAYS use eye protection when operating a staple gun. ALWAYS use caution and common sense when using a staple gun.