
Installation Instructions


Recommended Products:
Reflective/Bubble/Bubble/White - Roll: RDBW48100 (48”x 100’)
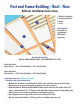
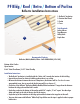
Bottom of the Purlins
Open Interior
R-6.4* Heat Flow Down | R-3.7* Heat Flow Up
Installation Instructions:
• The Reflectix
®
Insulation is installed with the “white side” towards the interior of the building.
• Inspect the roof area for clutter in buildings where there is no ceiling.
• Measure the distance between the trusses. Many times, the distance will be 4’ or less. In some
geographical areas, due to snow load, the distance will be as close as 2’.
• Cut pieces of the Reflectix
®
Reflective/Bubble/Bubble/White Insulation 6” longer than the distance
between the ridge pole and the bird’s mouth.
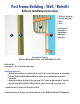
• Staple the product to the bottom of the purlins with 5/16” staples, 3” to 4” apart. Turn the edges
down and staple to the side of the top cord of the trusses.
• Staple the top of the insulation to the ridge pole and the bottom to the top plate at the wall.
• Tape any butt seams with Reflectix
®
White Poly Tape. Make sure the tape is applied so that a proper
bond occurs.
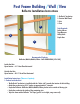
1. Reflectix
®
Insulation
2. Exterior Roof Panel
3. Purlin
4. Truss
Tools Required:
Safety Glasses
Tape Measure
Utility Knife
Staple Gun
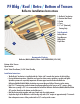
PF Bldg / Roof / Retro / Bottom of Purlins
Reflectix Installation Instructions
2
1
3
4