
Installation Instructions
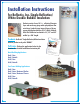


Recommended Products:
Reflective/Bubble/Bubble/White - Roll: RDBW48100 (48”x 100’)
Open Interior with a 3/4” Thermal Break • R-4.6* Heat Flow Horizontal
Open Interior with a Nominal 3/4” Drape in Product (No Thermal Break) • R-3.7* Heat Flow Horizontal
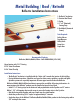
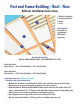
Installation Instructions: (There are 2 options)
1. Installed with 3/4” Thermal Breaks
• The Reflectix
®
Insulation is installed with the “white side” towards the interior of the building.
• Install Reflectix
®
Reflective/Bubble/Bubble/White product vertically, using 1/2” self tapping screws
to secure the insulation to the exterior of the C or Z girts.
• Tape the seams with a Reflectix
®
Foil Tape (goal is an air-tight, snug seam seal).
• Install a 3/4” thermal break and attach corrugated metal exterior finish.
2. Installed with a 3/4” Drape in Product (No Thermal Break)
• Per instructions above without the thermal break.
• When installing the product, insure there is a drape (towards the interior) of at least 3/4” at the
center of the cavity.
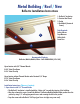
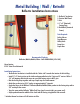
1. Reflectix
®
Insulation
2. Exterior Wall Panel
3. Girt
4. Red Metal (Structural
Frame)
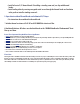
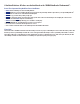
Tools Required:
Safety Glasses
Tape Measure
Utility Knife
Screw Gun
Staple Gun
Metal Building / Wall / New
Reflectix Installation Instructions
2
1
4
3