
Installation Guide


Reflective/Woven Fabric Radiant Barrier
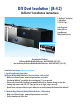
Installation Instructions:
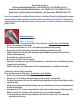
Directly to Roof Decking - Above Fiberglass - Southern Zone of the USA Only
• Benefit - Radiant Barrier - Blocks 96% of radiant heat
• Cut the entire roll of product into 16” or 24” lengths with a miter saw (depending on rafter spacing).
• Begin at the top of the cavity. Run product flush to the decking, parallel to the rafter.
• Staple sheet directly to the deck (nails poking through the Reflectix
®
product from above will not
interfere with performance).
• Do not block any venting (cut around).
• No need to cover rafters (no loop around).
• Ensure that a continuous air space (0.75 inch minimum) is on the bottom side of the Reflectix
®
product
(required and for ventilation).
• Install venting and mass insulation per local codes and manufacturer’s installation instructions.
Ventilation:
If ventilation is specified into your cathedral ceiling system, insure that you do not block ventilation paths
when you install Reflectix
®
.
Review These Important Safety Guidelines Prior to Installation:
• ALWAYS check local building codes before installing Reflectix
®
.
• ALWAYS check the area you are insulating and make any needed repairs. Any worn wiring should be replaced before you begin installing Reflectix
®
.
• ALWAYS make sure work areas are well ventilated and well lighted.
•
ALWAYS use eye protection when operating a staple gun.
• ALWAYS use caution and common sense when using a staple gun. Be aware of where electrical wiring is located. Stapling into a wire can cause
severe shock or death. NEVER staple into electrical wiring.
• ALWAYS be careful when working with large pieces of Reflectix
®
on windy days.
• When installing Reflectix
®
on bright sunny days, it is best to wear sun glasses.
• Do not work in areas such as attics when temperatures are too hot.
• Visit our website at www.reflectixinc.com for additional product and installation information.
Please Note:
The intention of these Installation Instructions and 3-D renderings are for the sole purpose of illustrating the correct location and relative position of the
Reflectix
®
products in specific building assemblies. The correct construction methods and techniques are the responsibility of the installer or contractor.
The methods outlined are recommendations on location of the Reflectix
®
products as a guideline. There are no claims on the part of Reflectix, Inc. that
these building assemblies are finite standards or meet building code requirements (as they can vary by region).
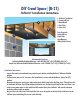
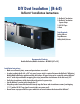
2. Staple the product directly to the underside of the rafter every 2 to 3 inches fully enclosing the rafter
cavity. Nail 1”x 2” (nominal) furring strips to the underside of the rafter (creating a continuous 0.75”
cavity).
• Install interior panel per local codes and manufacturer’s installation instructions.