
Installation Instructions


Recommended Products:
Reflective/Bubble/Bubble/Reflective - Roll: BP48025 (48”x 25’)
Installation Instructions:
• Cut three 2” wide strips of the Reflectix
®
Reflective/Bubble/Bubble/Reflective product at twice the
circumference of the water heater (to be utilized as spacers).
• Attach the three strips (doubled) around the circumference of the water heater (top, bottom and
middle).
• Cut the Reflectix
®
at a width equal to the height of the water heater. Secondly, cut the length of the
product equal to the circumference measured on the outside of the spacers plus 1”.
• If the water heater is taller than 48”, a section of product will need to be fashioned to make up the
shortage. The seam between the 48” sheet and the “extension” piece will need to be taped with
Reflectix
®
Foil Tape on both sides.
• Wrap the Reflectix
®
around the water heater and tape the vertical seam with Reflectix
®
Foil Tape.
• Trim product around pressure valve and cut on both sides of thermostat housing to create a flap type
cover for easy access. Additionally, cut product away from the cover of the lower access panel.
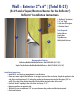
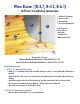
1. Reflectix
®
Insulation
2. Reflectix
®
Insulation
Spacer Strips
3. Water Heater
Tools Required:
Safety Glasses
Tape Measure
Utility Knife/Scissors
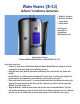
Water Heater| (R-4.5)
Reflectix
®
Installation Instructions
1
3
2