
Pro Residential, Post Frame and Metal Building Applications


Recommended Products: Reflective/Bubble/Bubble/Reflective - Roll: BP48025 (48”x 25’)
Staple Tab, Reflective/Bubble/Bubble/Reflective - Roll: ST16025 (16”x 25’)
Installation Instructions: (There are 5 methods with varying levels of benefit)
Note: For all methods, inspect the structural integrity of the sub-floor and make any needed repairs before
installing Reflectix
®
.
1. Product (Double Layer) Installed to Underside and Inside of Floor Joist - R-21 and a Radiant Reflector
• Begin at one end of the house. Insert the first course of Reflectix
®
half way up into the joist cavity and
staple (at approximately 3” to 4” intervals) the edge of the product to the side of the joist. The goal
is to split the joist cavity into two approximately equal enclosed air spaces.
• Continue with the second course of product at one end of a joist cavity (after the first course has been
installed) and secure the product “end” with staples to the sub-floor or band board. Proceed down
the joists by stapling each edge (or middle of the Reflective/Bubble/Bubble/Reflective 48” wide
product) to the face of each joist. Staple the product at intervals of approximately 3” to 4”. Enclose
the entire joist run(s).
• Seal seams with Reflectix
®
Foil Tape to create a vapor/moisture barrier.
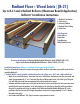
1. Reflectix
®
Insulation
2. Floor Joists
3. Existing Subfloor
4. Radiant Floor Tubing
5. New Floor
Tools Required:
Safety Glasses
Staple Gun
Tape Measure
Utility Knife/Scissors
Radiant Floor - Wood Joists| (R-21)
Up to R-21 and a Radiant Reflector (Maximum Benefit Application)
Reflectix
®
Installation Instructions
1
3
4
5
2