
Quick Start Guide


2
EN
FR
DE
IT
ES
PT
NL
DA
SV
PL
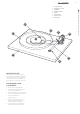
SETUP AND CONNECTIONS
1. Only use the Rega supplied PS1 AC adaptor.
2. Connect the power DIN lead (supplied) between
the rear of the Planar 6 and the 24 V AC input
socket on the rear panel of the Neo.
3. Plug in the Rega PS1 and switch the mains power on.
4. To turn the Neo on, push the buon marked ‘power’
located on the front panel and the turntable
plaer will rotate at the selected speed.
5. When the power supply is switched on, if the Rega
logo illuminates red, 33⁄ rpm is selected.
6. If the Rega logo is illuminated green, 45 rpm is selected.
7. To change between speeds, press the buon
marked ‘33/45’ on the front panel as required.
Note: To minimise the risk of hum picked up by the
cartridge, the Neo should be situated as far from the
turntable as the interconnect cable will allow.
CONNECTING TO THE AMPLIFIER
The tonearm external phono leads must be
connected to a suitable phono stage.
Connect as follows: Red = right chanel / Black = le channel
Depending on the type of cartridge you have chosen, you will
require the appropriate moving magnet (MM) or moving coil
(MC) stage. If your amplifier does not have an integrated phono
stage, you will require an external stage (sold separately).
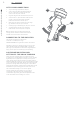
CARTRIDGE MOUNTING AND
SETTING UP THE RB330 TONEARM
Firstly, ensure the cartridge fixings are orientated correctly
according to the cartridge makers specification. Use the cartridge
alignment protractor (supplied) to accurately set the position
of the cartridge. Ensure that the tracking force dial (A) and bias
adjustment slider (B) are both set to zero. Place the balance weight
(C) on to the balance weight sha. With the stylus guard removed,
position the cartridge above the lead-in groove of an LP. Whilst
supporting the headshell, carefully push the weight further up the
sha until the stylus is floating just 1 mm clear of the record.
The recommended tracking force can now be applied
using the tracking force dial. Always use a force which
corresponds to the upper limit of the cartridge makers
recommended range. Finally, push the bias adjustment slider
to the same number as the tracking force control.
B
A
C
www.rega.co.ukEN