
Owner`s manual


ASSEMBLY OF DOWNROD SYSTEM
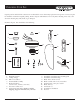
ATTACHING DOWNROD, CANOPY AND COLLAR COVER (FIG. 2):
1. Carefully support fan body (motor) in its styrofoam packing with the mounting collar (where the wires come out)
facing upward.
2. Remove ball from downrod by loosening set screw in the side of the ball. Slide ball down and remove ball pin; remove ball.
3. Feed the wires from top of fan through end of downrod and set end of downrod into mounting collar so the hole
in the downrod lines up with the hole in the side of the mounting collar.
4. Insert downrod pin through holes in mounting collar and downrod; slip cotter pin through small hole in end of
downrod pin to hold downrod pin in place.
5. Tighten jam screws against downrod using a large
flat blade screwdriver to ensure a tight fit against
downrod. Then tighten lock nuts against
mounting collar.
NOTE: Fan has 6 feet of hook-up wire in case you are
using a long extension downr
od. W
ires can be cut so only
8 inches or so extend beyond the top of the downrod to
make the electrical connections easier and safer.
6. Feed wires through and slide collar cover down
the downrod to top of fan.
7. Feed wires through canopy and slide canopy over
downr
od to lay on top of collar cover. It will be
attached to ceiling later.
8. Feed wires through ball and slide ball over down-
rod, past hole in the top end of downrod. Insert
ball pin (r
emoved in Step 2), slide ball up and
tighten set screw to secure ball in place.
9. Feed wire through holes in ball cover and snap
ball cover over top of ball.
5
Fig. 2