
Owner`s manual


1. Be sure your hanger bracket is secure. The entire weight of the fan will
now be hanging from it.
2. Lift fan body/downrod/ball assembly into hanger bracket opening.
NOTE: The tab in hanger bracket opening should fit into slot on ball
(Fig. 3).
3. Make wire connections, (refer to section titled “Electrical Connections”page 6)
4. Slide canopy up and fasten to hanger bracket with screws provided
AFTER all electrical connections are complete.
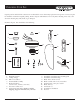
Ball
Ball slot
Hanger
b
racket
tab
6
INSTALLING THE FAN
Fig. 3
WARNING: To avoid damaging the blade arms and blades,
do not install onto fan until fan is fastened to ceiling.
ELECTRICAL CONNECTIONS
Fan and light controlled by
independent wall switches.
Light
switch
FAN
switch
RED
BLK
WH
BLUE
Wiring Box
BLK
BLK
WH
WH
WH
WH
BLUE
BLK
FAN
LIGHT
Power Lines
120V
Green
ground
Ground to
downrod on mounting bracket
BLK
BLK
WH
WH
WH
WH
BLUE
BLK
LIGHT
120V
Green
ground
Ground wire
BLUE
BLK
WH
1. Four wir
es are connected to the fan.
Black - this is the “hot” power to run fan.
White - this is the “common” power to run fan and light.
Blue - this is the “hot” power for light kit.
Green - Ground wire (on bracket or downrod)
2. If fan and light are to be connected to the same circuit, black
and blue wires can both be connected to house circuit black wire.
E
E
L
L
E
E
C
C
T
T
R
R
I
I
C
C
A
A
L
L
C
C
O
O
N
N
N
N
E
E
C
C
T
T
I
I
O
O
N
N
S
S
:
:
Be sure electricity is turned off at the main power box before wiring
*
Fan and light controlled by
independent wall switches.
Light
switch
FAN
switch
RED
BLK
WH
BLUE
Wiring Box
BLK
BLK
WH
WH
WH
WH
BLUE
BLK
FAN
LIGHT
Power Lines
120V
Green
ground
Ground to
downrod on mounting bracket
BLK
BLK
WH
WH
WH
WH
BLUE
BLK
LIGHT
120V
Green
ground
Ground wire
BLUE
BLK
WH
Standar
d Installation
Receiver Installation