
Installation manual


40 | LRI4E / HRI4E Direct Vent Gas Insert
|
40
operating instructions
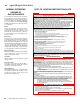
COPY OF LIGHTING INSTRUCTION PLATE
NORMAL OPERATING
SOUNDS OF
GAS APPLIANCES
It is possible that you will hear some sounds from
your gas appliance. This is perfectly normal due to
the fact that there are various gauges and types
of steel used within your appliance. Listed below
are some examples. All are normal operating
sounds and should not be considered as defects
in your appliance.
Blower:
Regency gas appliances use high tech blowers
to push heated air farther into the room. It is not
unusual for the fan to make a "whirring" sound
when ON. This sound will increase or decrease
in volume depending on the speed setting of your
fan speed control.
Burner Tray:
The burner tray is positioned directly under the
burner tube(s) and logs and is made of a different
gauge material from the rest of the firebox and
body. Therefore, the varying thicknesses of steel will
expand and contract at slightly different rates which
can cause "ticking" and "cracking" sounds. You
should also be aware that as there are temperature
changes within the unit these sounds will likely
re-occur. Again, this is normal for steel fireboxes.
Blower Thermodisc:
When this thermally activated switch turns ON it will
create a small "clicking" sound. This is the switch
contacts closing and is normal.
Pilot Flame:
While the pilot flame is on it can make a very slight
"whisper" sound.
Gas Control Valve:
As the gas control valve turns ON and OFF, a
dull clicking sound may be audible, this is normal
operation of a gas regulator or valve.
Unit Body/Firebox:
Different types and thicknesses of steel will expand
and contract at different rates resulting in some
"cracking" and "ticking" sounds will be heard
throughout the cycling process.
919-401
A) This appliance is equipped with an ignition device which automatically lights the pilot.
Do not try to light the pilot by hand.
B) BEFORE OPERATING smell all around the appliance area for gas. Be sure to smell next to the fl oor
because some gas is heavier than air and will settle on the fl oor.
WHAT TO DO IF YOU SMELL GAS
- Do not try to light any appliance.
- Do not touch any electric switch, do not use any phone in your building.
- Immediately call your gas supplier from a neighbours phone. Follow the gas supplier’s instructions.
- If you cannot reach your gas supplier, call the fi re department.
C) Do not use this appliance if any part has been under water. Immediately call a qualifi ed service
technician to inspect the appliance and replace any part of the control system and any
gas control which has been underwater.
A) Cet appareil est muni d’un dispositif d’allumage qui allume automatiquement la veilleuse.
Ne tentez pas d’allumer la veilleuse manuellement.
B) AVANT DE FAIRE FONCTIONNER, renifl ez tout autour de l’appareil pour déceler une odeur
de gaz. Renifl ez près du plancher, car certains gaz sont pluslourds que l’air et peuvent
s’accumuler au niveau du sol.
QUE FAIRE SI VOUS SENTEZ UNE ODEUR DE GAZ :
• Ne pas tenter d’allumer d’appareil
• Ne touchez à aucun interrupteur; ne pas vous servir des téléphones se trouvant dans le
bâtiment.
• Appelez immédiatement votre fournisseur de gaz depuis un voisin. Suivez les
instructions du fournisseur.
• Si vous ne pouvez rejoindre le fournisseur, appelez le service des incendies
C) N’utilisez pas cet appareil s’il a été plongé dansl’eau, même partiellement. Faites inspecter l’appareil par un tech-
nicien qualifi é et remplacez toute partie du système de contrôle et toute commande qui ont été plongés dans l’eau.
DO NOT REMOVE THIS INSTRUCTION PLATE
TO TURN OFF GAS APPLIANCE
This appliance must be installed in accordance with local codes, if any;
if none, follow the National Fuel Gas Code, ANSI Z223.1/NFPA 54, or
Natural Gas and Propane Installation Codes, CSA B149.1.
CAUTION: Hot while in operation. Do not touch. Severe Burns may result. Due to high surface
temperatures keep children, clothing and furniture, gasoline and other liquids having fl ammable
vapors away. Keep burner and control compartment clean. See installation and operating
instructions accompanying appliance.
WARNING: If you do not follow these instructions exactly, a fire or explosion may result
causing property damage, personal injury or loss of life. Improper installation, adjustment,
alteration, service or maintenance can cause injury or property damage. Refer to the owner’s
information manual provided with this appliance. For assistance or additional information
consult a qualified installer, service agency or gas supplier.
AVERTISSEMENT. Quiconque ne respecte pas à la lettre les instructions dans la présente notice
risquede déclencher un incendie ou une explosion entraînant des dommages, des blessures ou
la mort.
Une installation, d'ajustement, de modifi cation, de service ou d'entretien peut provoquer
des blessures ou des dommages matériels. Reportez-vous au manuel du propriétaire de
l'information fournie avec cet appareil. Pour obtenir de l'aide ou des informations supplémen-
taires consulter un installateur qualifi é, une agence de service ou fournisseur de gaz.
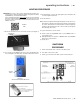
1) Ensure the wall switch/receiver is in the remote position.
2) Press and release the ON/OFF button on the remote handheld transmitter. An audible beep should be
heard from the receiver.
3) After approximately 4 seconds the spark ignition system will spark for 60 seconds to light the main burner.
4) The unit will turn on.
Note: The fi rst attempt to ignition will last approximately 60 seconds. If there is no fl ame ignition (rectifi ca-
tion) the board will stop sparking for approximately 35 seconds. After this wait time, the board will start a
second try for ignition by sparking for approximately 60 seconds. If there is still no positive ignition after the
second attempt the board will go into lock out.
The system will need to be reset as follows (after going into lock out mode):
a) Wait 5 minutes - turn the system off using ON/OFF switch or press ON/OFF button if using
remote
b) After approximately 2 seconds turn on ON/OFF switch or press ON/OFF button if using remote.
c) Unit will repeat step 2.
1) S’assurer que l’interrupteur mural/récepteur soit en position télécommande.
2) Appuyer sur la touche ON/OFF de la télécommande et relâcher. Un bip sonore se fera entendre depuis le
récepteur
3) Après environ 4 secondes, le système d'allumage des étincelles pendant 60 secondes pour allumer le
brûleur principal.
4) Les fl ammes s’allumeront.
Remarque : Au premier allumage, le système tente d’allumer les fl ammes pendant 60 secondes. Si l’essai
est infructueux, le système fait une pause de 35 secondes. C’est ce qu'on appelle l'étape de rectifi cation.
Ce délai écoulé, le système tente à nouveau d'allumer les fl ammes en produisant des étincelles pendant 60
secondes. Si les fl ammes ne s’allument toujours pas, le système se met en mode verrouillage.
Il faut alors le réinitialiser en suivant les étapes ci-dessous (pour le déverrouiller) :
a) Attendre 5 minutes et éteindre l’appareil en réglant l’interrupteur à la position « OFF »;
b) Attendre 2 secondes et rallumer le système à l’aide de l’interrupteur ou de la télécommande.
c) L'unité répétera l'étape 2.
1) Turn the wall mounted switch or remote to the "OFF" position.
2) Press "OFF" on the remote control.
3) Turn the gas control knob to the "OFF" position to turn off the pilot.
1)
Utilisez l'interrupteur murale ON/OFF du Brûleur ou du contrôle à distance pour éteindre le brûleur.
2) Appuyez sur OFF sur la télécommande.
3) Mettre le bouton de commande de gaz en position OFF pour éteindre la veilleuse.
LIGHTING INSTRUCTIONS
FOR YOUR SAFETY READ BEFORE LIGHTING