
User`s guide


User’s Guide
Table of Contents
36
Regency™ Series 400 Single Line Caller ID Telephone
User’s Guide
LCD Display Information
Regency™ Series 400 Single Line Caller ID Telephone
Congratulations on the purchase of your Regency™ Series single
line caller ID telephone. This high precision electronic device
includes advanced features suitable for use in today’s
environment and requires minimum maintenance. It is simple to
install and easy to use — especially with your Telephone
Company operating features.
Read this user’s guide to become familiar with all aspects of your
new telephone:
Getting to know the Features . . . . . . . . . . . . . . . . . . . . . . . . .Page 1
Learning about the Function Keys . . . . . . . . . . . . . . . . . . . . .Page 3
Connection Points . . . . . . . . . . . . . . . . . . . . . . . . . . . . . . . . . .Page 4
Installing the Telephone . . . . . . . . . . . . . . . . . . . . . . . . . . . . .Page 6
• Checking the parts list . . . . . . . . . . . . . . . . . . . . . . . . . . . . . .6
• Connecting the handset cord . . . . . . . . . . . . . . . . . . . . . . .6
• Connecting the line cord . . . . . . . . . . . . . . . . . . . . . . . . . 7
• Connecting the power adapter . . . . . . . . . . . . . . . . . . . 7
Wall Mounting the Telephone . . . . . . . . . . . . . . . . . . . . . . . . .Page 9
Programming the Telephone . . . . . . . . . . . . . . . . . . . . . . . .Page 10
• Language Option . . . . . . . . . . . . . . . . . . . . . . . . . . . . . . . .10
• Tone / Pulse Dialing Option . . . . . . . . . . . . . . . . . . . . . . . .10
• Automatic Time and Date Setting . . . . . . . . . . . . . . . . . . .11
• Manually Setting Time and Date . . . . . . . . . . . . . . . . . . . .11
• Flash into Memory . . . . . . . . . . . . . . . . . . . . . . . . . . . . . . . .12
• Pause into Memory . . . . . . . . . . . . . . . . . . . . . . . . . . . . . .12
• Area Code into Memory . . . . . . . . . . . . . . . . . . . . . . . . . . .13
• Access Code into Memory . . . . . . . . . . . . . . . . . . . . . . . . .15
• TouchLite® Message Retrieval Button . . . . . . . . . . . . . . . .16
• Editing the TouchLite Message Retrieval Button . . . . . . .18
• Speed Dial . . . . . . . . . . . . . . . . . . . . . . . . . . . . . . . . . . . . . .19
• Manual Entry and Key Pad Guide . . . . . . . . . . . . . . . . . .20
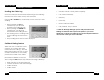
Deleting Caller Log Records
To delete ONE stored call:
1 Press the UP or DOWN key to
activate the display for scrolling.
The LCD screen will display TOP
OF LIST or BOTTOM OF LIST if you
reach either end. Scroll to the
number to be deleted.
2 Then press the DELETE key once
and the LCD will display the question ‘DELETE?’.
3 Press the DELETE key a second time to delete.
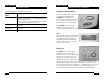
To delete ALL stored calls:
1 Press the UP or DOWN key to
activate the display for scrolling.
2 Press and hold the DELETE key until
the LCD displays the question
‘DELETE ALL?’
3 Release and press the DELETE key again.