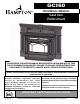
GCI60 TECHNICAL MANUAL Cast Iron Pellet Insert PLEASE READ THIS ENTIRE MANUAL BEFORE INSTALLATION AND USE OF THIS PELLET-BURNING ROOM HEATER. FAILURE TO FOLLOW THESE INSTRUCTIONS COULD RESULT IN PROPERTY DAMAGE, BODILY INJURY OR EVEN DEATH. Contact your building or fire officials about restrictions and installation inspection requirements in your area. WARNING: Improper installation, adjustment, alteration, service or maintenance can cause injury, property damage, or loss of life. Refer to this manual.
Safety Note: If this stove is not properly installed, a house fire may result. For your safety, follow the installation instructions, contact local building, fire officials, or authority having jurisdiction about restrictions and installation inspection requirements in your area. The authority having jurisdiction should be consulted before installation to determine the need to obtain a permit.
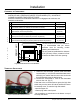
Table of Contents Safety Warnings & Recommendations...............................................................................................3 Specifications.................................................................................................................................5 Rating Label & Location............................................................................................................5 Dimensions............................................................................
Safety Warnings & Recommendations * This manual is designed for the technician in conjunction with the owner’s manual. * Please read this entire Technical Manual before installing or operating your Hampton Pellet Stove. Failure to follow these instructions may result in property damage, bodily injury or even death. Any unauthorized modification of the appliance or use of replacement parts not recommended by the manufacturer is prohibited.
Safety Warnings & Recommendations ELECTRICAL: The use of a surge protected power bar is recommended. The unit must be grounded. The grounded electrical cord should be connected to a standard 110-120 volts (4.2 Amps), 60 hertz electrical outlet and also must be accessible. If this power cord should become damaged, a replacement power cord must be purchased from the manufacturer or a qualified Hampton dealer.
Serial No. / No. De Serié: INSTALLED AS A FIREPLACE INSERT STOVE MODEL (FPI) / A INSTALLE COMME UN MODELE SUR PIED DE POELE. DO NOT REMOVE THIS LABEL / NE RETIREZ PAS CETTE ÉTIQUETTE J F M DATE OF MANUFACTURE / DATE DE FABRICATION: A M J J A S O N D 2011 2012 2013 Utilisation avec granules - le bois, le maïs, le blé, & l'orge seulement. Utiliser seulement lorsque les portes avants et la porte du réceptacle de cendre sont fermées.
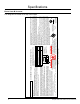
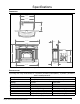
Specifications Dimensions: 26 7⁄8 24 ¾ 16 3⁄8 43 3⁄16 11 ¾ 33 9⁄16 22 15⁄16 12 ¾ 41 7⁄8 Figure 2: Dimensions of GCI60. Specifications: Input rating when using: Wood Pellets/Corn - 55,000BTU (16.1KW•hr) & Wheat/Barley - 53,000BTU (15.5KW•hr). Table 1: GCI60 Specifications. Description Residential Pellet Heater Fuel type 6mm (¼”) dia. Pellets - wood, corn, wheat, & barley* Voltage 110 - 120 V Current 4.2 Amps Max Power 504 Watts Frequency 60 Hz Hopper Capacity up to 60 lb (36.
Installation Deciding Where to Locate your Pellet Appliance: 1. Unit must be installed in a masonry fireplace. 2. Do not install the stove in a bedroom or room where people sleep in. 3. Locate the stove in a large and open room that is centrally located in the house. This will optimize heat circulation. 4. Check clearances to combustibles and for the least amount of interference to house framing, plumbing, wiring, etc. 5. You can vent the stove with approved flex pipe. 6.
Installation NOTE: Installer must attach the metal “fireplace altered” tag using screws or nails to the fireplace, in a location readily visible should the fireplace insert be removed, if the fireplace has been modified to accomodate the GCI60. Installing the Insert Frame & Levelling: Warning: Careless installation is the major cause of safety hazards. Check all local building and safety codes before installation of unit. 1. Mount Surround Panel to Insert Frame. 2.
Installation To Start Stove: Sele LABEL / NE RETIREZ PAS CETTE ÉTIQUETTE grades of wood pelle of pellets in the burn INSTALLED AS A FIREPLACE INSERT STOVE MODEL (FPI) / A INSTALLE To Operate Stove: M COMME UN MODELE SUR PIED DE POELE. MODE: (Requires a Minimum clearances to combustible materials./ Les dégagements minimums aux thermostat contacts matériels combustibles: close again. / AUTO *hr) A Sidewall to center of unit (De la paroi au centre de l'unité) 24” (610 mm) automatically.
Installation Vent Termination Requirements: IT IS RECOMMENDED THAT YOUR PELLET STOVE BE INSTALLED BY AN AUTHORIZED DEALER/INSTALLER. Table 2: Use in conjunction with Figure 6 for allowable exterior vent termination locations. Letter Minimum Clearance A 24 in (61 cm) Description B 48 in (122 cm) Beside/below any door or window that may be opened. (18” (46 cm) if outside fresh air installed.) C 12 in (30 cm) Above any door or window that may be opened. (9” (23 cm) if outside fresh air installed.
Installation Outside Fresh-Air Connection: This Heater must have adequate air for proper combustion in the room that it is installed. A Fresh-air intake is strongly recommended for all installations. Failure to install intake air may result in improper combustion as well as the unit smoking during power failures. The inlet to the intake must be below and a minimum of 12” (30cm) away from the unit exhaust outlet.
Installation Masonry Fireplace Installation: A non-combustible manufactured hearth pad (min. 24 gauge galvanized steel or similar) must cover combustible flooring underneath, as well as 6” (150 mm) in front of the heater and 6” (150 mm) to the side of the heater. Rain Cap Steel Plate or Flashing Flexible or Rigid 4" Stainless Steel Liner Damper Removed or Fastened Open Flexible stainless steel pipe connection 12" (30.
Installation Positive Flue Connection without a Full Reline (USA Only): This unit does not require a full reline (in USA only) when installing into a masonry fireplace, however, it is recommended to ensure proper drafting of the appliance. IMPORTANT: Ensure the chimney and firebox are cleaned and free of all debris, including soot and ashes, before proceeding with this installation. If it is not clean soot maybe blown into the room through the unit’s blower.
Installation Built-In Installation: Installation without a masonry fireplace The GCI60 can be installed without an existing masonry fireplace by building an enclosure for the unit to be installed in. This enclosure must be a minimum of 18” deep, 36” wide and 23-1/4” high and made with ½” noncombustible cement board. The floor of the enclosure must consist of a minimum of 1-1/4” air space and a layer of ½” noncombustible cement board and a layer of tile.
Installation Horizontal Exhaust Through Wall Installation: Vent installation: install vent at clearances specified by the vent manufacturer. A chimney connector shall not pass through an attic or roof space, closet or similar concealed spaces, or a floor, or ceiling.
Installation RECOMMENDED - Through Wall With Vertical Rise and Horizontal Termination Installation: NOTE - This venting configuration is only for use with the Built-In installation. Termination cap 90°elbow Wall framing Vertical section of vent pipe Wall strap Horizontal frame for thimble Clean out tee Wall thimble Figure 12: Venting horizontally with rise.
Installation Outside Vertical Installations: To accomplish an outside vertical pipe installation, follow the “Horizontal Exhaust Through Wall Installations” section and then finish it by performing the following. 1. Install a tee with clean out on the outside of the house. 2. Install PL vent upward from the tee. Make sure that you install support brackets to keep the vent straight and secure. All joints in the exhaust venting system must be fastened with at least three (3) screws. 3.
Installation Inside Vertical Installations: 1. Install a tee or 90° elbow on the inside of the house. 2. Install PL vent upward from the tee. Make sure that you install support brackets to keep the vent straight and secure. All joints in the exhaust venting system must be fastened with at least three (3) screws. 3. Install ceiling thimble and secure the flashing as you go through the roof. 4. Ensure that the rain cap is a minimum of 24” (61 cm) above the roof.
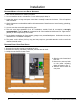
Installation Slider/Damper Set-Up: This is used to regulate the airflow through the pellet stove. CONVECTION FAN EXHAUST CHANNEL EXHAUST SENSOR & REMOVABLE PLATE SLIDER DAMPER NOTE: THE SURROUND PANEL MOUNT HAS BEEN REMOVED FOR CLARITY Figure 15: Slider/Damper Plate & Rod in Unit. This unit is designed to operate within a negative pressure range of 0.15-0.17 inches of water column (37-42 Pa) (See image on right for location to measure negative pressure test port).
Troubleshooting DO NOT: ● Service the stove with wet hands. The stove is an electrical appliance, which may pose a shock hazard if handled improperly. Only qualified technicians should deal with possible internal electrical failures. ● Do not remove from the firebox any screws without penetrating oil lubrication. WHAT TO DO IF: 1. The stove will not start. 2. The stove will not operate when hot. 3. The exhaust blower will not function normally. 4. Light # 3 on Heat output bar flashing. 5.
Troubleshooting • • Exhaust Temperature Sensor failure. Bypass sensor located on Exhaust Blower, if stove now operates properly, the unit may require cleaning or a new sensor. Contact your local dealer for service. Check the agitator to make sure it is turning properly 3. The exhaust motor will not function normally. • Check the line fuse to see if it has blown. • Open the access panels; check all connections against the wiring diagram.
Troubleshooting 7. The convection blower will not function normally. • Check the line fuse to see if it has blown. • Clean all grill openings at the back and below unit . • Check the Voltage across the blower wires, It should adjust with the heat output settings. If not contact your local dealer for service. 8. Ignitor - the pellets will not light. • Check the line fuse to see if it has blown. NOTE: The ignitor should be bright orange in color.
Wiring Diagram Red Combustion Blower Black Black Blue 2µF Capacitor Brown Exhaust Temperature Sensor Brown Blue Blue Black White Red White 120V Ground Plug Air Pump Green Ground Red White 5 Amp Green White Ground Black 2 Amp 2 Amp 2 Amp 2 Amp Thermostat Red Yellow Purple Blue Brown Brown White Connect Thermostat Here White Agitator Motor Blue/Yellow Black 24 Ignitor White Yellow Auger Motor 6 µF Capacitor Purple White Grey Grey Grey Grey Orange Orange Orange Orange
Parts List Reference # Description Part # OPTION Log Set GC60-930 OPTION Service Rails GCI60-900 OPTION GCI60 O/S Filler Panel GCI60-918 HOPPER SWITCH GC60-016 High Limit Temp Sensor 200°F (93°C) Manual Reset GF55-011 1 not shown 3 120°F (49°C) CERAMIC EXHAUST TEMP SENSOR GF55-009 4 ⅝” I.D.
Parts List Reference # 26 Description Part # 40 1/4" SPRING PIN GC60-010 41 AGITATOR BUSHING LEFT SIDE GC60-012 42 WIRING HARNESS GC60-030 43 LATCH BOLT & ROLLERS C/W NUT GC60-031 44 MOTHERBOARD MOUNTING PANEL GCI60-004 45 BURN POT SCRAPER TOOL GF55-023 46 DOOR & ASH DOOR GASKET 9/16 FIRM (10') W/JOINING TAPE(2) GC60-019 47 CAST FRONT MOUNTING BRACKETS (SET OF 2) GCI60-015 48 4" EXHAUST STARTER TUBE C/W GASKET GCI60-005 49 CAST FLUTED FIREBOX LINER GCI60-006 50 PED & ASHPA
Parts List Reference # Description Part # 64 GCI60 Cast Front - CHARCOAL GCI60-201 65 GCI60 Cast Top - CHARCOAL GCI60-211 66 GCI60 Cast Side Left - CHARCOAL GCI60-221 67 GCI60 Cast Side Right - CHARCOAL GCI60-231 68 GCI60 Cast Ash Door - CHARCOAL GCI60-241 69 GCI60 Cast Surround Left - CHARCOAL GCI60-251 70 GCI60 Cast Surround Right - CHARCOAL GCI60-261 71 GCI60 Cast Surround Top Left - CHARCOAL GCI60-271 72 GCI60 Cast Surround Top Right - CHARCOAL GCI60-281 73 GCI60 Cast Surr
Parts Diagram - Components 6 8 23 48 4 3 19 20 37 13 29 2 14 10 1 15 52 11 42 47 9 21 49 7 41 18 54 45 17 16 22 28 5 24 12 53 25 40 Hampton GCI60 Cast Pellet Insert Technical Manual
Parts Diagram - Steel 71 69 73 72 70 38 28 30 63 39 5 62 37 36 61 51 44 65 59 66 57 26 27 68 Hampton GCI60 Cast Pellet Insert Technical Manual 67 64 29
warranty FPI is the manufacturer of the Hampton line of heating products. At FPI, our commitment to the highest level of quality and customer service is the most important thing we do. Each Hampton stove is built on a tradition of using only the finest materials and is backed by our Exclusive Lifetime Limited Warranty to the original purchaser. With Hampton, you’re not just buying a stove, you’re buying a company with years of unequalled performance and quality.
warranty Exclusions and Limitations: 1. This Warranty does not cover tarnish, discoloration or wear on the plating or paint. 2. This Warranty excludes wear and tear or breakage caused by cleaning, moving or service on log set. 3. A qualified installer must install this stove or fireplace. This Limited Warranty covers defects in materials and workmanship only if the product has been installed in accordance with local building and fire codes; in their absence, refer to the owner’s manual.
warranty 19. The paint on the Metal Brick Liner may peel. This is due to the extreme conditions applied to the paint during normal usage. It is not a flaw and is not covered under warranty. 20. FPI is free of liability for any damages caused by the fireplace or stove, as well as inconvenience expenses and materials. The Limited Warranty does not cover incidental or consequential damages. 21.
NOTES ___________________________________________________ ___________________________________________________ ___________________________________________________ ___________________________________________________ ___________________________________________________ ___________________________________________________ ___________________________________________________ ___________________________________________________ ___________________________________________________ ______________________________________
Register your Regency® warranty online www.regency-fire.com Reasons to register your product online today! • View and modify a list of all your registered products. • Request automatic email notification of new product updates. • Stay informed about the current promotions, events, and special offers on related products.