
Installation manual


Regency P121-1/P121LC-1/P121RC-1/P131-1 Zero Clearance Direct Vent Gas Fireplace 23
CONVERSION KIT FROM NATURAL GAS TO PROPANE MODEL #730-969
FOR P121-1/P121LC-1/P121RC-1/P131-1 USING SIT 820 NOVA GAS VALVE
THIS CONVERSION MUST BE DONE BY A QUALIFIED GAS FITTER
IF IN DOUBT DO NOT DO THIS CONVERSION !!
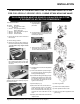
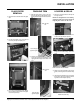
5) Pull off the pilot
cap to expose the
pilot orifi ce.
6) Unscrew the pilot orifi ce with the allen key
and replace with the LP pilot orifi ce in the
kit and replace pilot cap.
8) Reinstall new burner orifi ce LP stamped #50
and tighten.
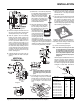
9) Remove and discard the 3 pressure regula-
tor mounting screws (A), pressure regulator
tower (B) and diaphragm (C).
10) Insure that the rubber gasket (D) is properly
positioned and install the new HI/LO pres-
sure regulator assembly to the valve using
the new screws (E) supplied with the kit.
Tighten screws securely.
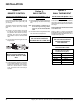
11) Reverse steps 4) to 1).
12) Attach clear label "This unit has been con-
verted to Propane" near or on the serial #
decal. Attach white label "This valve has
been converted from NG to LPG using SIT
conversion Kit Code 0.907.202" onto the
valve.
13) Replace yellow "Natural Gas" label with red
"Propane" label
7) Remove burner orifi ce with a 1/2" wrench
and discard. Use another wrench to hold
on to the elbow behind the orifi ce.
Burner Orifi ce
Conversion Kit Contains:
Qty. Part # Description
1 910-018 SIT Conversion Kit-50%
Turndown LP
1 910-037 LP Injector (Pilot Orifi ce)
1 * Burner Orifi ce #50
1 908-255 Decal "Converted to Propane"
1 908-529 5/32" Allen Key
1 918-032 Instruction Sheet
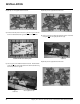
1) Remove the louvers and trim kit. Remove
the front door.
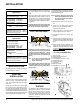
2) Remove the logs, embers.
3) Remove the grate by lifting straight up.
Remove the side brick panels (if installed).
The brick panel is very fragile - handle
with care.
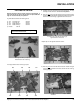
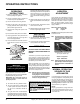
Diagram 1: Remove the left and right screws
and then slide the burner assembly away from
the orifi ce and lift out.
4) Remove the burner assembly by removing
the 4 Phillips head screws and then slide
the burner assembly away from the orifi ce
and lift out.
14) Check for gas leaks.
15) Check inlet and outlet pressures.
16) Check operation of fl ame control.
17) Check for proper fl ame appearance and
glow on logs.
INSTALLATION