
User Manual


9
To remove the Neutrik® Speakon® plug, grip body of plug, place thumb on chrome lever, move
lever backwards, rotate plug anticlockwise quarter turn and withdraw.
The high-level input is designed to accept the stereo (two-channel) signals from the speaker
terminals of your receiver, integrated amplifier or basic amplifier. This has the advantage of
ensuring that your subwoofer receives exactly the same signal as the main speakers, which means
that the character of the bass from the main system is carried forward into the Sub-Bass System.
This is a very important point and together with REL’s Natural RollOff™ circuitry, ensures far
superior system integration of the Sub-Bass System with the main system.
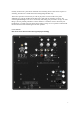
High-Level Input: Connections should be made to the same binding post on main amplifier as
the main speakers. Connect as shown above. Red to amplifier main right speaker red terminal,
yellow to amplifier main left speaker red terminal and black to amplifier main speaker black
terminal, right or left but not both. Plug the Neutrik® Speakon® plug into the HI LEVEL
Speakon® socket.
.1 Input: This requires a phono-to-phono cable and is a dedicated true .1 channel. This circuit
therefore eliminates the normal Natural RollOff™ Crossover and passes the .1 low-level signal
through with only the required 120Hz fourth-order filter.
Low-Level Input: These left and right phono inputs allow for conventional connection from a
preamplifier and should be used in the rare event that a high-level connection proves
incompatible. Connect as shown below. Plug one end of the phono-phono cables into the LOW
LEVEL INPUT left and right jacks of the REL and the other end into the left or right channel
output of your preamplifier.
PHASE SWITCH – Used to set phase
Position 0 / High-Level, Low-Level or LFE: 0 degrees phase
Position 180 / High-Level, Low-Level or LFE: 180 degrees phase
PHASE SELECTION AFFECTS BOTH HIGH- AND LOW-LEVEL INPUTS
Crossover is always engaged for Hi level input. The .1/LFE signal does not pass through the
crossover circuit.
PAGE BREAK
REL Set-Up Made Simple [major heading]
REL products are not traditional subwoofers, but true Sub-Bass Systems. A REL is designed to
augment the performance of “full range” speaker systems in order to provide, in certain cases,
linear response below 15 Hz. Therefore, for the moment, please set aside everything you’ve been
taught about subwoofers and how they are integrated into a stereo or home cinema system. REL
Sub-Bass Systems set-up and positioning differs from conventional subwoofers. A REL will take
advantage of physics and room acoustics to provide deep pressurization as no traditional
subwoofer can. It is important that you bring to the set-up process a willingness to do things a
little differently in order to obtain these superior results. The end result of your labours will be an
utterly seamless integration of true deep bass to a sound system, regardless of the main speakers’
low bass capability.
Basic set-up should take no more than ten to fifteen minutes to accomplish once connected.
Two Things Before You Begin
1 It is helpful to know that you will almost always connect the REL to the input on the rear
panel labeled “HIGH LEVEL INPUT.” This connection is made using the supplied 32’ 10” (10
meters) cable, the bare leads of which connect to the speaker output terminals of the power